A New Home for Mortise & Tenon Magazine

Featured

Today’s guest post comes from Joshua A Klein, a talented furniture conservator/maker from the Maine coast and the brainchild behind Mortise & Tenon Magazine

We have enjoyed working with Joshua over the past year and are delighted and grateful to have him write (and photograph!) for the Green Mountain Timber Frames blog. Our whole team has poured over his publications and we can not recommend his work strongly enough to our fellow woodworkers and kindred spirits in appreciation of yesteryear’s craftsman. It has been a true honor to collaborate with Joshua, his family, and his team. 

Mortise and Tenon Timber Frame Shop Rafters Ridge Pole-14

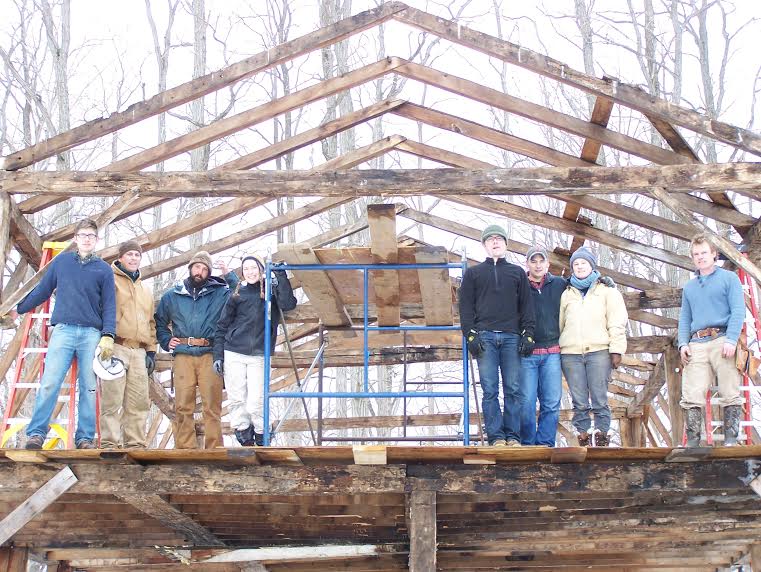
The GMTF team along with the crew from Mortise & Tenon, in front of the future Mortise & Tenon headquarters

It’s long been a dream of mine to have an antique timber frame workshop to build furniture in. Sure, I could have built a brand-new stick-frame shop and hid the frame underneath boards but as a period furniture maker and conservator, I revere historic craftsmanship. I find it inspiring to work at my craft while surrounded by tool marks left behind by artisans 200 years ago. The awe-inspiring craftsmanship of our ancestors was something I wanted to connect to in the deepest way. I wanted to be immersed in it.

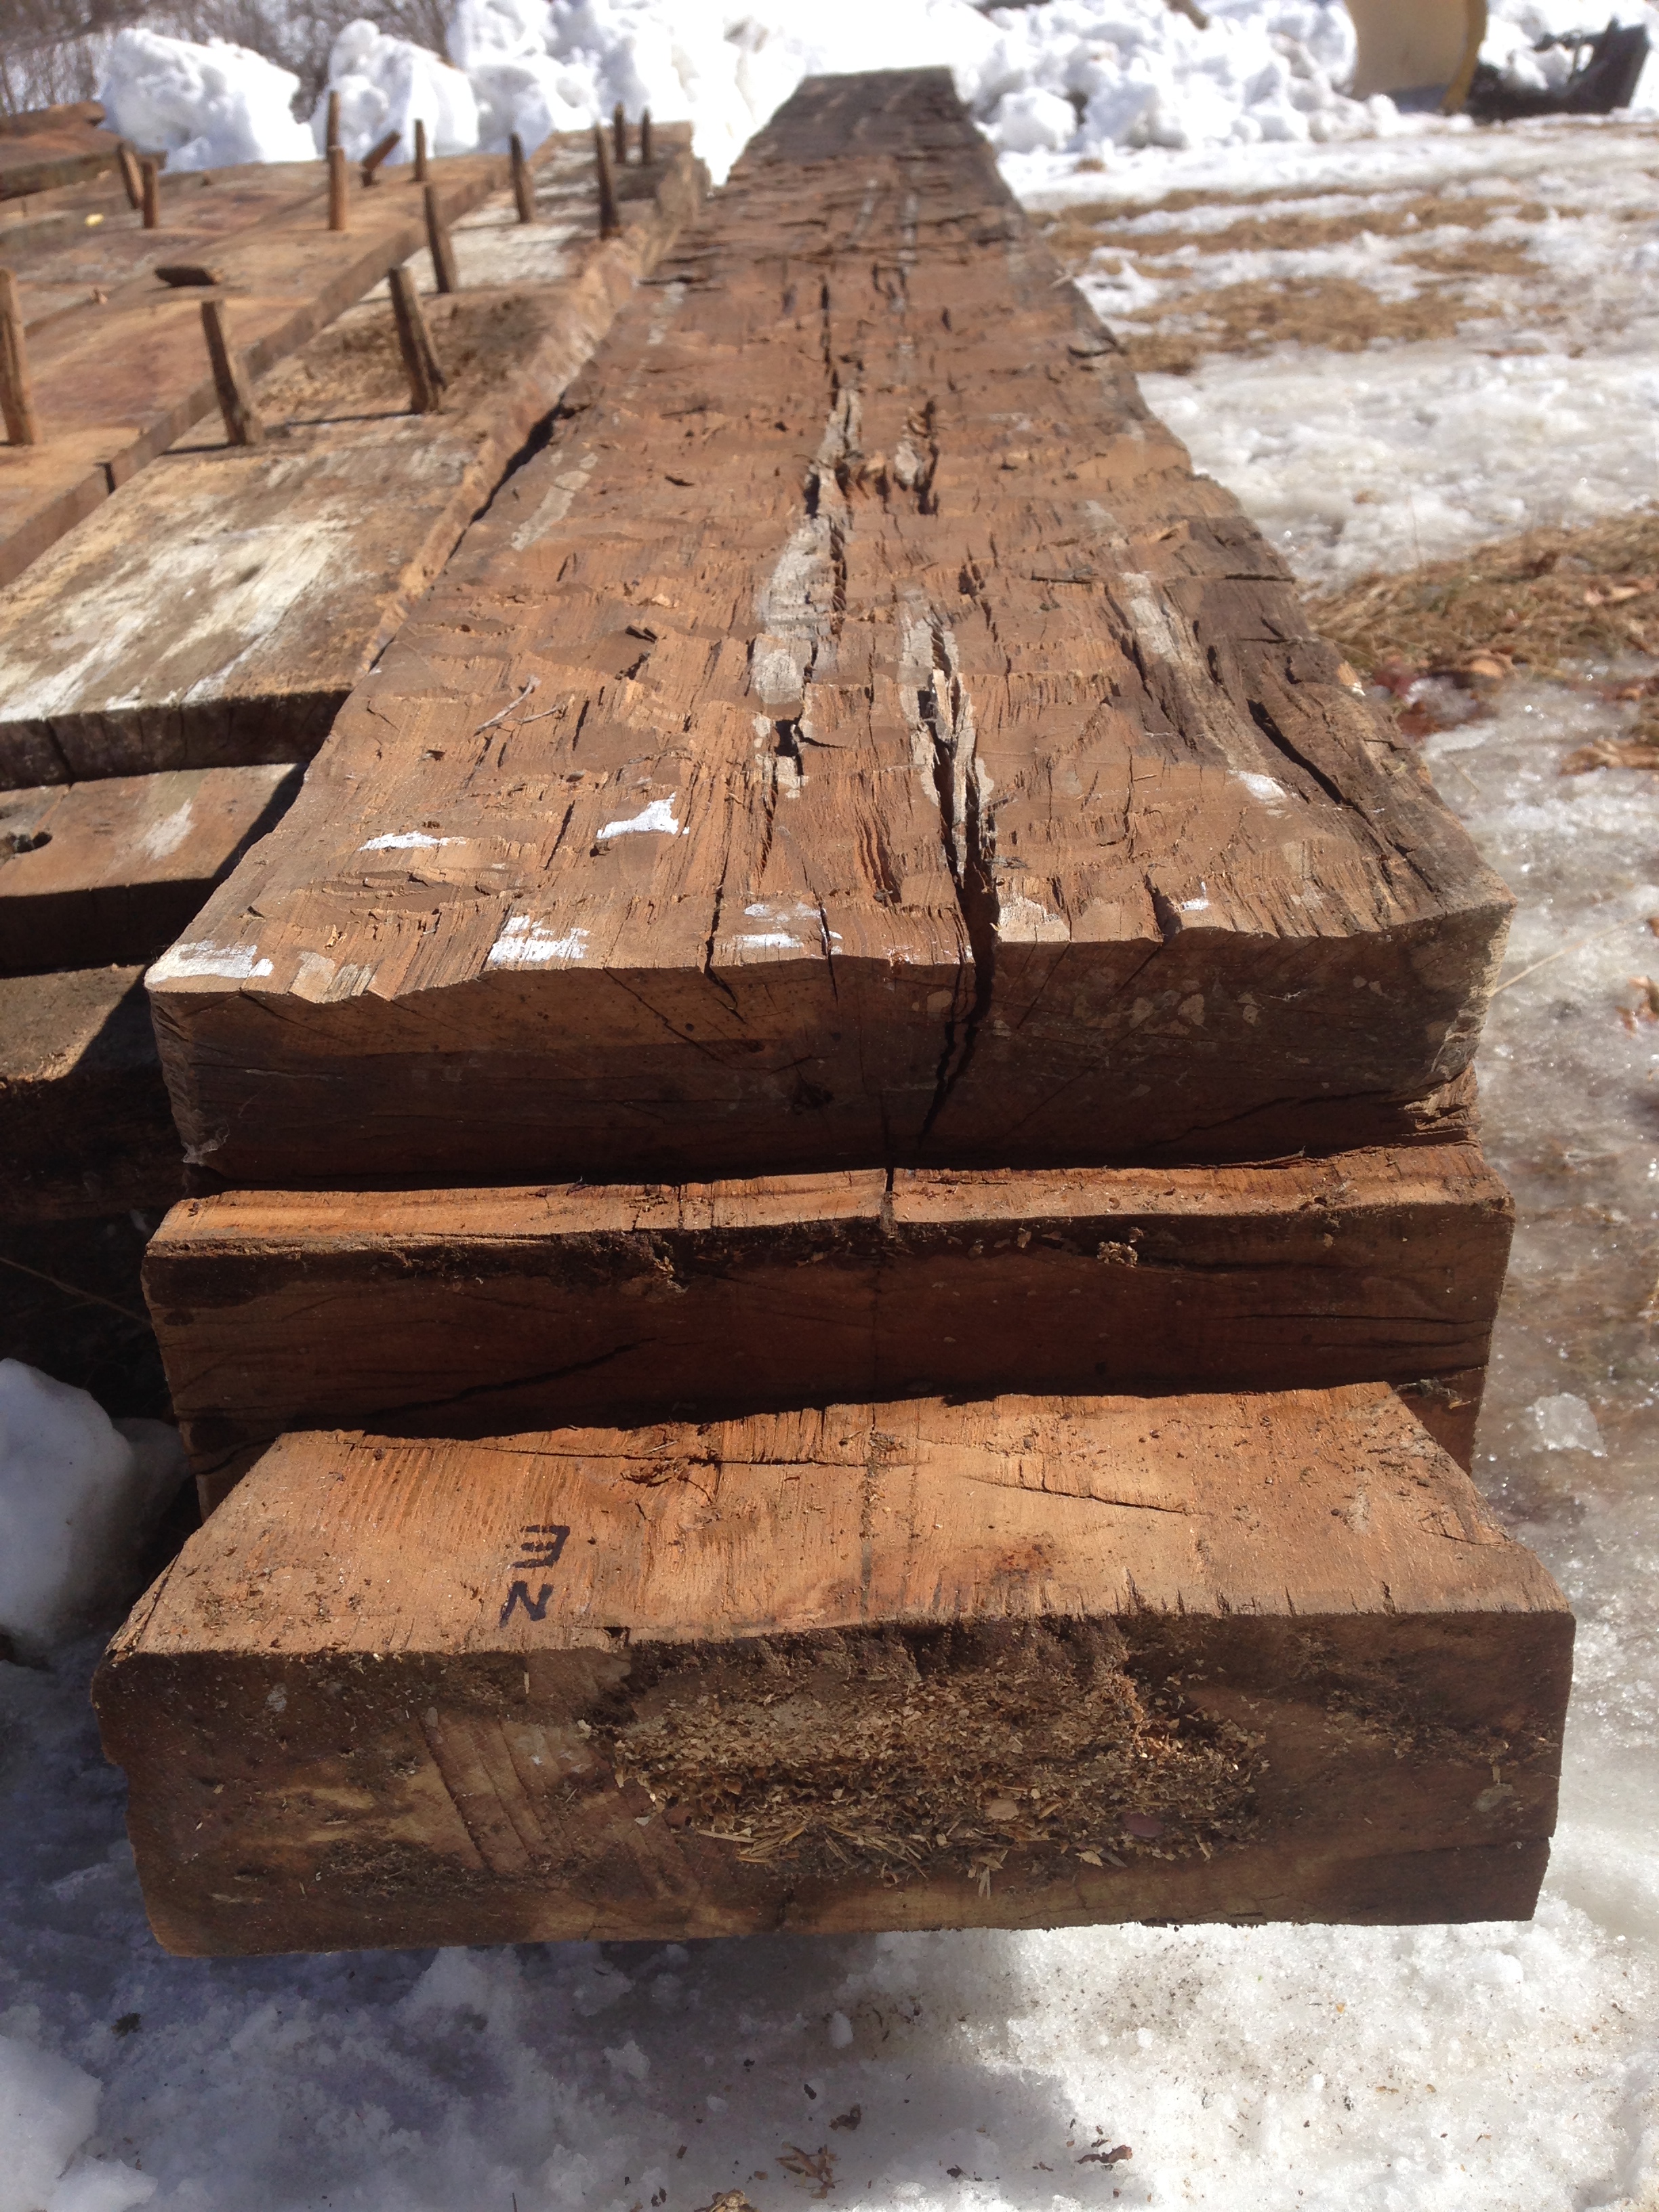
When it came time to put up a new workshop/headquarters for my publication, Mortise & Tenon Magazine, I sought out a hand-hewn frame from Green Mountain Timber Frames. The 24’ x 26’ beech and chestnut frame was built in Pawlet, Vermont around the year 1800.

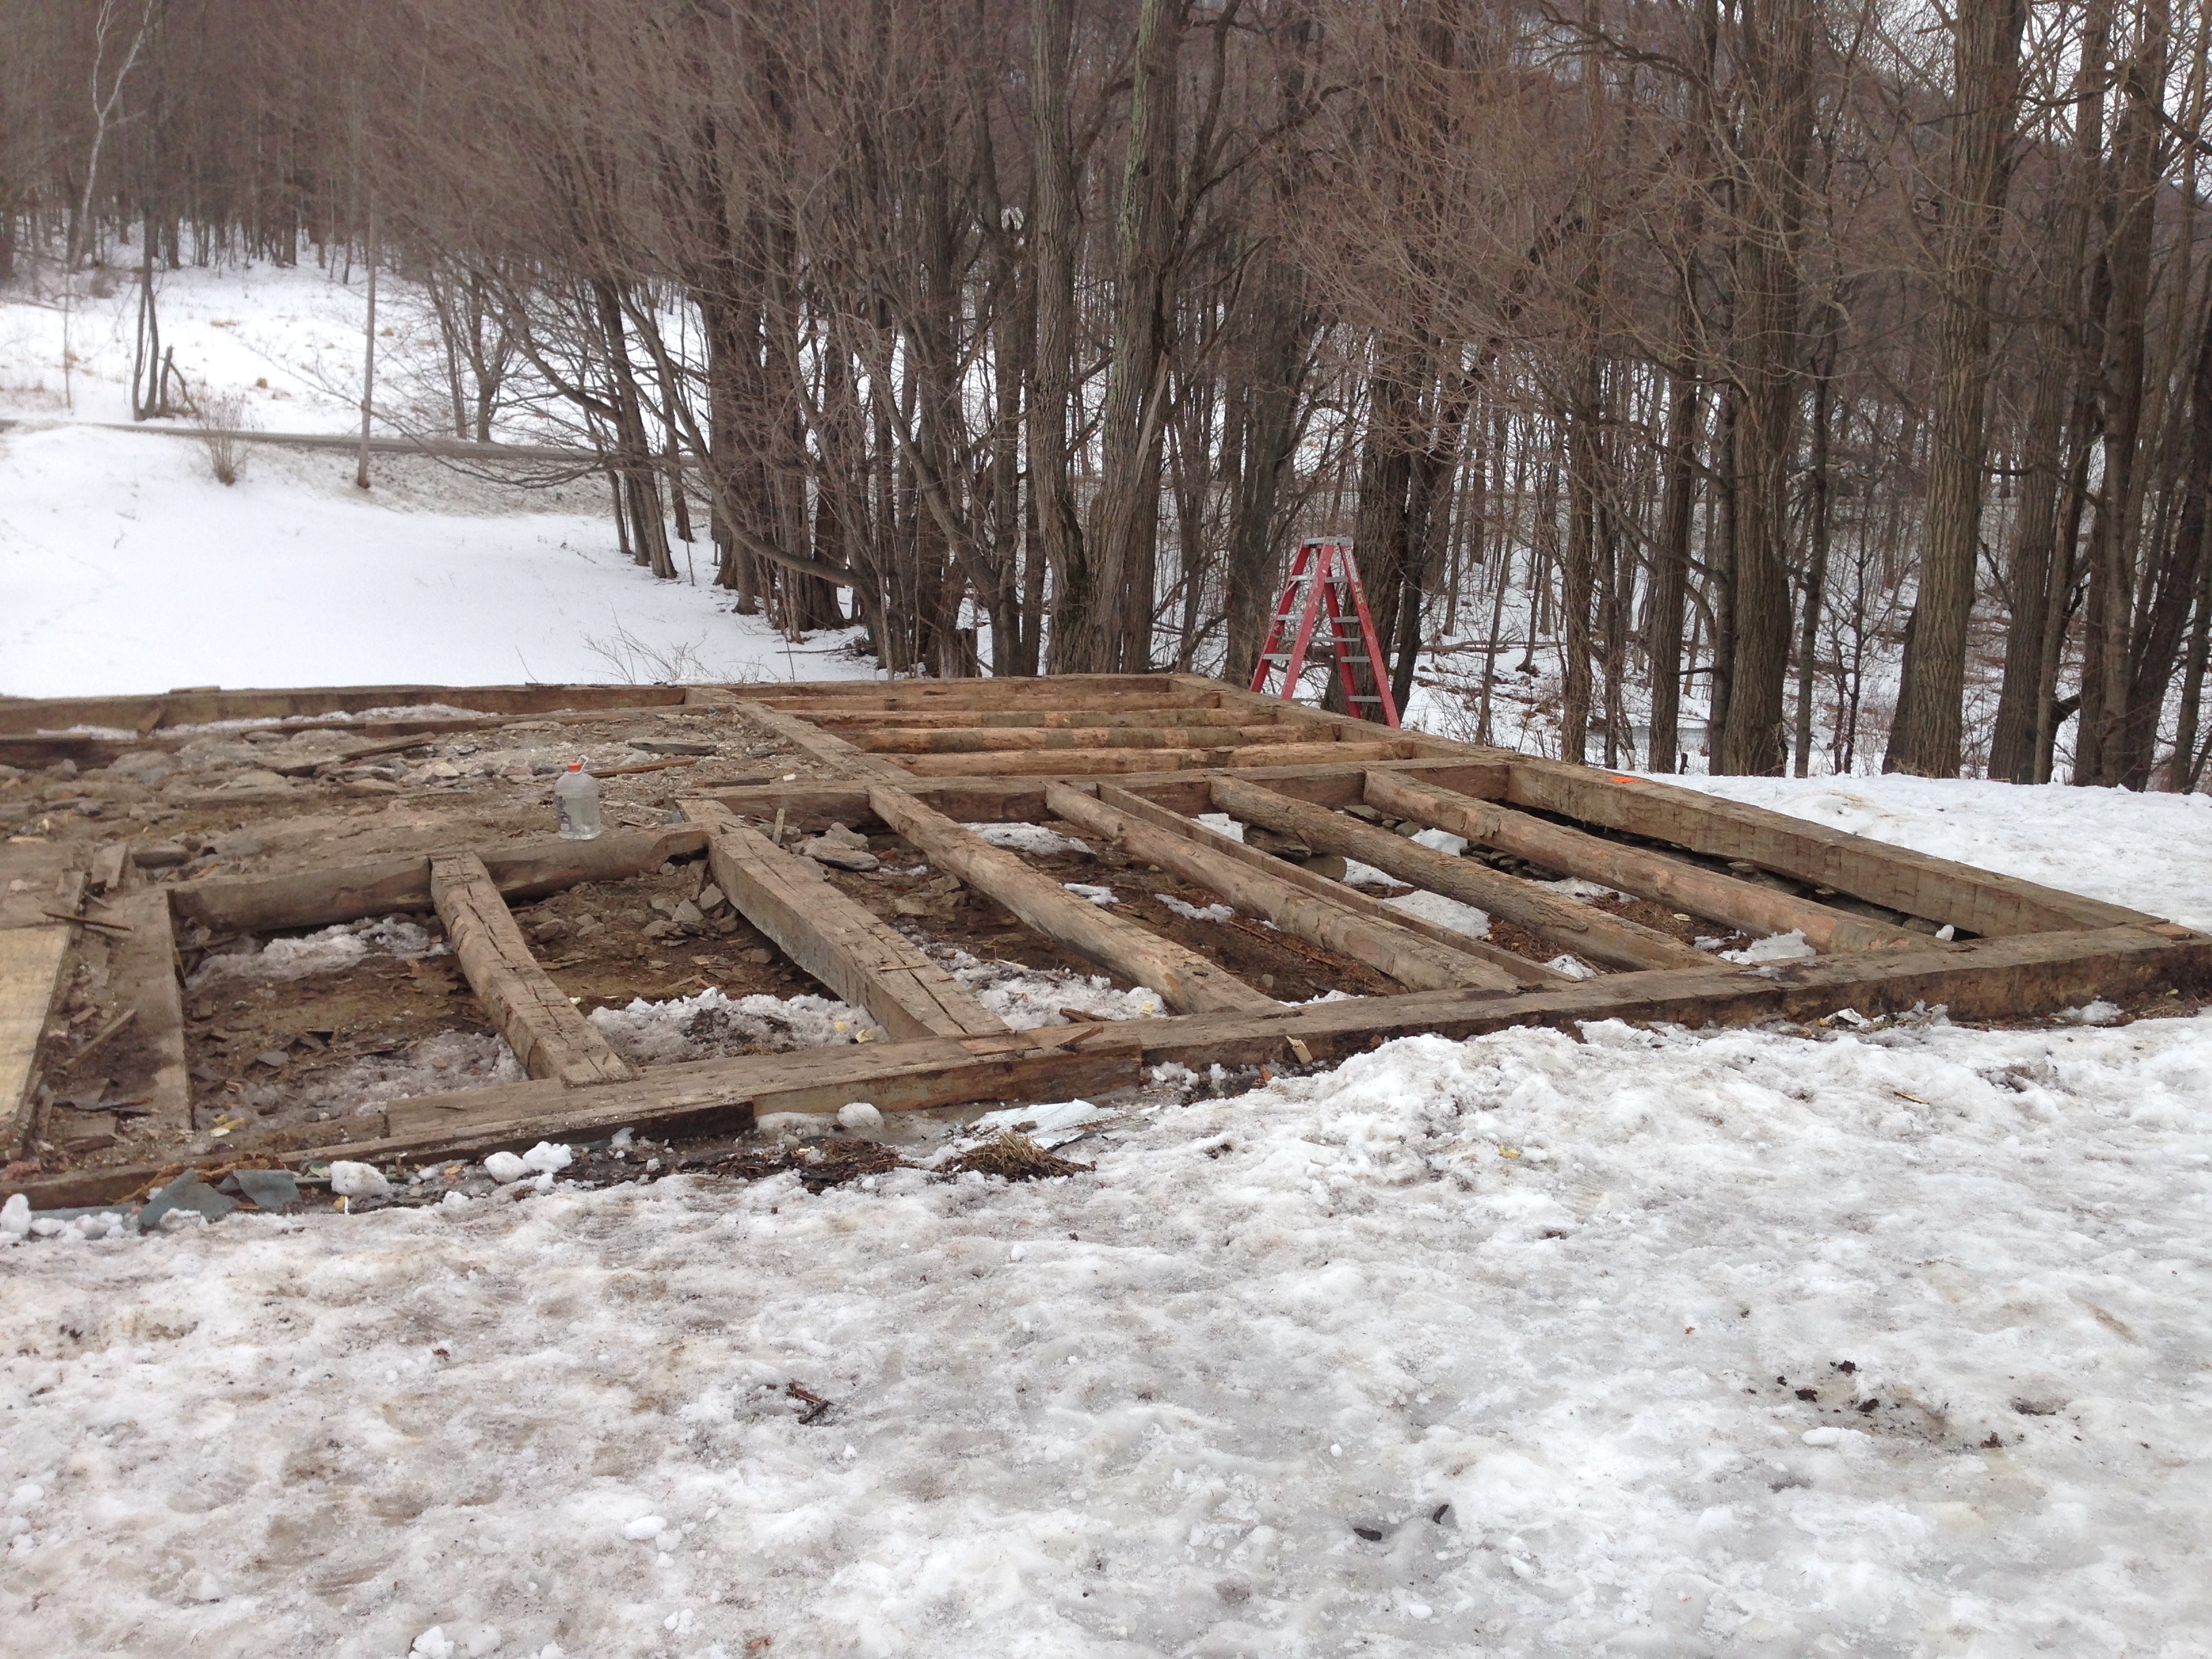
About a year ago, Luke purchased the neglected house and he and his crew carefully disassembled it for restoration. The frame was in great shape with the exception of the rafters and ridge beam, which suffered fire and leak damage. I went down to see the frame in person this July and became even more excited about it. This frame is absolutely gorgeous. 

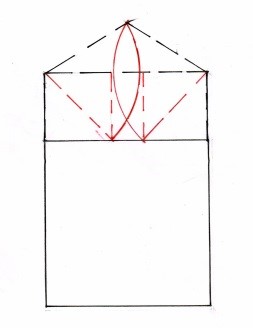
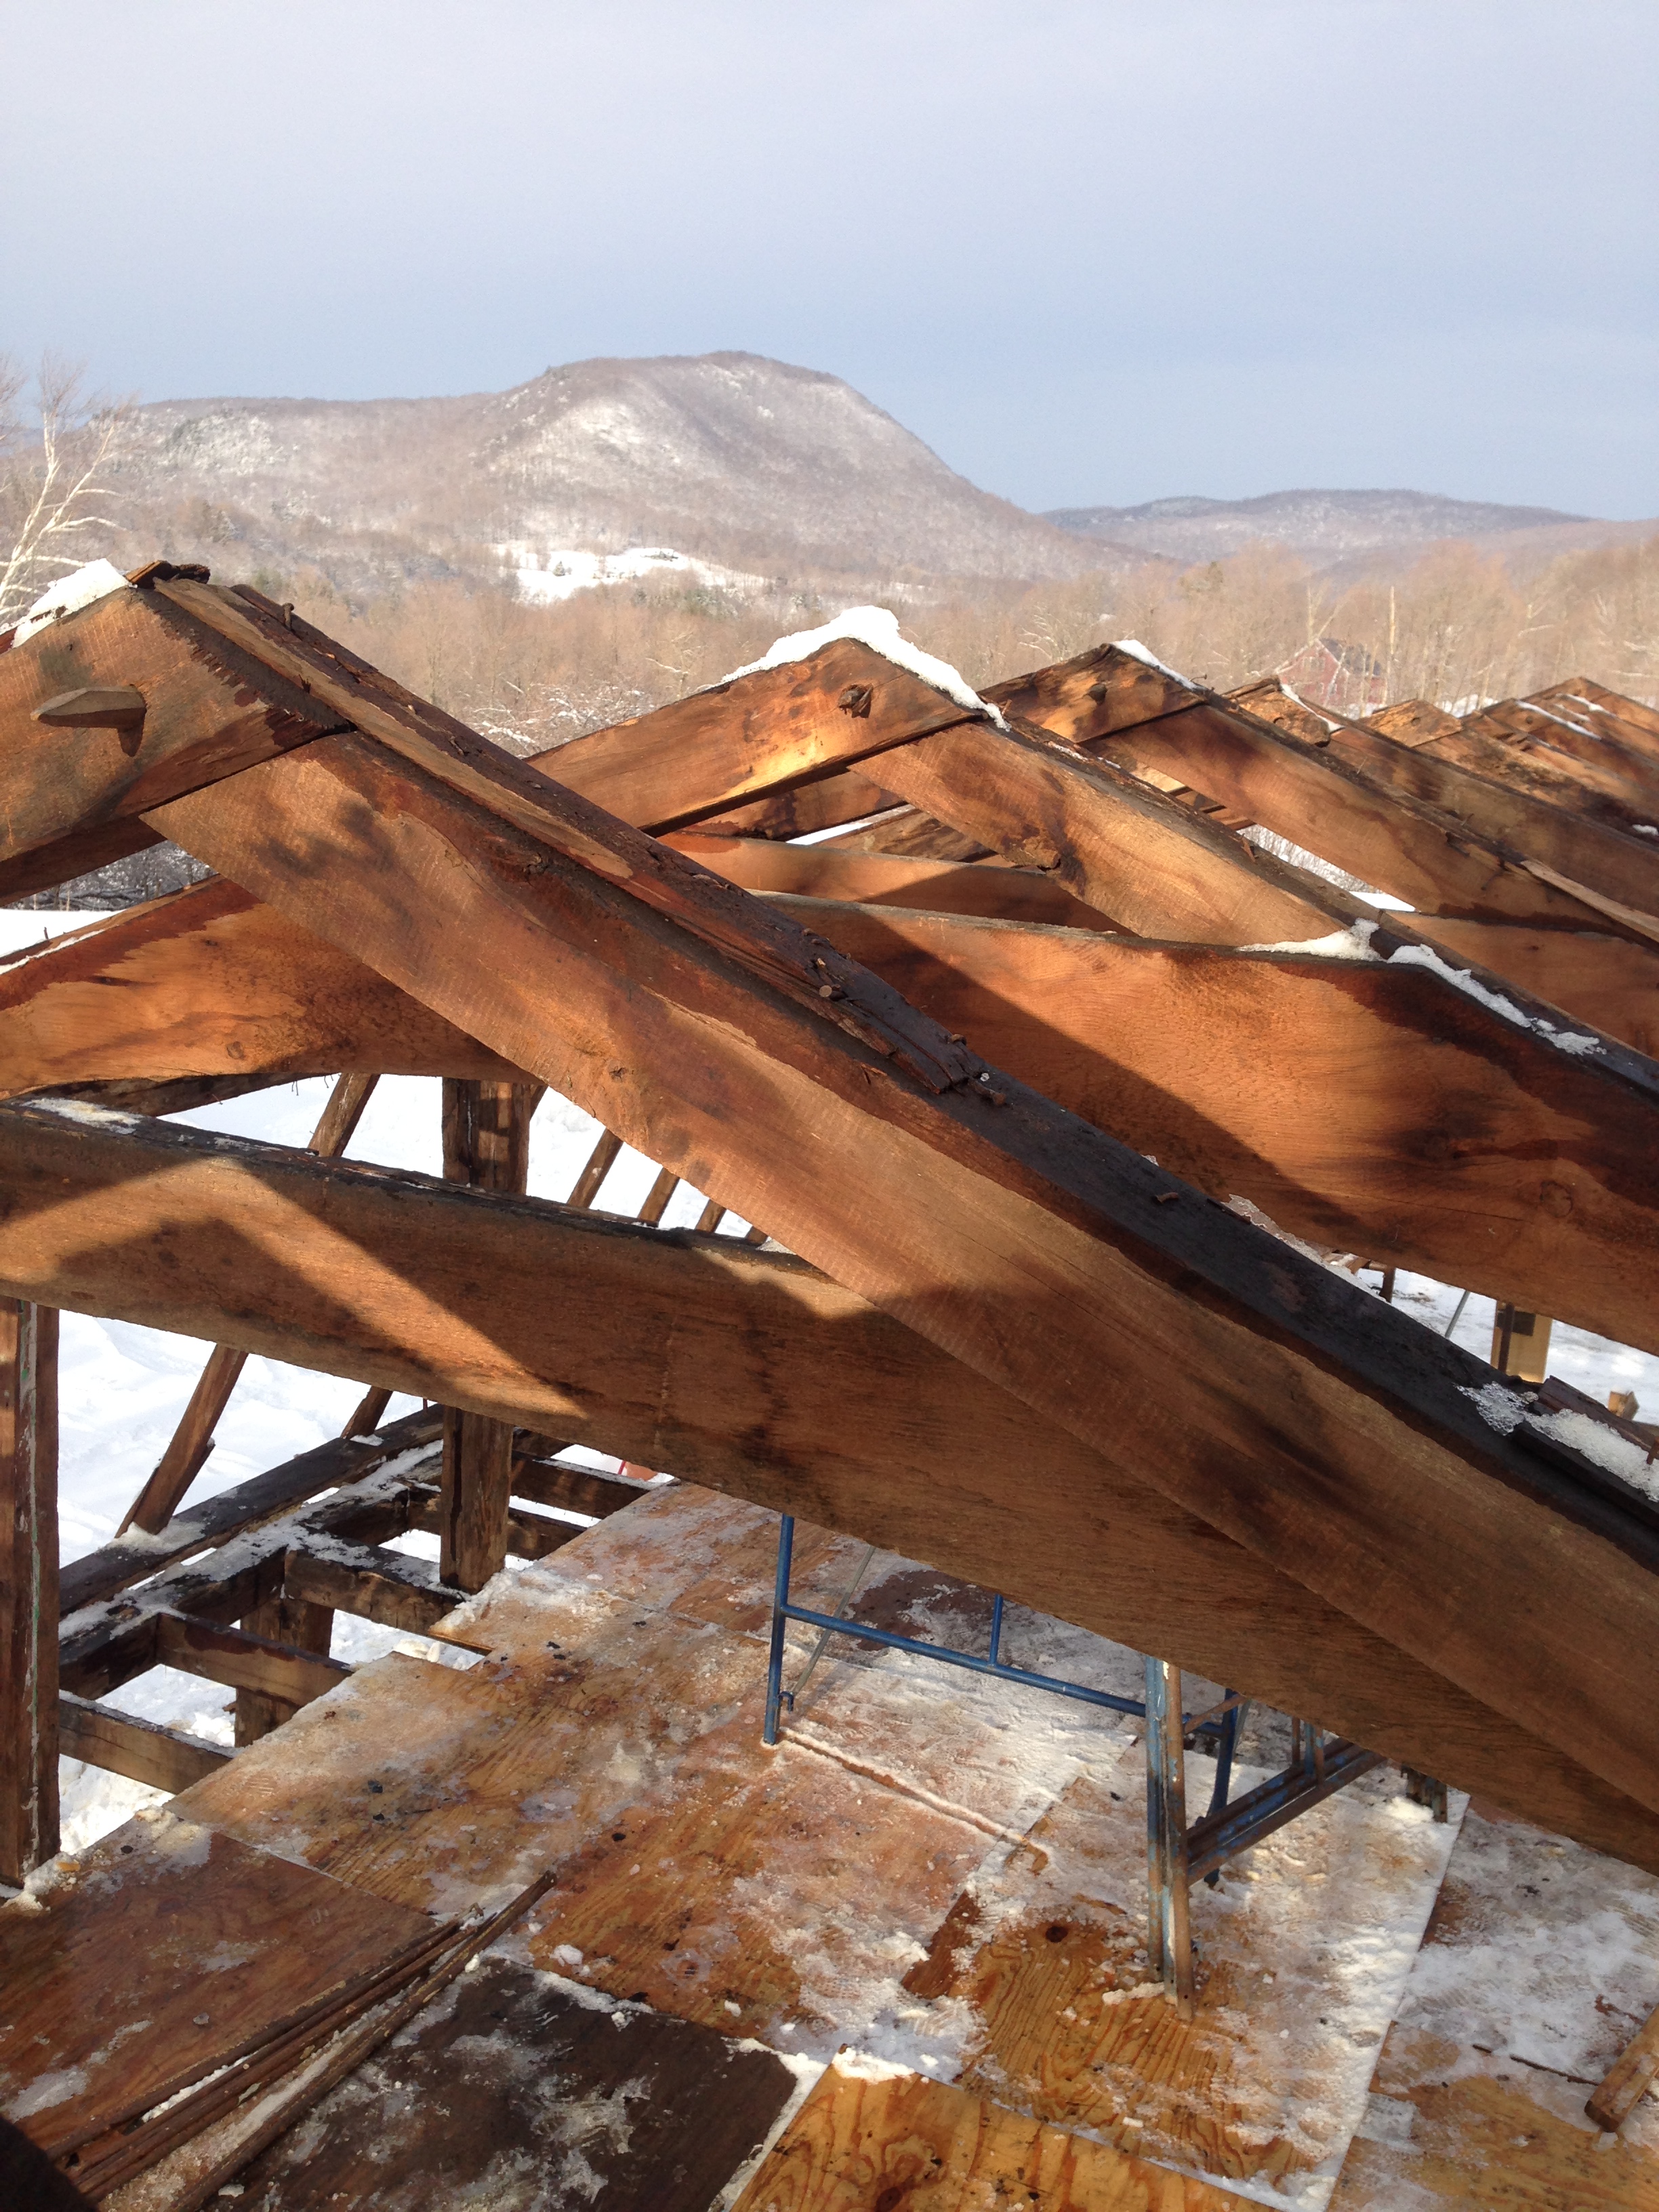
Luke and I discussed how to rebuild the damaged rafter system. I told him I wanted old material, as close to the original roof system as possible. He did some digging and came up with a five-sided pine ridge beam as well as round cedar rafters from a barn in Addison, Vermont, virtually identical to the original.

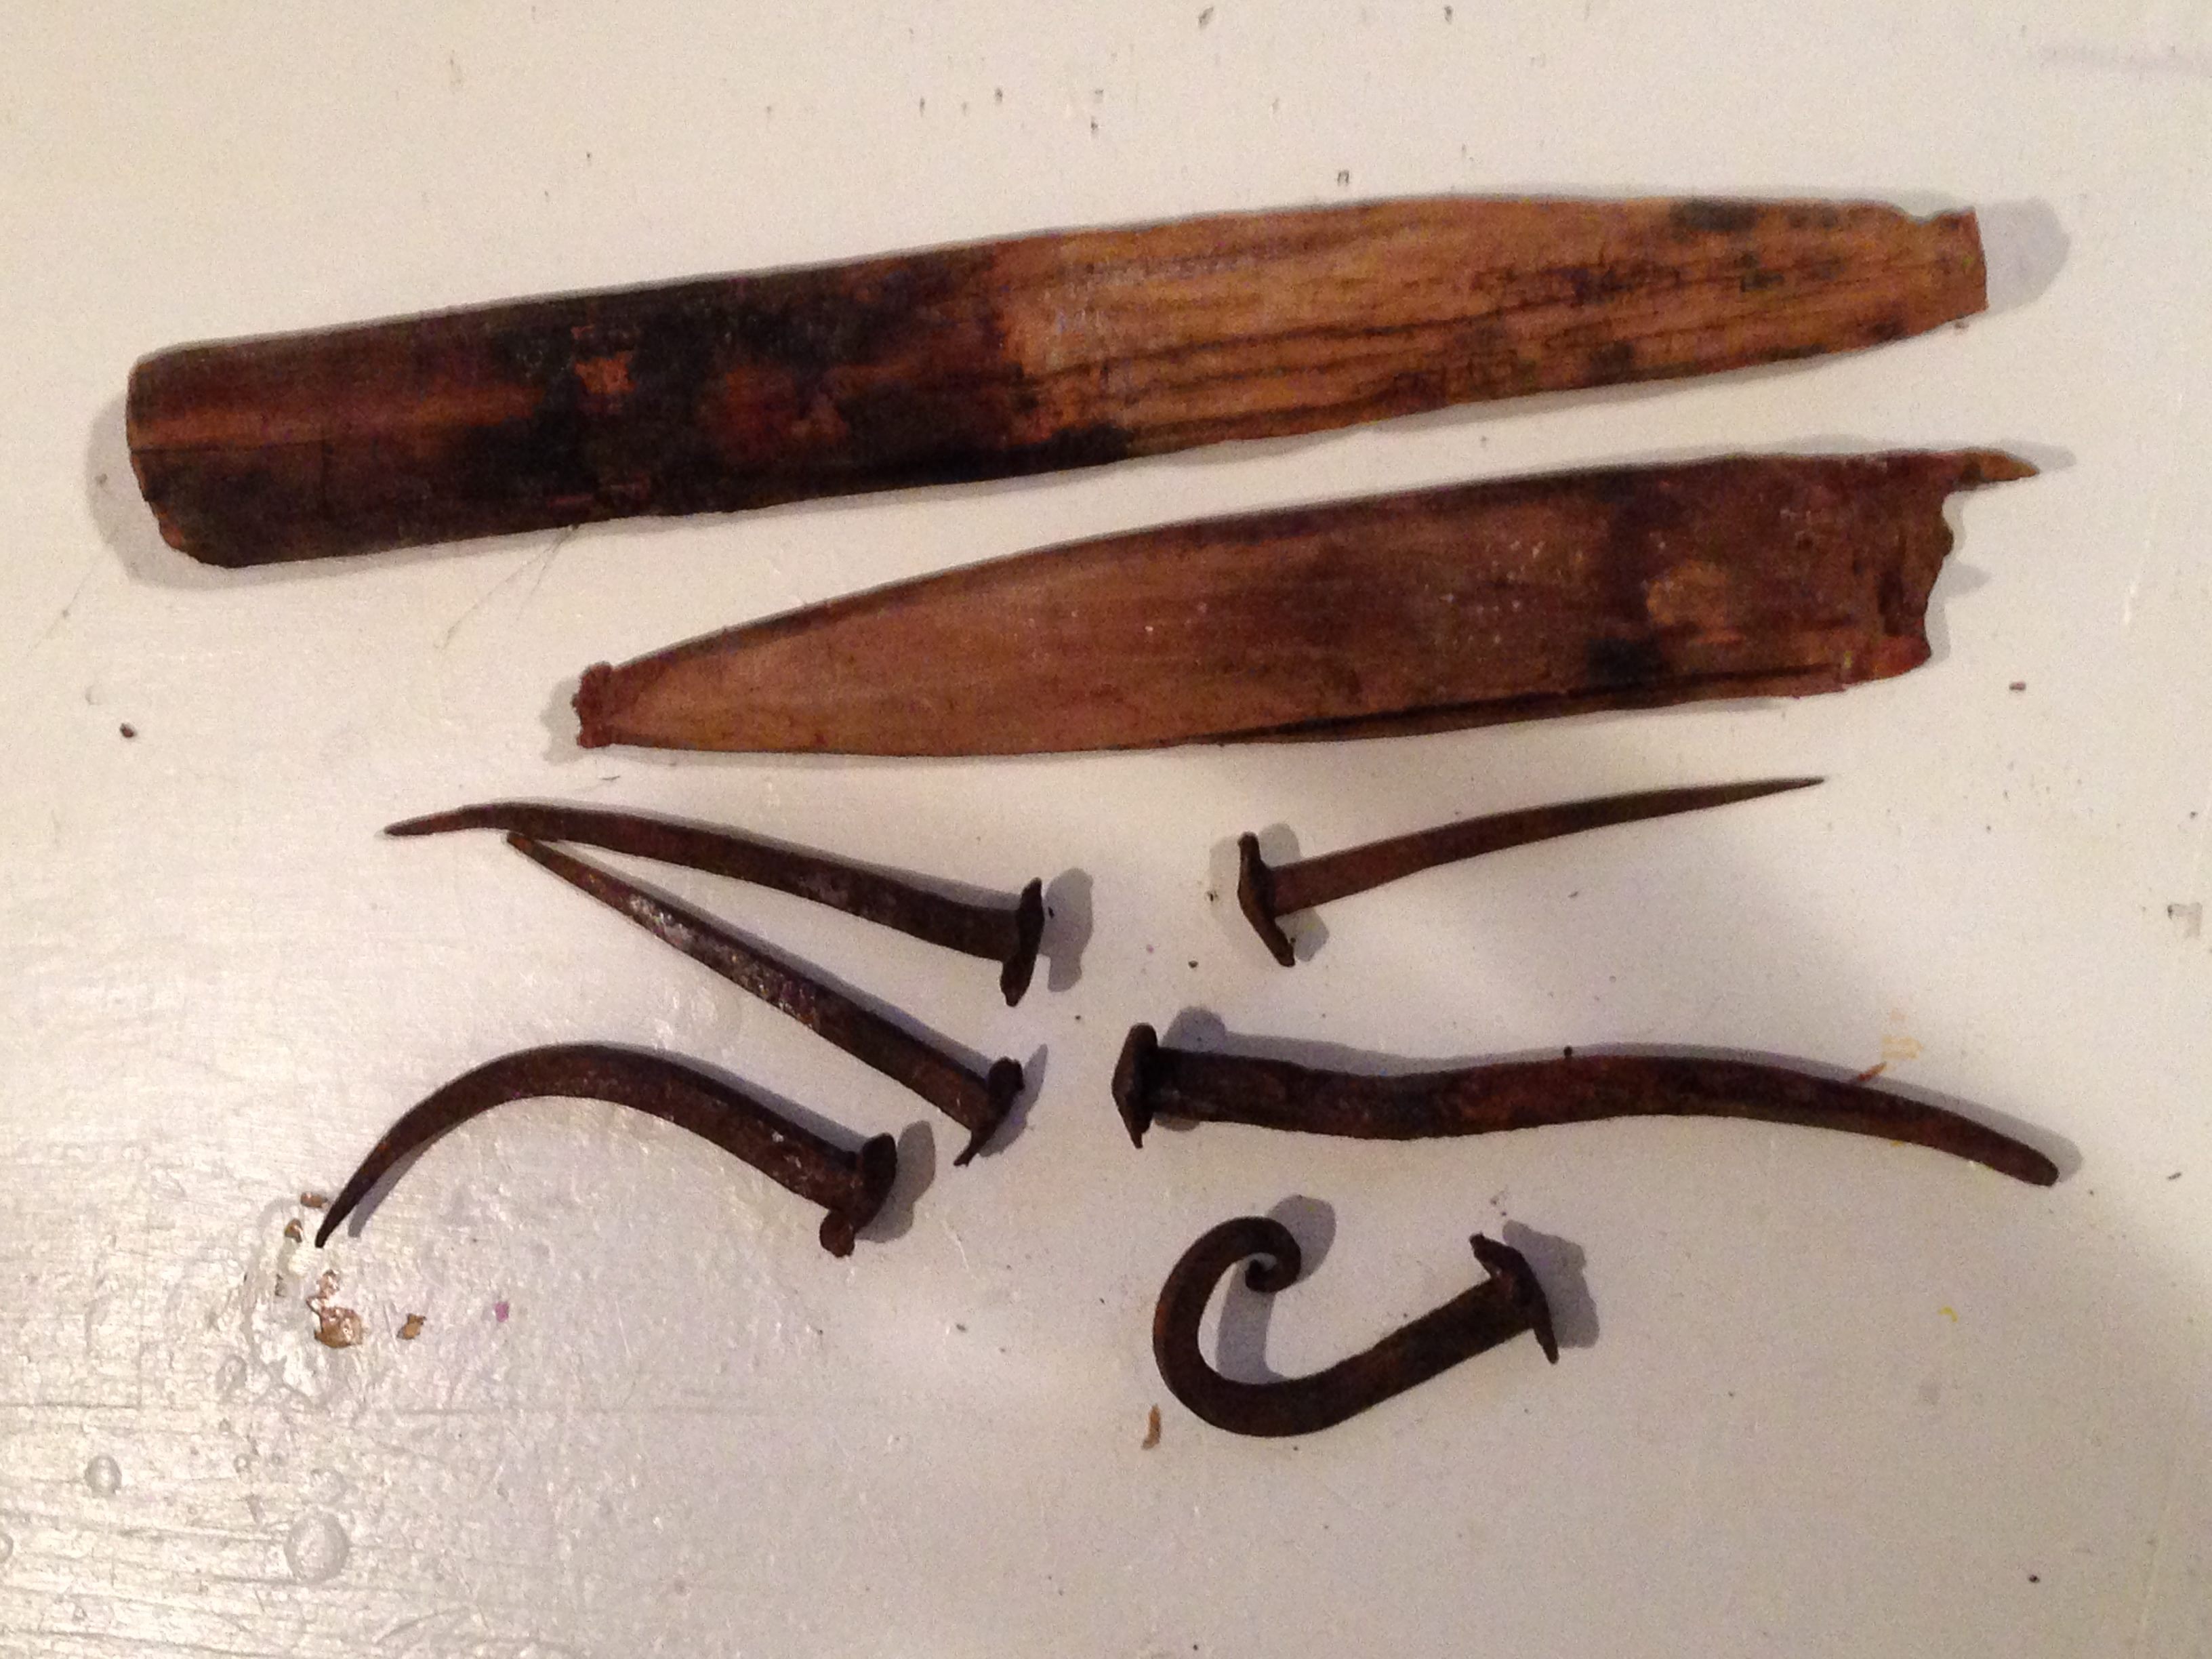
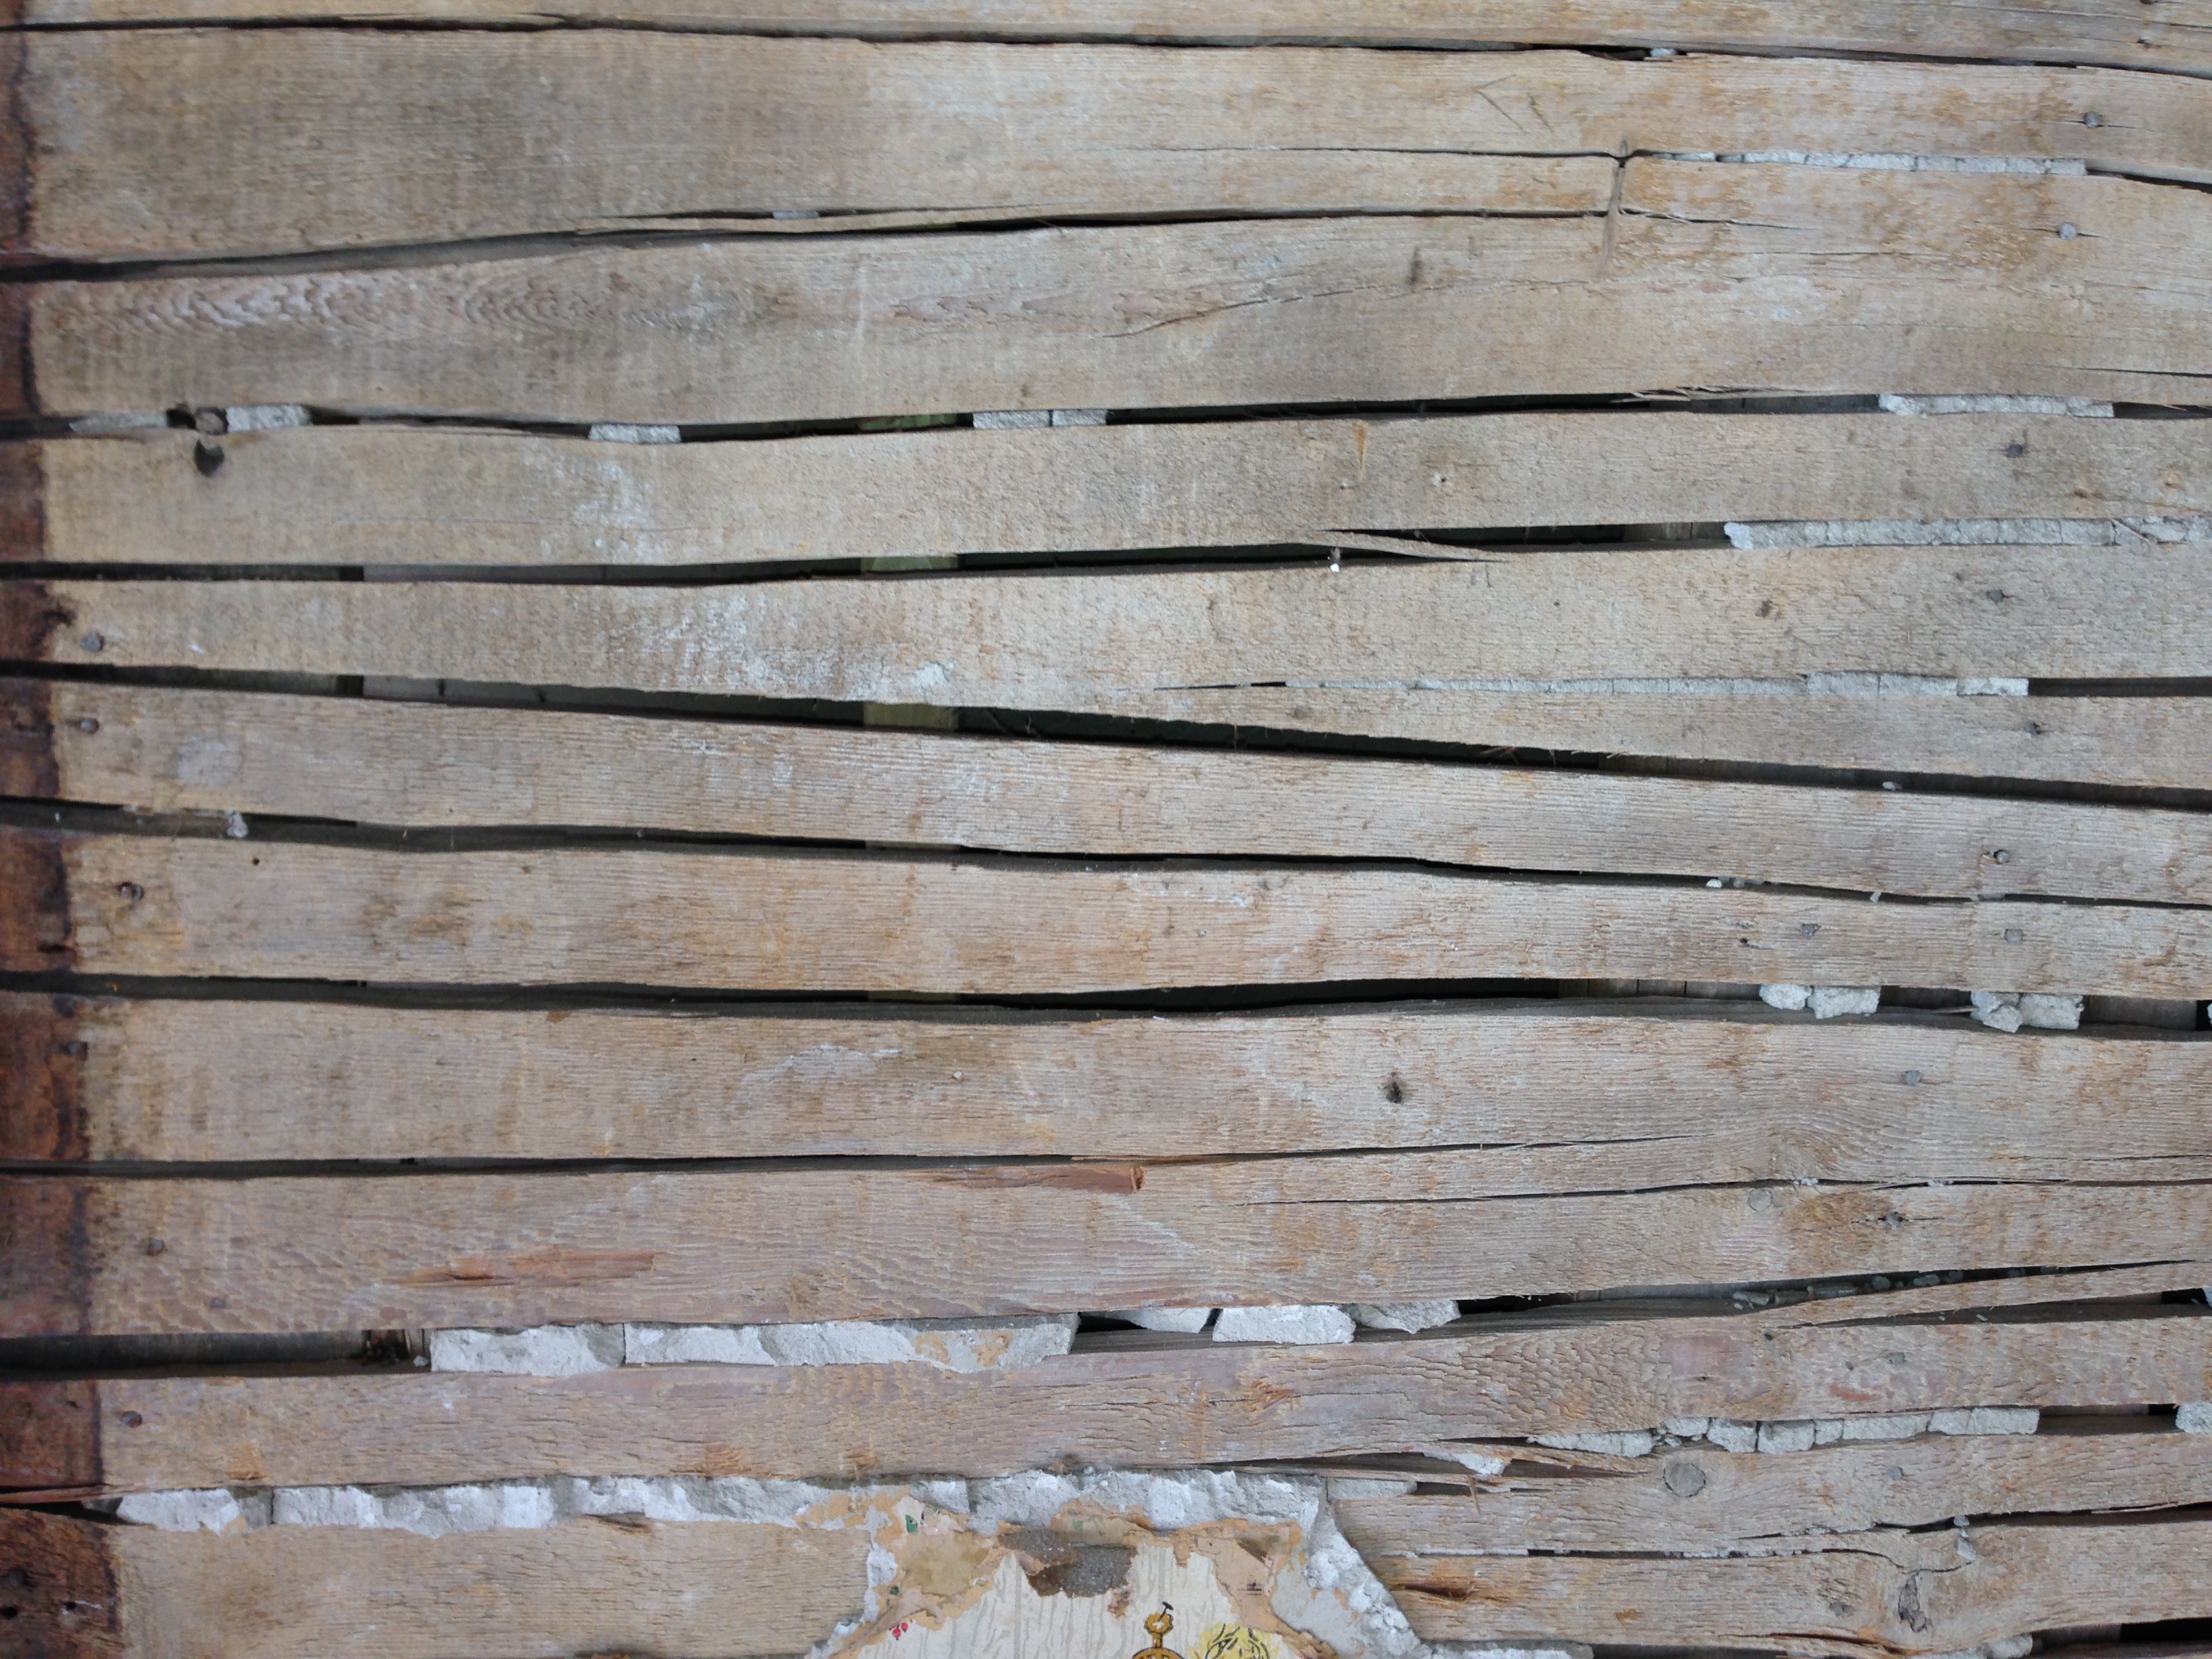
He and his crew replicated the original roof system using these reclaimed materials. They took great care to leave the original surfaces unmarred. They also de-nailed and washed all the 1-1/4”-thick sheathing. As Luke put it, “There is nothing like the patina of old boards.” I totally agree.

Mortise and Tenon Timber Frame Shop Sheathing-9

The five-sided ridge beam and rafters are wonderfully matched to the style and size of the original.

Raising the Frame

This September, Luke and his crew brought the restored frame up to my place in MidCoast Maine. Matt lifted the assembled bents with the telehandler as Luke directed it into the mortises. It was incredible to watch these two work together. Their subtle but effective communication showed that they’ve been doing this a long time. As each tenon slipped seamlessly into its mortise, I couldn’t help but think about how well the resurrection of this frame honored the original makers.

Mortise_and_Tenon_Timber_Frame_Shop_Raising_Bents_Day_Two-12

The final gable bent is set into place

Mortise and Tenon Shop Building Timber Frame Raising Day Three-13

John trims the excess length off the oak pegs

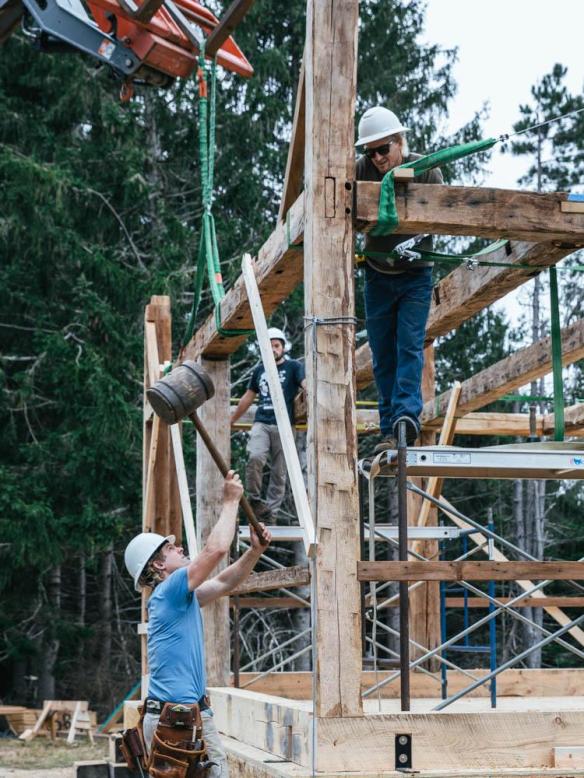
The whole team got involved with the methodical placement of the rafters. Luke said the first pair of rafters is the hardest, especially when they have diagonal braces and a collar tie to be installed along with them. After the first gable end was secured, the rest dropped into place without issue. As they worked through down the ridge, the manual lift helped stabilize it and hold it at the optimum height (decreasing as they went along). The whole process took several hours of careful adjustments and minor paring of the tails that were a hair too wide for their pockets.

Mortise and Tenon Timber Frame Shop Rafters Ridge Pole-6

The first pair of rafters being set, and pegs driven into the rafter braces

By midafternoon that day, the last gable was installed. We drove the final pegs into the joinery and the crew made tiny adjustments before the ceremonial tacking of the evergreen bough onto the ridge.

Mortise_and_Tenon_Timber_Frame_Shop_Rafters_Ridge_Pole-16

Placing an evergreen bough on a newly raised timber frame is an ancient tradition, meant to respect the trees from which the frame was built.

The next day, we nailed gorgeous 200-year-old hemlock roof sheathing in place. Because the crew had already cut, fit, and labeled the boards before bringing them up, the installation process went quickly. The patina in these boards is sacred to this crew. Because they work so hard to de-nail, power wash, repair, and straighten edges, they are very careful not to scratch the beautiful interior show surfaces.

Finishing the Shop

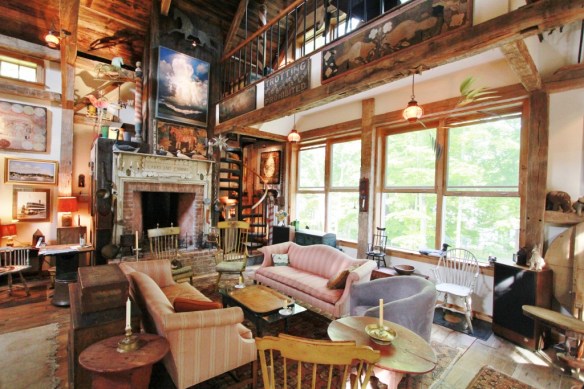
I have to pinch myself standing inside this frame. It far exceeds anything I ever imagined and I consider myself blessed to be the next caretaker for this historic structure. I am leaving the interior unfinished with rough sawn old sheathing boards and the frame completely exposed. All the insulation will be installed in a 2×4 wall built outside of the frame and then exterior sheathing attached to that. I’ve also purchased a pile of antique window sashes (with wavy glass) that I am beginning to restore for the shop. From the inside, it will look like an 18th-century cabinetmaker’s workshop in all its rough-hewn glory.

Mortise and Tenon Timber Frame sheathing-10

The vintage sheathing boards are thick hemlock, and the patina is something that only time can create through the play of air and light.

I am so grateful for this crew and the frame that they’ve restored for us. Luke, Matt, Isaac, and John are not only exceptional craftsmen, but they are incredible people to spend time with. I left the experience inspired.

This building is the new home of Mortise & Tenon Magazine. All our articles will be written and edited here, our instructional videos will be filmed here, and in this place woodworking classes will happen. We will make many memories within these walls.

IMG_5923

Thank you, Luke and crew, for the care you’ve taken with this restoration. Your conscientious workmanship honors the craftsmen who built it over 200 years ago. I hope M&T’s use of it will continue to honor the work of their and your hands.

You can read more about the history of this timber frame in our blog from back in 2016 about the Dutch Cape House from 1800.


Interested in owning your own historic post and beam frame?
Drop us a line.


Camp Moonrise…Or How Our Old Barn Home on Lake Champlain Found Its Name

Featured

Steven KelloggToday’s guest post comes from the talented author and illustrator, Steven Kellogg. We so enjoyed working with him and are honored to have him write for our little blog! 

I am an artist who, for decades, on rambles throughout the northeast, has admired old barns. Recently, I have been thrilled with the acquisition of a rugged, hand hewn barn frame The barn itself had been slowly deteriorating on the abandoned farm it had once served, and then was subsequently rescued, and restored.

4

The historic gunstock frame stood tall and true on the Champlain Island of North Hero

It came into my life because, with our family grown and my wife having developed some health issues that required a residence that is handicap accessible, I decided to build a home with supportive features to accommodate those needs on a piece of property on the shore of Lake Champlain that we had owned for a number of years.

I envisioned a house with several spacious, wheelchair accessible rooms overlooking the lake, that, most importantly, would have an old barn at its core. The interior would be designed so that classic proportions, a richly-toned original ceiling, and sculptural, hand hewn beams would serve as the major architectural themes.

Window View_Steven Kellogg Timber Frame Home

The windows look out over the beautiful lake, and towards the barn’s original location

My search for just the right barn led me to Dan McKeen of Green Mountain Timber Frames, and then to his friend and colleague, Luke Larson, a master carpenter in Middletown Springs, Vermont. They had a number of impressive barn frames available in their inventory. Each one had been rescued from its original location on the farm where it had originally served. Each of these restored barn frames was like a rural cathedral with beautiful, simple, architectural lines, massive, hard wood beams, and magnificent notched and pegged construction.

Amongst these treasures, one of them stood out because of its superior details and appropriate size. I could picture it perfectly on our property. This particular historic frame came with added appeal: it was originally built around 1780 on one of Lake Champlain’s North Hero Island farms, not far from its prospective new home on our wooded knoll overlooking that very same lake.

When Luke and his skilled crew erected the barn frame on our wooded site, it seemed so harmoniously situated that it gave the impression that it had always been there.

Because our land is on the New York side of the lake, we resolved to honor the Adirondack tradition of calling rustic lakeside and woodland homes “camps” and giving them names. Prompted by the fact that the reconstructed North Hero Island barn faced our favorite monthly spectacle — the full moon lifting above the Vermont mountains and the lake — we decided it would henceforth be known as “Camp Moonrise.”

Interior View_ Steven Kellogg Timber Frame Home

The sign over the hearth reads “Camp Moonrise”

Now that we are happily putting down roots in this beautiful building and enjoying every hour of living here, we will be forever grateful to Luke, Dan, and their team of master craftsmen for their passion for old barns and their creative talents, which made this opportunity available to us.

Read more about the process of restoring this old barn in this blog.  For the Camp Moonrise project, Green Mountain Timber Frames partnered with the talented staff at Cloudspitter Carpentry and Hall Design Group.


More Images of the Beautifully Restored Barn HomeCamp Moonrise

This slideshow requires JavaScript.

A Comparison of Timber Frame v. Stick Built Construction

Reading this in your email? For easier reading – Click here.

This week’s guest blog is from builder and timber framer, Glenn Tarbell. Glenn has collaborated on many projects with Green Mountain Timber Frames over the last two decades.  Recently, he built this beautiful timber frame garage for a client. 

Final Timber Frame Garage.jpg

Why Use Timber Frame Construction?

Recently I had a customer who wanted a new garage. They live in a beautiful wooded area with large oak trees near a wetland. Their house is not large and has a low sloping roofline. The siding is rustic, rough sided pine that is stained. They asked me to build a two bay garage.

Timber Frame v. Stick Built

I inquired if they would be interested in a timber frame garage rather then a traditional stick built garage if the pricing was not considerably higher. They loved the idea of a timber frame and we began the design process. The pricing for a timber frame style building was only slightly higher, so we decided to go with it!

Designing the New Garage 

In the design phase, we talked a lot about the height of the new building. The customer did not want a garage looming over everything. We talked about enclosed and not enclosed bays, power needs, and building materials for the roofing, siding and the timbers. They also needed storage for kayaks and canoes and windows on the south face for garden starts.

We decided that the final building would be a barn-garage. We would create a structure that looked like a barn with an extension for the traditional hay hook or, as we discussed, a canoe hook. The customer had a rope system with a vintage pulley that has already pulled the boats into the upper half story for the winter.

The structure we finally designed has one fully enclosed bay with an overhead door and a shed roof off one side for the second bay. We ultimately choose this look for two reasons: height and looks.

6_plate section for the shed roof

Building the Barn – The Construction Process

When it came time to start building the garage, we chose hemlock wood for the frame. This is a ridged softwood that works well for timber frames. We cut the joinery traditionally using chisel, saw and chain mortiser. Then, we dry fitted all the parts of the frame at my shop. Seeing the mortise and tenons fit together and then seeing the bent sections laid on the sawhorses was wonderful. Dry fitting the frame gives a sense of what the building will become, while also allowing for us to check for accuracy in layout.

2_All the bents are up

Here we are drilling 1-inch holes for the wooden pegs.

The barn posts are six by six, the girts are eight by eight, the rafters are four by four and the braces are three by six. As a big pile of wood it does not look like much, even with the joinery cut. But on raising day, wow, it takes on a look of its own.

4_4x4 rafters in place

Here you can see all the bents assembled and the frame with shed walls erected.

And here’s a look at the new garage once the roof sheathing and trim were on:

7_Roof sheathing and trim

Pricing Timber Frame v. Stick Built Construction

When pricing this kind of project and determining the cost difference between timber frame and stick built construction, I have to look at the two styles of building with the thought, “What steps will be different?” Siding will be applied in the same manner in both building styles, as will trim, roofing and sheathing. The only real difference then, is the framing.

It took nine days to cut out the timber frame and tip it up, including roof sheathing.

3_Drilling holes for pegs

The frame with all the 4×4 rafters in place.

To build a traditional stick built garage with roof sheathing, it may take seven to eight days to get to the same point. Therefore, the difference in this project was two days of labor.

Timber Framing – A Worthwhile Investment

In the end I think timber frame construction makes more sense both financially and aesthetically. Even if it takes a bit longer and requires a slightly larger initial investment, (usually 15-20% more) a new timber frame is strong. Barns built this way have lasted hundreds of years.

Standing in a timber frame feels good. You can see the craftsmanship of the builder and know that the history of barns and houses built this way dates back hundreds of years. So whether you build a new timber garage or use a vintage timber frame barn as the frame for a garage, from my experience timber framing is usually the way to go. It’s cost effective and the building can last for centuries if the roof is maintained.

Interested in your own timber frame barn or home? Let us know!

We’d be glad to hear from you! 

Luke – Green Mountain Timber Frames
luke@GreenMountainTimberFrames.com
802.774.8972

Buried Treasure! Antique Loom Found in 1780s Timber Frame

Reading this in your email? For a better view of the blog - click 
here!

This week’s guest blog comes to us from our fellow builder and timber framer, Glenn Tarbell, who is currently restoring a 1780s timber frame from Tinmouth, VT. 

We found this loom in a 1780s homestead in Tinmouth, Vermont. It was in the attic of a timber frame house I was taking down to restore for future construction.
 18th Century Loom_Green Mountain Timber Frames_Vermont
This particular timber frame has a fascinating rafter system. When I first assessed the frame, I went upstairs to take a look at the construction of the rafter system in this house.
Rafter System Historic Loom_Green Mountain Timber Frames

Inside the attic of the frame

Rafter System Historic Loom_Green Mountain Timber Frames

Rafter system

The rafter system was really strong with horizontal ties and bracing, not what you would find in many houses that early. It must have been built with an eye to the future – when roofs were made of slate – even though the frame was likely cedar-shingled the day it was built. The house also stood on a hill which has strong winds. The strong bracing and ties may have been added to ensure that the house would be able to withstand the unforgiving winds of a Vermont winter on a barren hilltop.
Rafter System Historic Loom_Strong horizontal ties and bracing

Strong horizontal ties and bracing

It was during my trip upstairs that I first caught a glimpse of the loom. Immediately, I thought it was an interesting and exciting discovery.

Discovering the Loom

The loom was scattered about the attic amid old magazines, glass jars, Model-T car pistons, feather or thresh bed mattresses and other old things that get stashed in an attic over 200 years.
magazine and other discoveries in an old timber frame barn_Green Mountain Timber Frames

Magazines and other discoveries in the old timber frame

I gathered the pieces of the loom from all corners of the attic. The big massive log where the fabric ends up was tossed in one corner, while another piece was on the far eve side of the house. The frame of the loom was still together, standing right next to the chimney. What is most beautiful about the loom is the craftsmanship. It’s built like a proper timber frame, as if it were a piece of furniture, or part of the house itself.

Restoring the Loom

When restoring any timber frame, the first task is to remove all the contents from the house and then begin to dismantle the frame. Because the work of historic timber frames is so much about preserving history, we save what we think is valuable or interesting for the new owner of the restored timber frame house.
18th Century Loom_Green Mountain Timber Frames

Restored loom

In this case, the loom was put aside, washed, and stored in Vermont. It will be shipped and delivered to the new owner together with the restored frame next spring.
The loom cleaned up nicely! I know there must be more to the loom then what I found, and I would love to see the loom in working condition with fabric once more being woven.

Know anything about historic looms or colonial weaving? Let us know! We’d love to hear from you! Leave a comment below or contact Luke or Glenn:
Luke Larson
Luke@GreenMountainTimberFrames.com
Tel: 802.774.8972

Glenn Tarbell

Geometry in Historical Frames – a guest blog

Reading this in your email? For a better view of the blog - click 
here!

This week’s guest blog is from architect and historian Jane Griswold Radocchia. You can learn more about her work in her personal blog. She writes here about her encounter with one of Dan McKeen’s barn restoration projects and how she could determine that the builder of this 1791 barn used geometry to build the original frame. 

“I invited myself to a Green Mountain Timber Frames barn dismantling earlier this fall. Of course I was glad I went.

Here’s what I saw:

Three historic barns from Hartford, NYThe three barns sat, connected in an L shape beside the road on the uphill slope of a valley. None of them faced the road, on their west and windy, side. Instead they faced south and east, creating a protected barnyard, a sun pocket. In the middle, protected from storms and wind, was the corn crib. Other farm buildings repeated the pattern, facing south, no doors on the west.

Hartford NY Historic timber frame corn crib

Hartford NY Corn Crib

The main barn also had a door on the north, directly across from the one facing south. It fronted on the farm road and looked at the house across the way. Two doors across from each other were for threshing and ventilation; a north-facing door was for bringing in hay and grain on the shady side of the barn in summer.

North side view of historic timber frame

North side view of timber frame

North side view of timber frameHow could I tell that geometry was used in building this frame?

After we had climbed up to the rafters, Dan McKeen handed me prints of the frame measured and drawn up by James Platteter. James Platteter is a master furniture maker and Dan was lucky enough to work with him on this project and have him dedicate his time to drawing up the detailed plans. (Do take a look at Jim’s beautiful work on his website.)

To have a sense of the building, I checked some of the dimensions. The framer really did make his barn 30’- 1” wide!  He also made it 42’-6” long. The diagonal of a 30’ x 30’ square will be 42‘-6” long. The shape of the floor for the barn is based on √2.

Both that extra inch and the √ are indications that the master-carpenter for this barn used geometry to determine its size and framing.

The carpenter had a pretty good rule! Over 30′ and his rule was only off by 1”. But how did he share his dimensions with apprentices if their rules differed from his?

He used geometry!
Geometry is a language, one most of us haven’t mastered. Our ancestors spoke (drew!) it well and used it for construction.

How did the farmer build his barn?

He probably hired a timber framer, a master builder. The framer knew about how big his barn should be and how it would be used. He began his design with a square with 30′ sides. This initial measurement of 30′ set the foundation for all the measurements of the barn.

How?

One side of the square would become the width of the barn. Then, the builder crossed the square with its diagonals – corner to corner – and swung his compass, extending the diagonal to meet the side of the square. The length of the diagonal became the length of the barn.geometric drawing of timber frame barn

square geometric corners of timber frameAbove, is the floor plan of the barn: 30′ wide, 42′-6” long.

The new rectangle on the end of the square was also a good height for the wall of the barn. So the framer drew a square on each corner. Using the diagonals for those squares he swung an arc to locate the ridge. You can see the squares and the diagonal in the diagram below.

Ridge location in timber frame barnThe framer may have used the barn floor for his layout just as carpenters today use the floor of a house to lay out rafters for the roof above. If so, it would have looked like this:

floor for raftersHere is the drawing of the end elevation showing that layout.

North gable end view of barnThe red x on the right is the original square. The dashed line is the arc locating the ridge. To locate the second intermediate post the framer used the side of the square, the height of his wall, as an arc.

Diagonal determines placement of the braceWhere it crosses the diagonal, he placed the post.

diagonal post placementThe north and south walls used the same geometry. The right end was laid out as was the end wall. The space for the door was a square. The left side was divided in half, as marked below by the diagonals. I enjoy finding that the braces followed the line of the diagonals. The barn door height was determined by the point where the arcs cross.

Final drawing of timber frame historic geometryThe east wall used the same geometry – first the square at its diagonal marking the right hand intermediate post; then the remaining space divided in half.

east wall timber frame geometry

The framer applied this same geometry as he laid out the roof, the braces and collar ties. The whole barn evolved from his first length: 30’-1”.

I look at this: so simple, so sophisticated. I am amazed! The geometry is there, but we have forgotten it. It is so beautiful!.

I will follow Green Mountain Timber Frames as they dismantle other pre-1800 barns and house frames for more confirmation of how early timber framers used geometry in structural design.”

Restoring a Barn Home – with Guest Blogger (and Carpenter) Luke Larson

Today’s blog was written by a guest blogger, Luke Larson.

A tremendous thanks to Luke of Larson Carpentry for sharing this with us – not only his pictures and story, but his talent with wood. Luke and his crew recently dismantled the Gambrel style timber frame which I wrote about earlier in the winter. You can read more about the English Gambrel style home, which was built in the 1790s, in my blog here.

This beautiful vintage timber frame is looking for a new owner. Interested in calling this frame home? Contact us! 

Vermont Timber Frame Gambrel Roof_Crew Shot

Dismantling the Gambrel Frame – Luke and Crew

Gambrel Roof Timber Frame

Timber Frame Home with Gambrel Roof from Danby, Vermont

When we first began inspecting this home back in the fall, we were guessing it was built in the 1820s. Throughout the process of gutting the house down to the original ingredients, we have made the exciting discovery that it is an earlier timber frame, built in the 1790s!
We also discovered that the house is featured in a Vermont architectural survey, described as an early and rare example of craftsmanship. The frame size is 28 x 38 feet and the stout timbers are made out of American chestnut, beech and white oak wood. The main beams are hand hewn while some of the floor joists and the rafters are water sawn. These were likely crafted at a river mill within a few miles of the site.
Gambrel Roof Timber frame in New England Snow

The Gambrel Roof Timber Frame in New England Snow

“Gambrel” refers to the double pitched roof seen above. It is a style that is uncommon here in Vermont. One of the major benefits is the wide open and spacious feeling of the second floor. There is a 22 X 38 foot clear space in the center. With the uncommon arches collar ties on the back half, this will make a remarkable master bedroom! The posts on both floors are gunstock, meaning that they get larger at the top and make for exceptionally strong timber frame joints.
I had a great crew of 10 for the day we lowered the frame to the ground. It is an amazing thing to remove the oak pegs that have been holding the building together for the past two hundred plus years. And it is amazing to be learning my craft from master builders who lived more than two hundred years ago. Every piece of this house is now labeled and carefully stored away.
2014-03-14 17.24.20

Beautiful Joinery on New England Frame. Note the arched collar ties!

Let’s return to the detective-like task of uncovering the date the house was constructed. After about 500 hours of tearing out additions, sheet rock, wiring and insulation, we were finally able to get a better look at the original ingredients. A major clue as to the date of the house came from the nails used. Most were rose head nails, meaning they were formed completely by hand with a forge. The term “rose head” comes from the beautiful shape of the nail head, which was pounded out with four quick strokes of the blacksmith’s hammer.
Some cut nails (made by machine) were also used on this house, primarily on the flooring. It was exciting to discover that these cut nails were of the earliest variety, as evidenced by the way the metal sheets from which the nails were cut had to be flipped over during the process, creating a slight metal bur on opposite sides of the nail. Only a few years later, the technology had developed enough that the nails were “stamped out” of sheet metal without needing to be flipped over, creating a different bur pattern.
The earliest machine-made nails still had the heads fine-tuned by hand, but with only two strokes of the hammer. It was a very narrow window of time during which these nails were made and it helped provide the time frame for this home’s construction.
 Rosehead Nails for Timber Frame Wood

Rose Head Nails

Another clue in the dating process involved the plaster and lathe. Very early homes such as this one used split board lathe to hold horsehair plaster to the wall. It was made by chopping a wide board with a hatched, thus stretching it apart like an accordion. This was then nailed to the wall. As sawing became more economical during the early 1800s, later home builders used narrow lathe that was sawn rather than split. This house had accordion lathe throughout, as the next photo shows. This picture is just one wide board that has been cut and spread apart.

Accordion Lathe on colonial timber frame

Accordion Lathe

Here I have stripped the house down to the original siding boards:
Gambrel 1

Original Siding – up to 22 inches wide!

The boards you see above are one and a quarter-inch thick hemlock planks. Many are over twenty inches wide! Imagine the trees that the boards came from! At this stage in the process, I was able to discover all of the original window and door layout, which I have carefully documented. Notice the tiny windows out in the eves. These would have allowed light into the area right under the rafters.
Joinery Summer Beam
Here is some of the amazing joinery. In the picture above, you can see the end of a summer beam, meaning a beam that runs mid-span and supports floor joists. This joint is “dovetailed,” meaning the joint is made in such a way that it cannot physically pull apart.
Finally, we were down to the first floor after the upper structure was down. Once the beautiful wide flooring boards were removed and saved, I labeled each of these sills and floor joists. Even without a foundation, the rot-resistant tendency of American Chestnut means that many of these sills are still in great shape and ready to be used again!
First Floor of Timber Frame with Upper Structure Down

First Floor of Timber Frame with Upper Structure Down

It was a pleasure working on dismantling this frame and I enjoyed uncovering details at each step along the way!  Below are a few more of my favorite photographs from the dismantling process.

In may ways, it was both a joyful and sobering task to take this houses down. There were many poignant moments when I thought about all of the living that has taken place in this space, all of the generations and families that have called this building home.

My hope is that the time-darkened timbers and patina laden boards of this house will again be someone’s home. I intend to honor both the craftsman who chopped these beams from the forest as well as all those who have cared for it since as I embark upon my next step: the restoration of this beautiful timber frame.

Below are a few more of my favorite photographs from the dismantling process:

Timber Frame of Gambrel House

A Beautiful Timber Frame!

Removing Timber Beam for Frame Restoration

Lifting Down One of the Five 38-foot Beams

Dropping Gambrel Frame into the ground

Preparing to Lower the Rafters

————————–

Please contact Green Mountain Timber Frames to learn about the vintage timber frames we have available – or to share your own story about barn restoration! We welcome guest blogs!