McKie Barn Raising & Open House

Featured

We invite the community to join us this Thursday, December 8 for a Barn Raising and Open House from 7:30 am to 3:00 pm. Watch the crew assemble the McKie Barn, and warm up in the Reuben Wait Barn with hot cider, coffee and donuts. Those that are able are invited to join us at 7:45 am for a barn raising blessing.

About the McKie Barn and Restoration: by Luke Larson

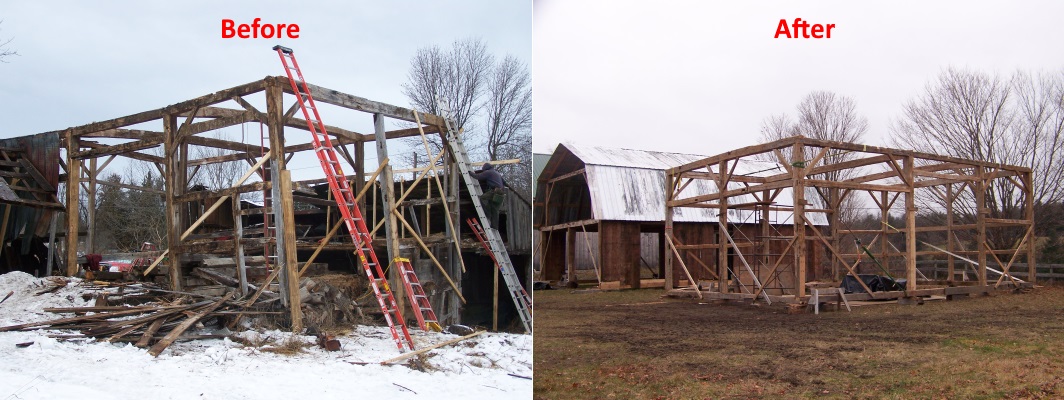
Back in July, I was contacted about a barn on a hillside farm in Cambridge, New York. It was one of five incredible barns, all of which were in serious disrepair when new owners took over the property last year. They decided they had to focus their energy and resources on saving the other barns, and generously offered this structure to us for use at our shop location.

Sheep Barn Cambridge New York

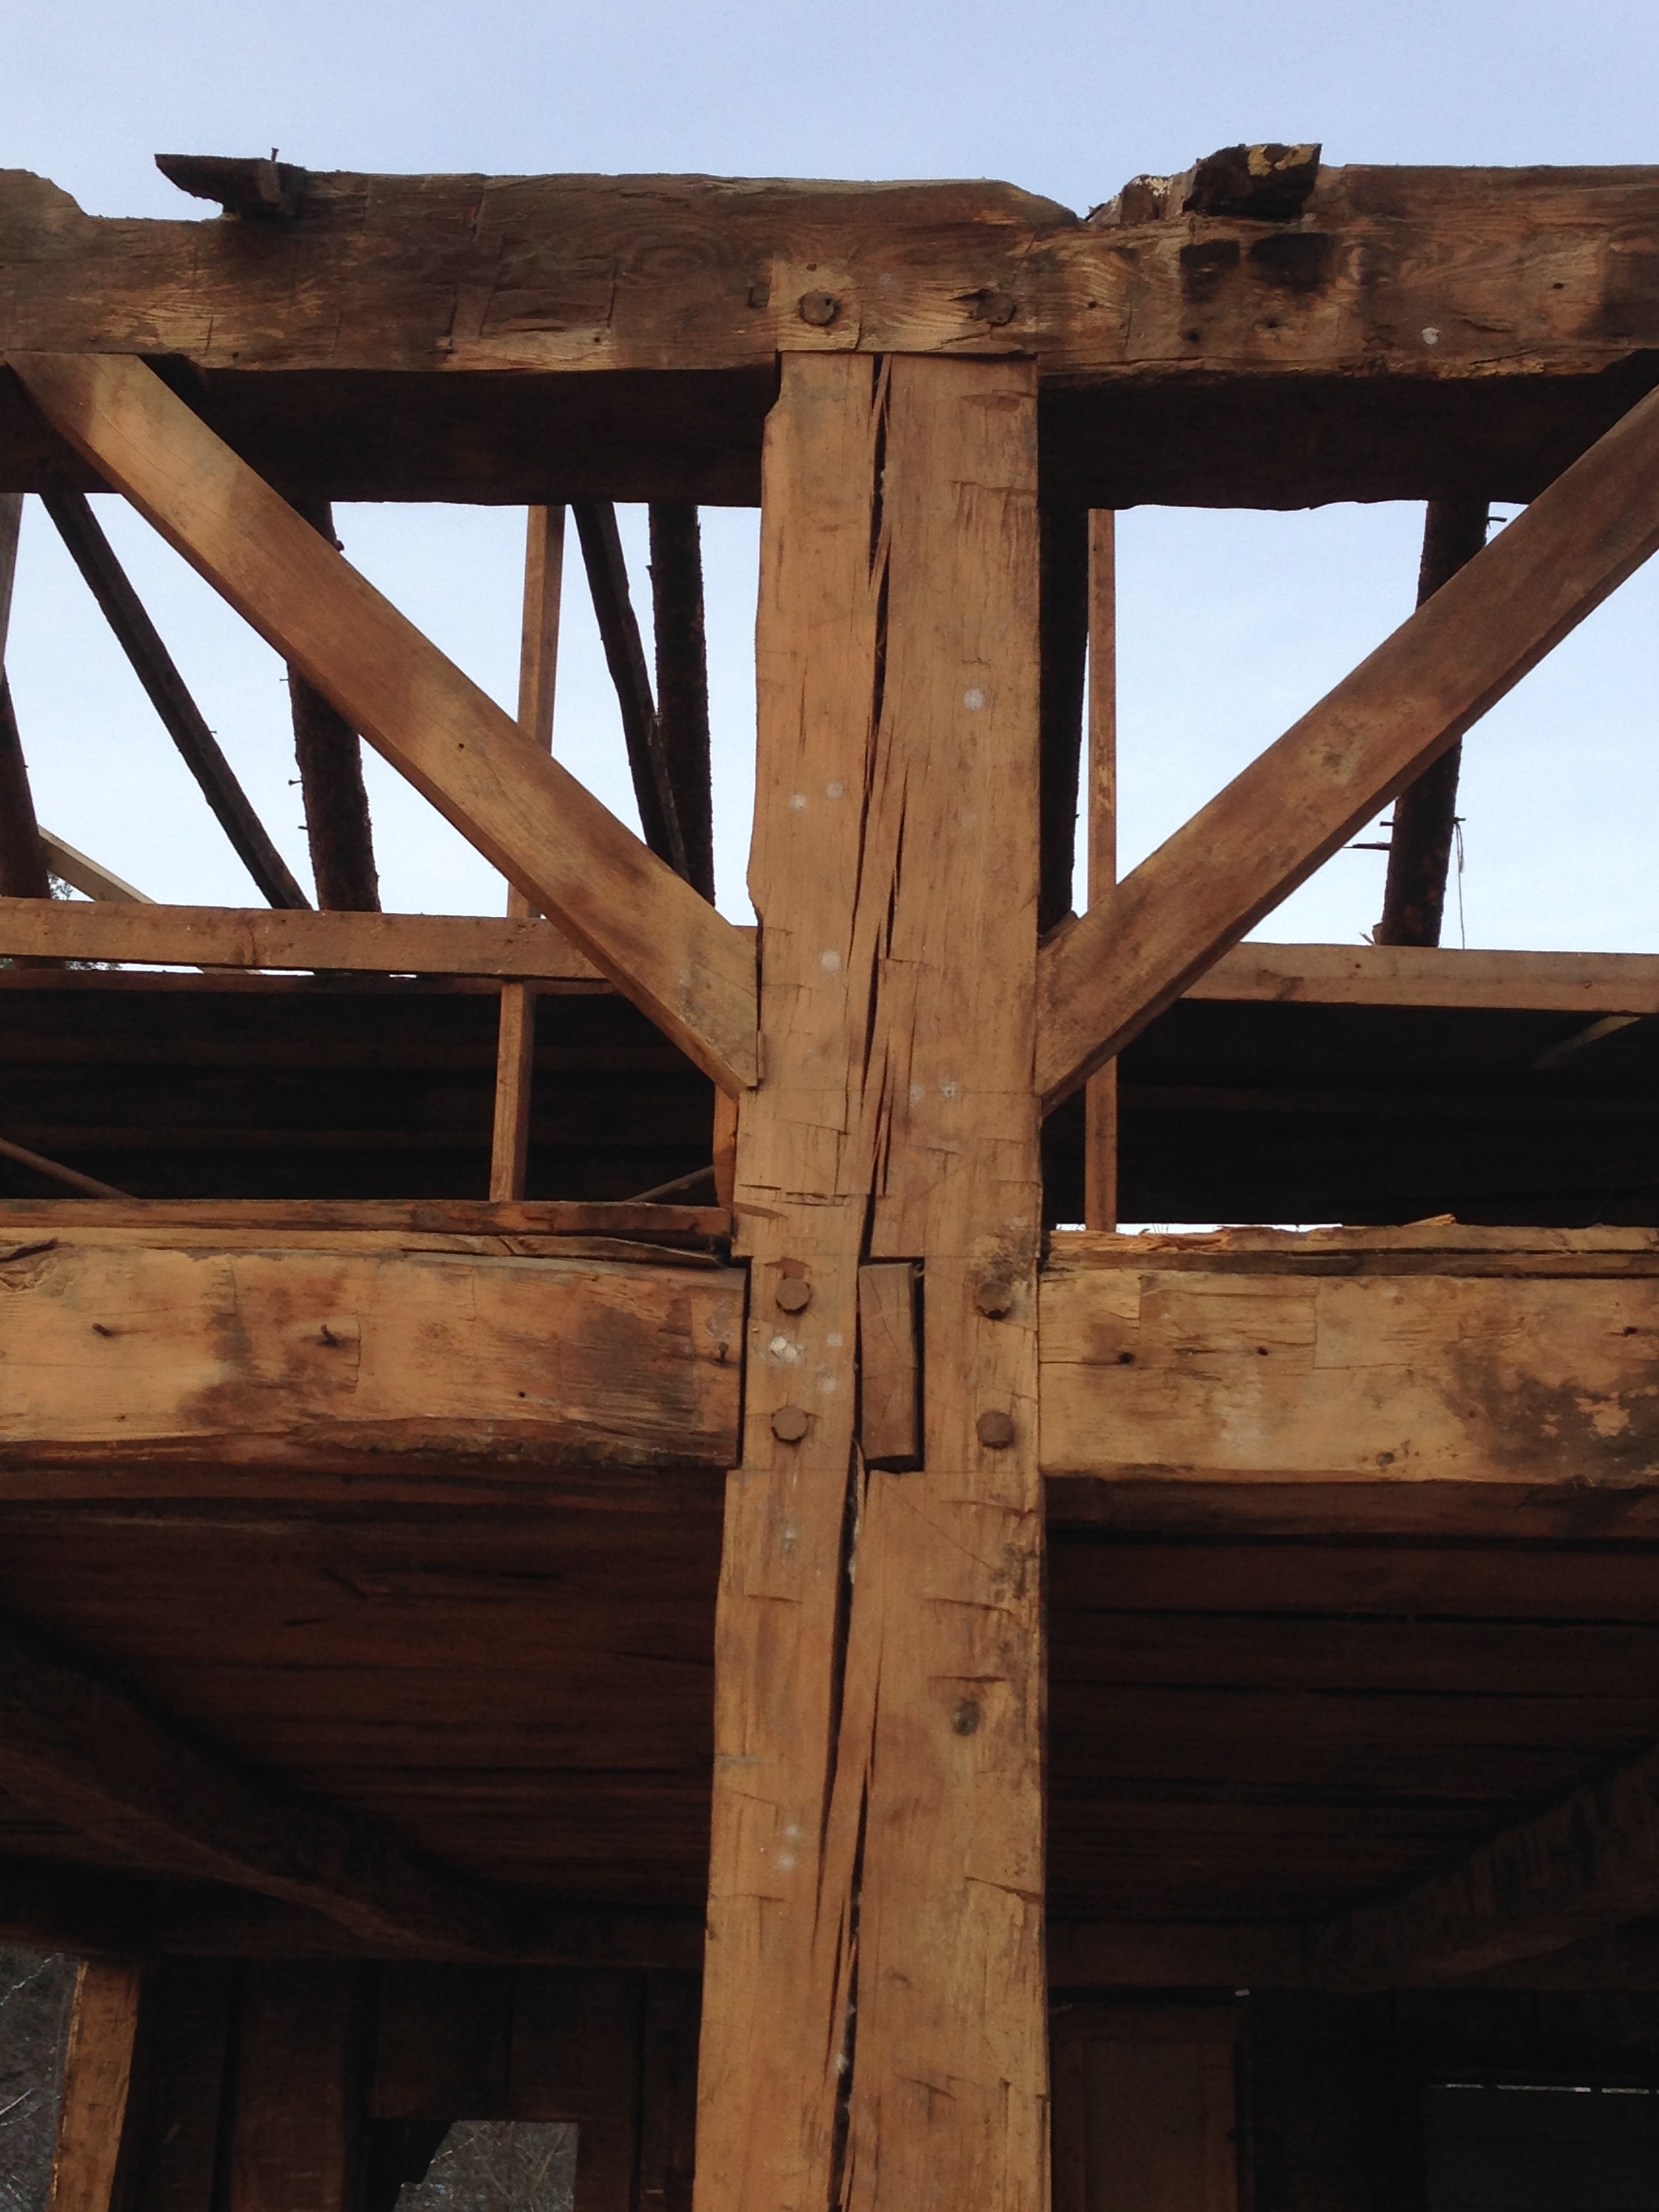
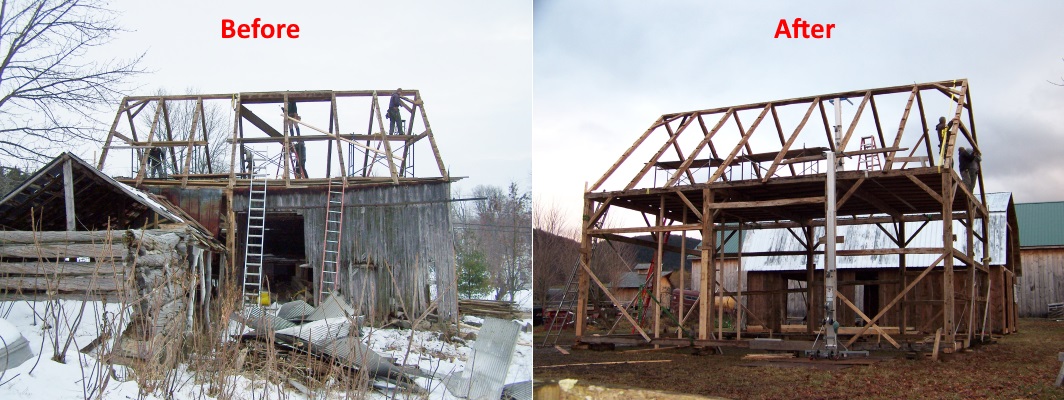
We disassembled the barn carefully in August, labeling each beam, brace, and board.

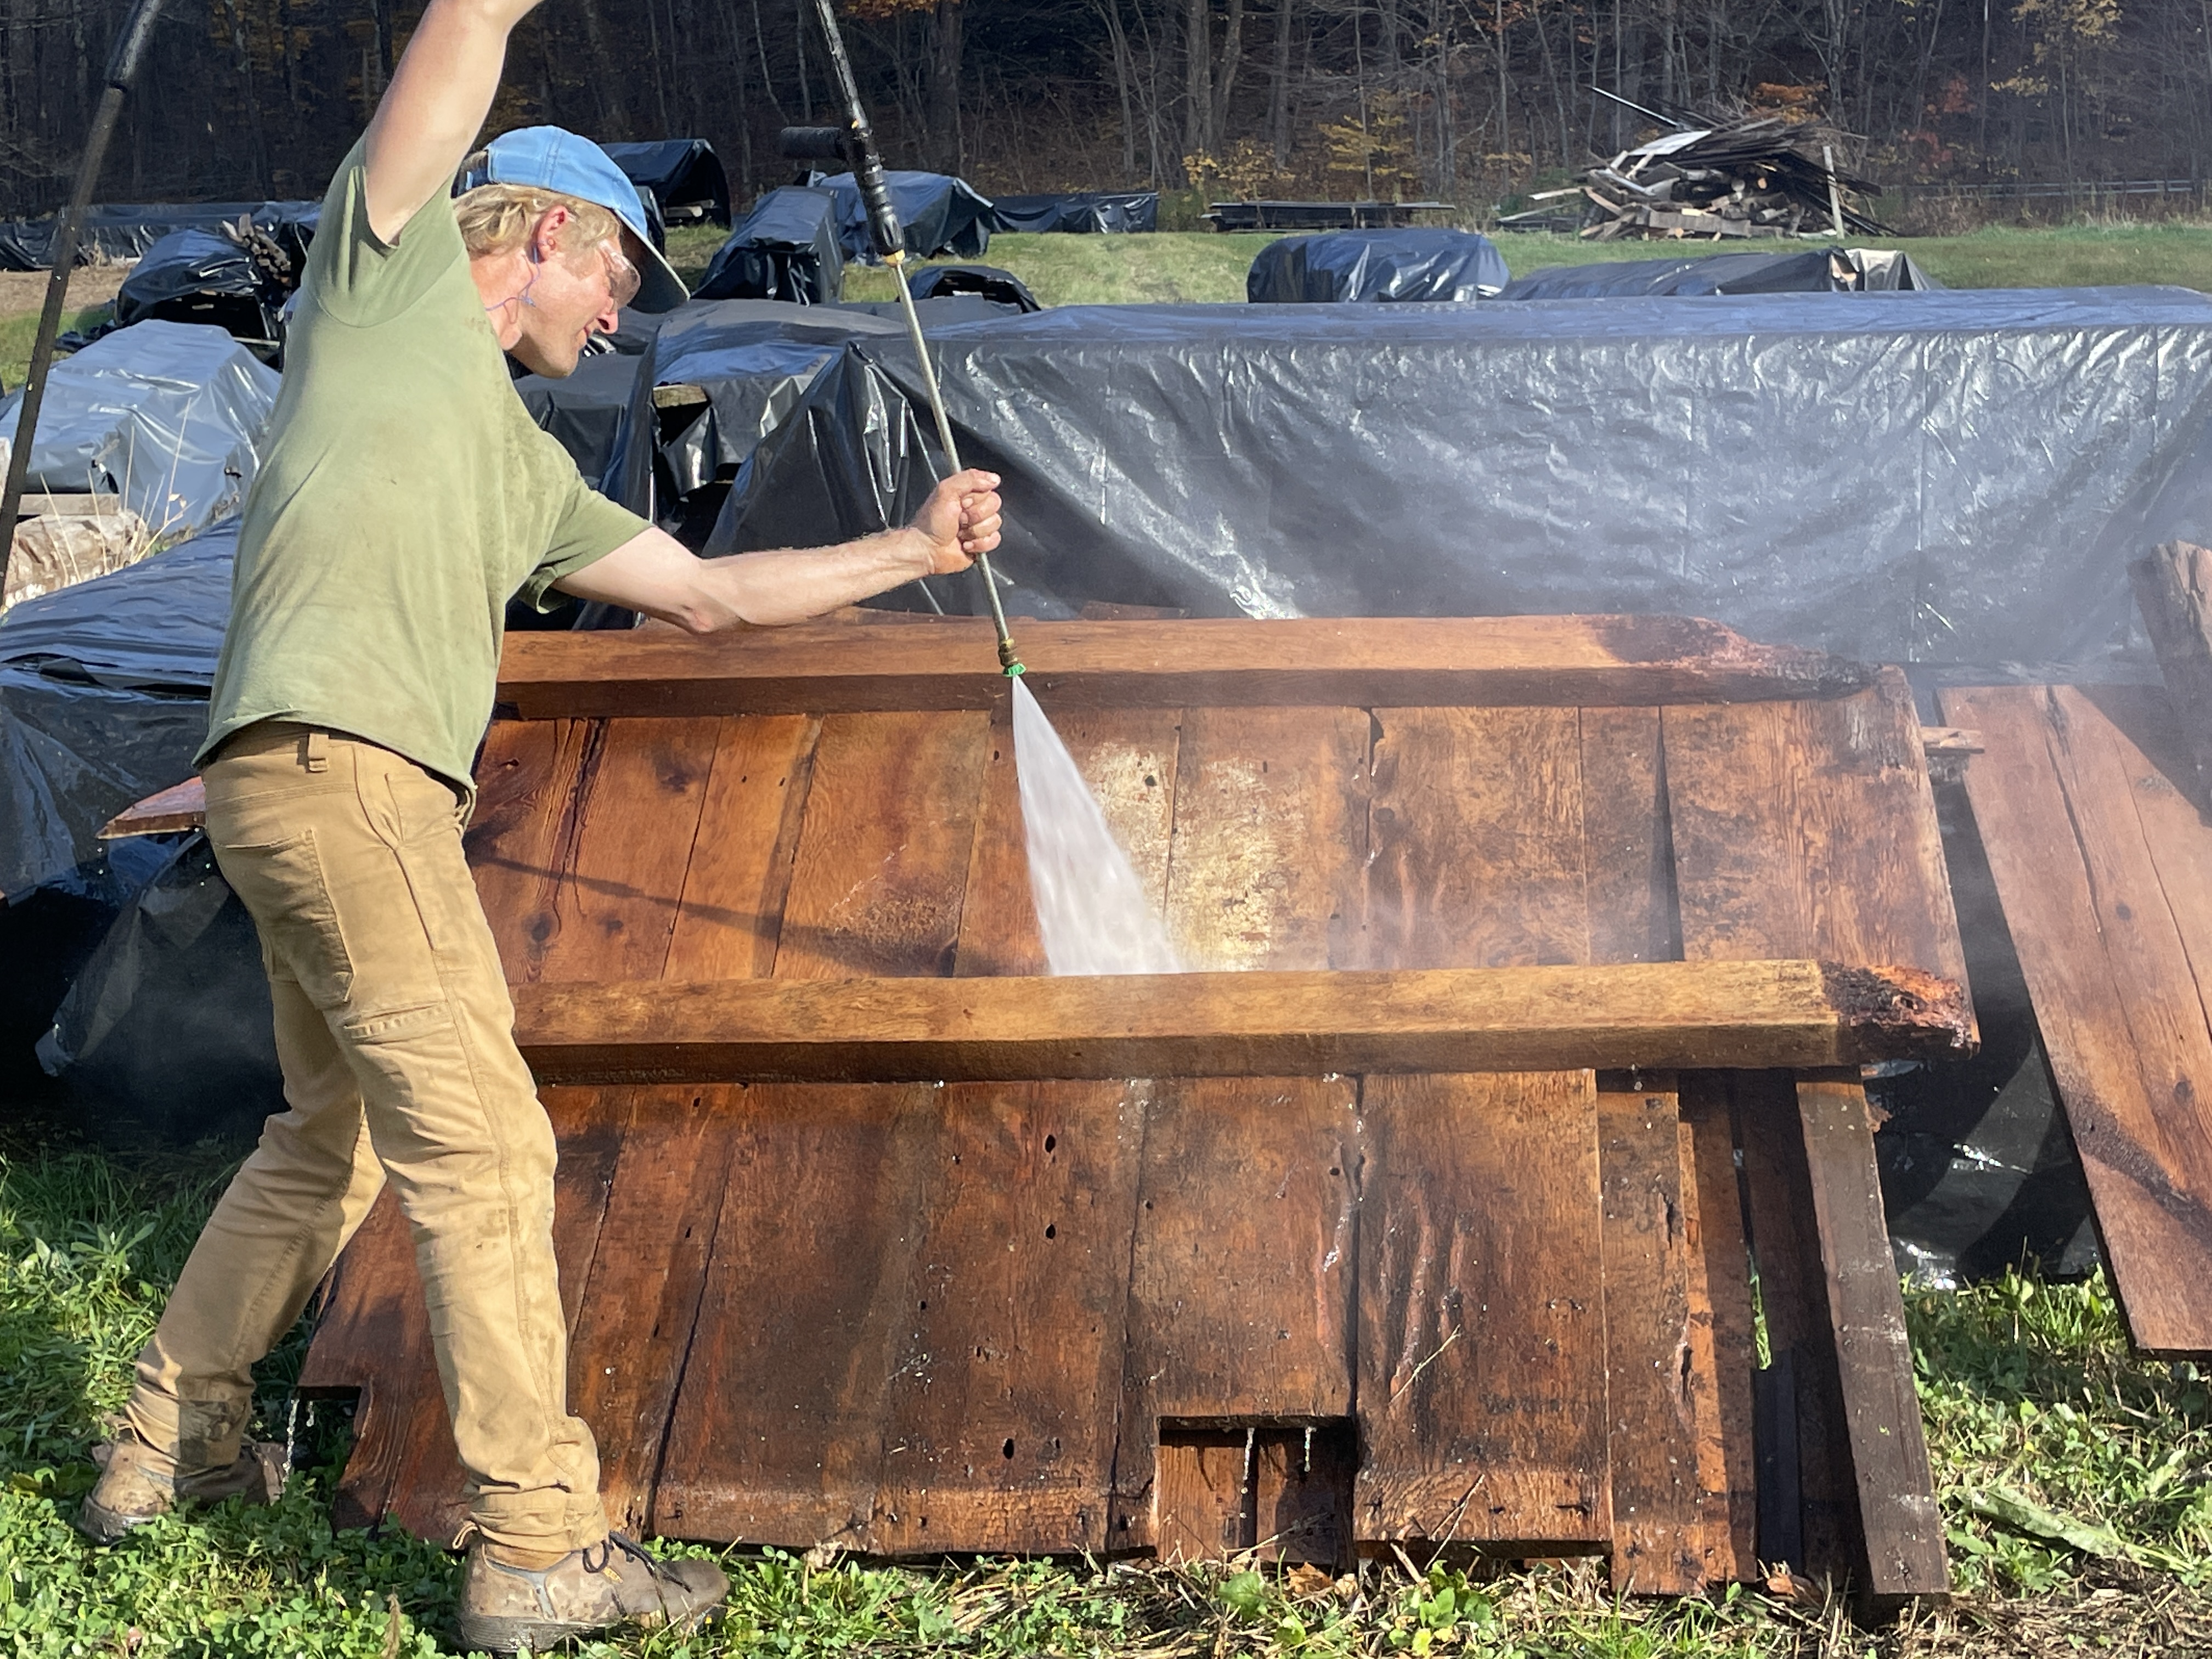
After the take down, we spent about a month carefully restoring the frame.

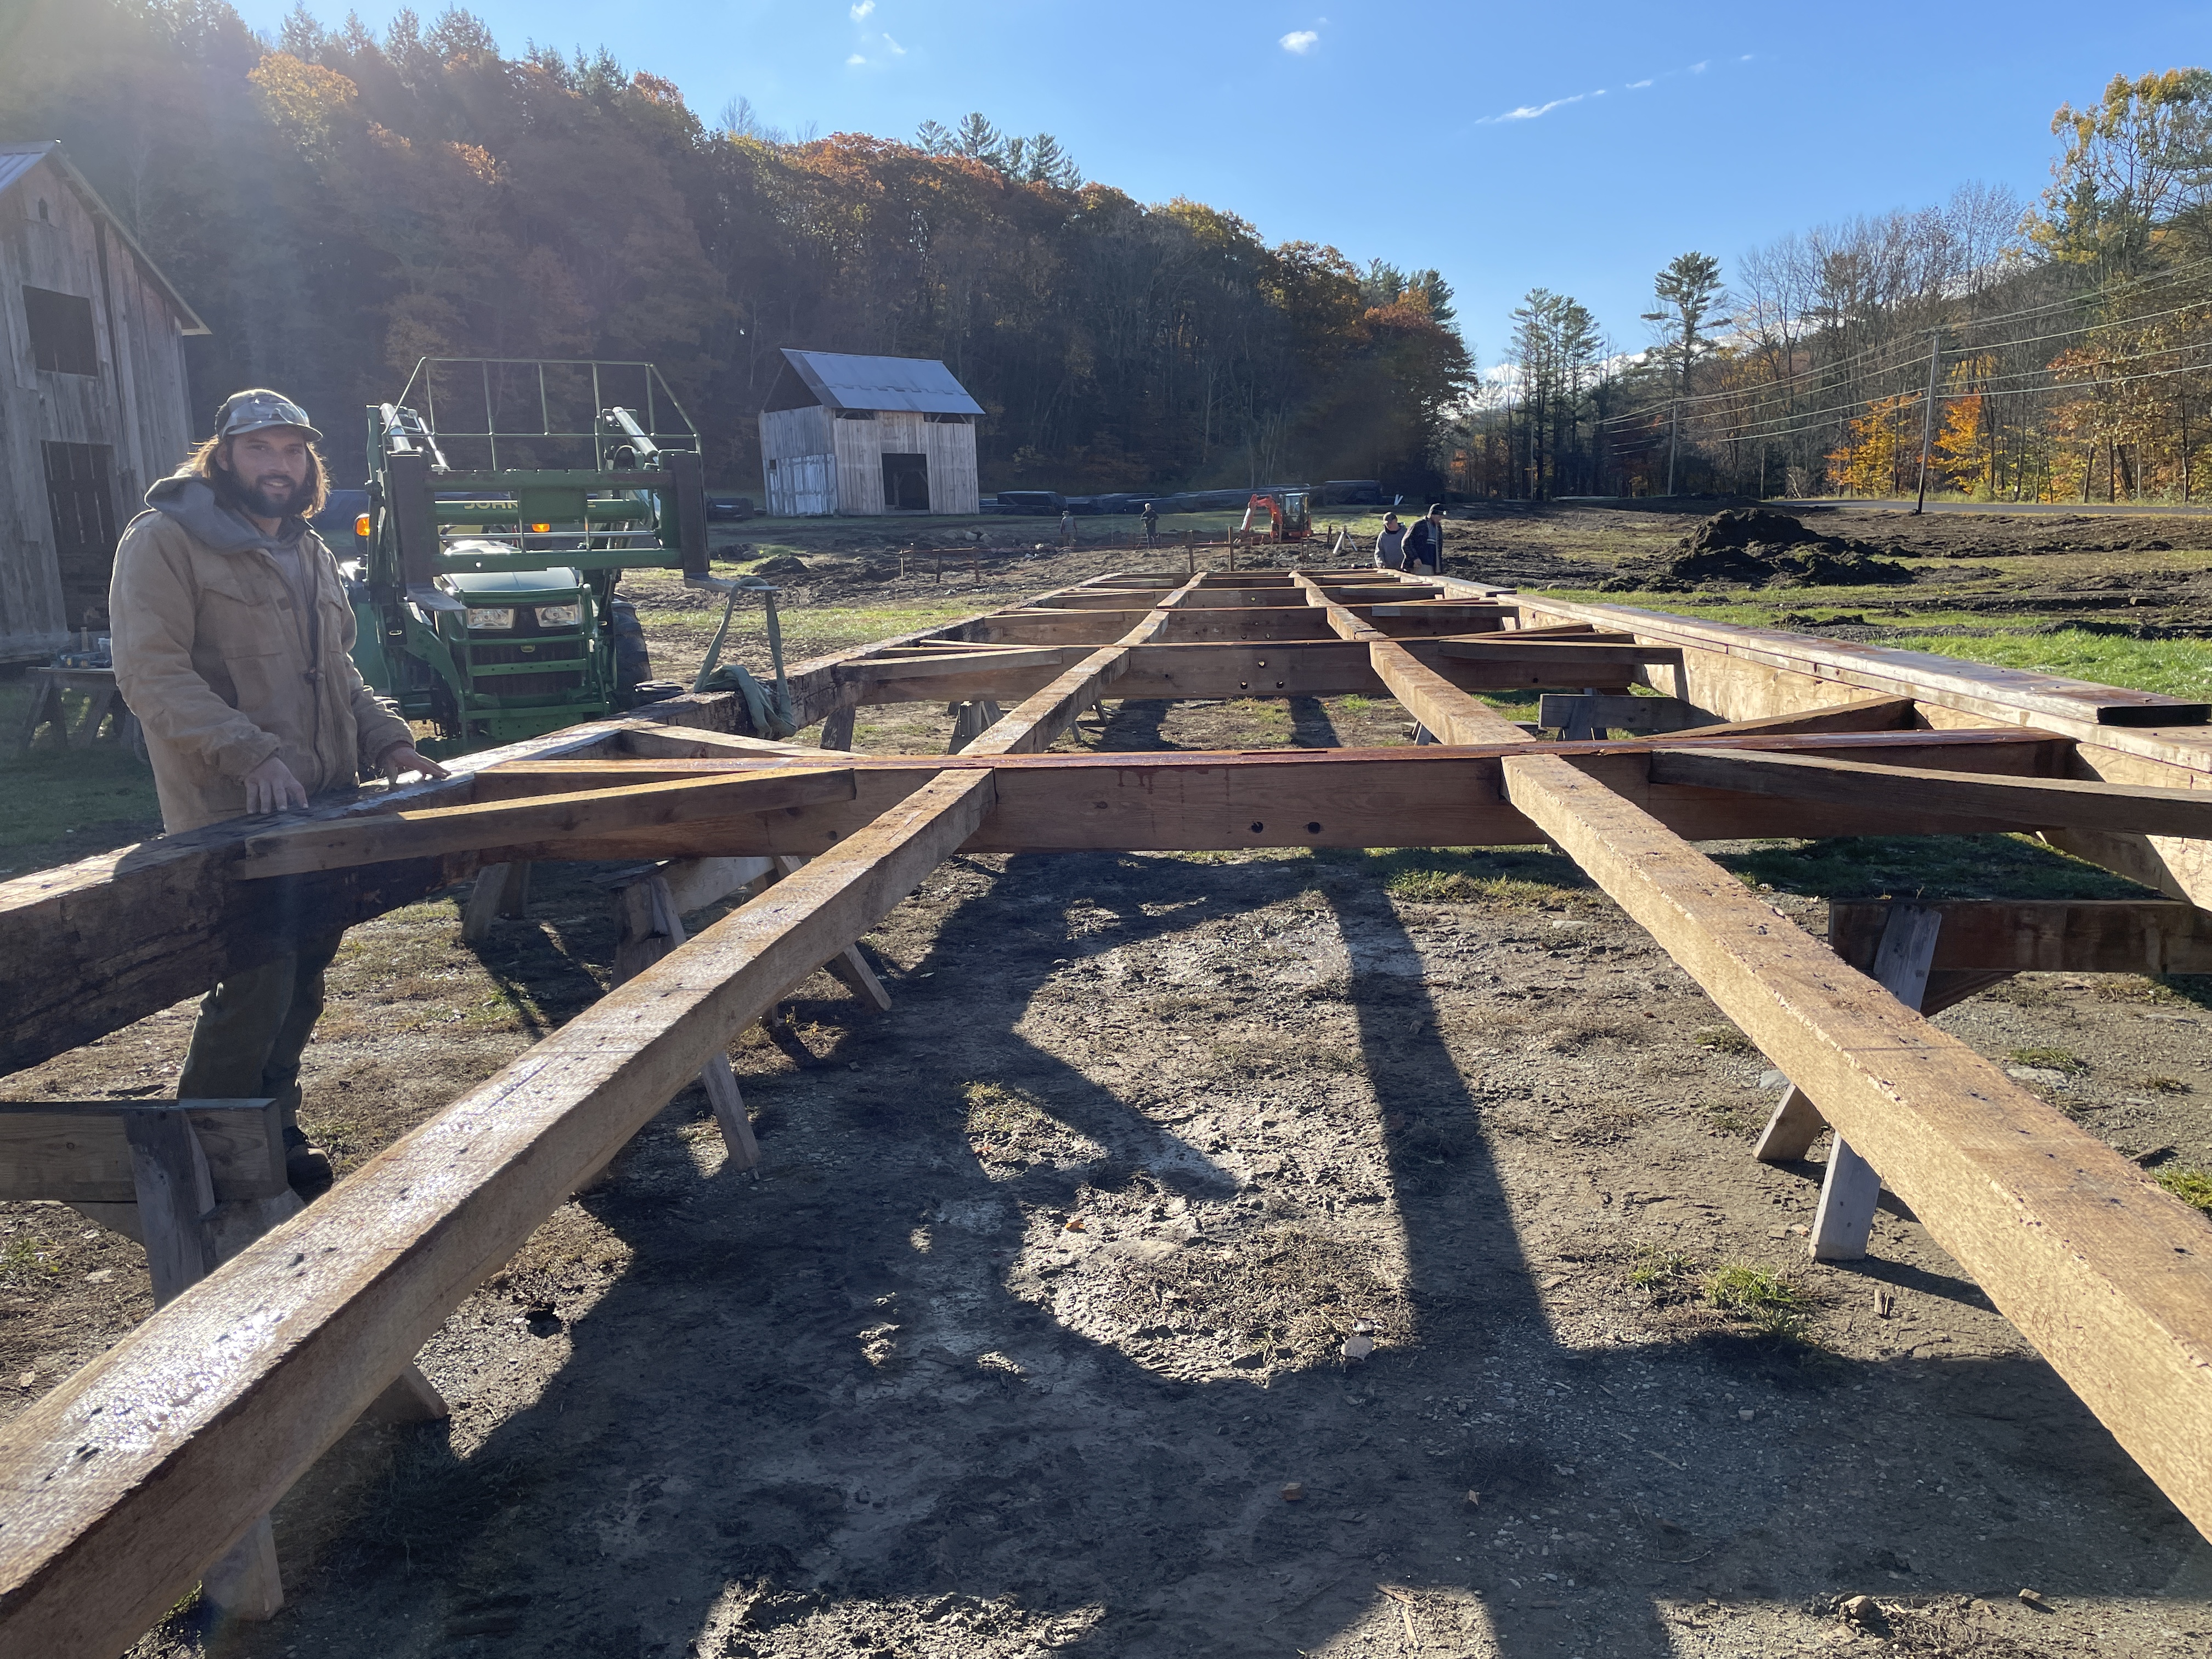
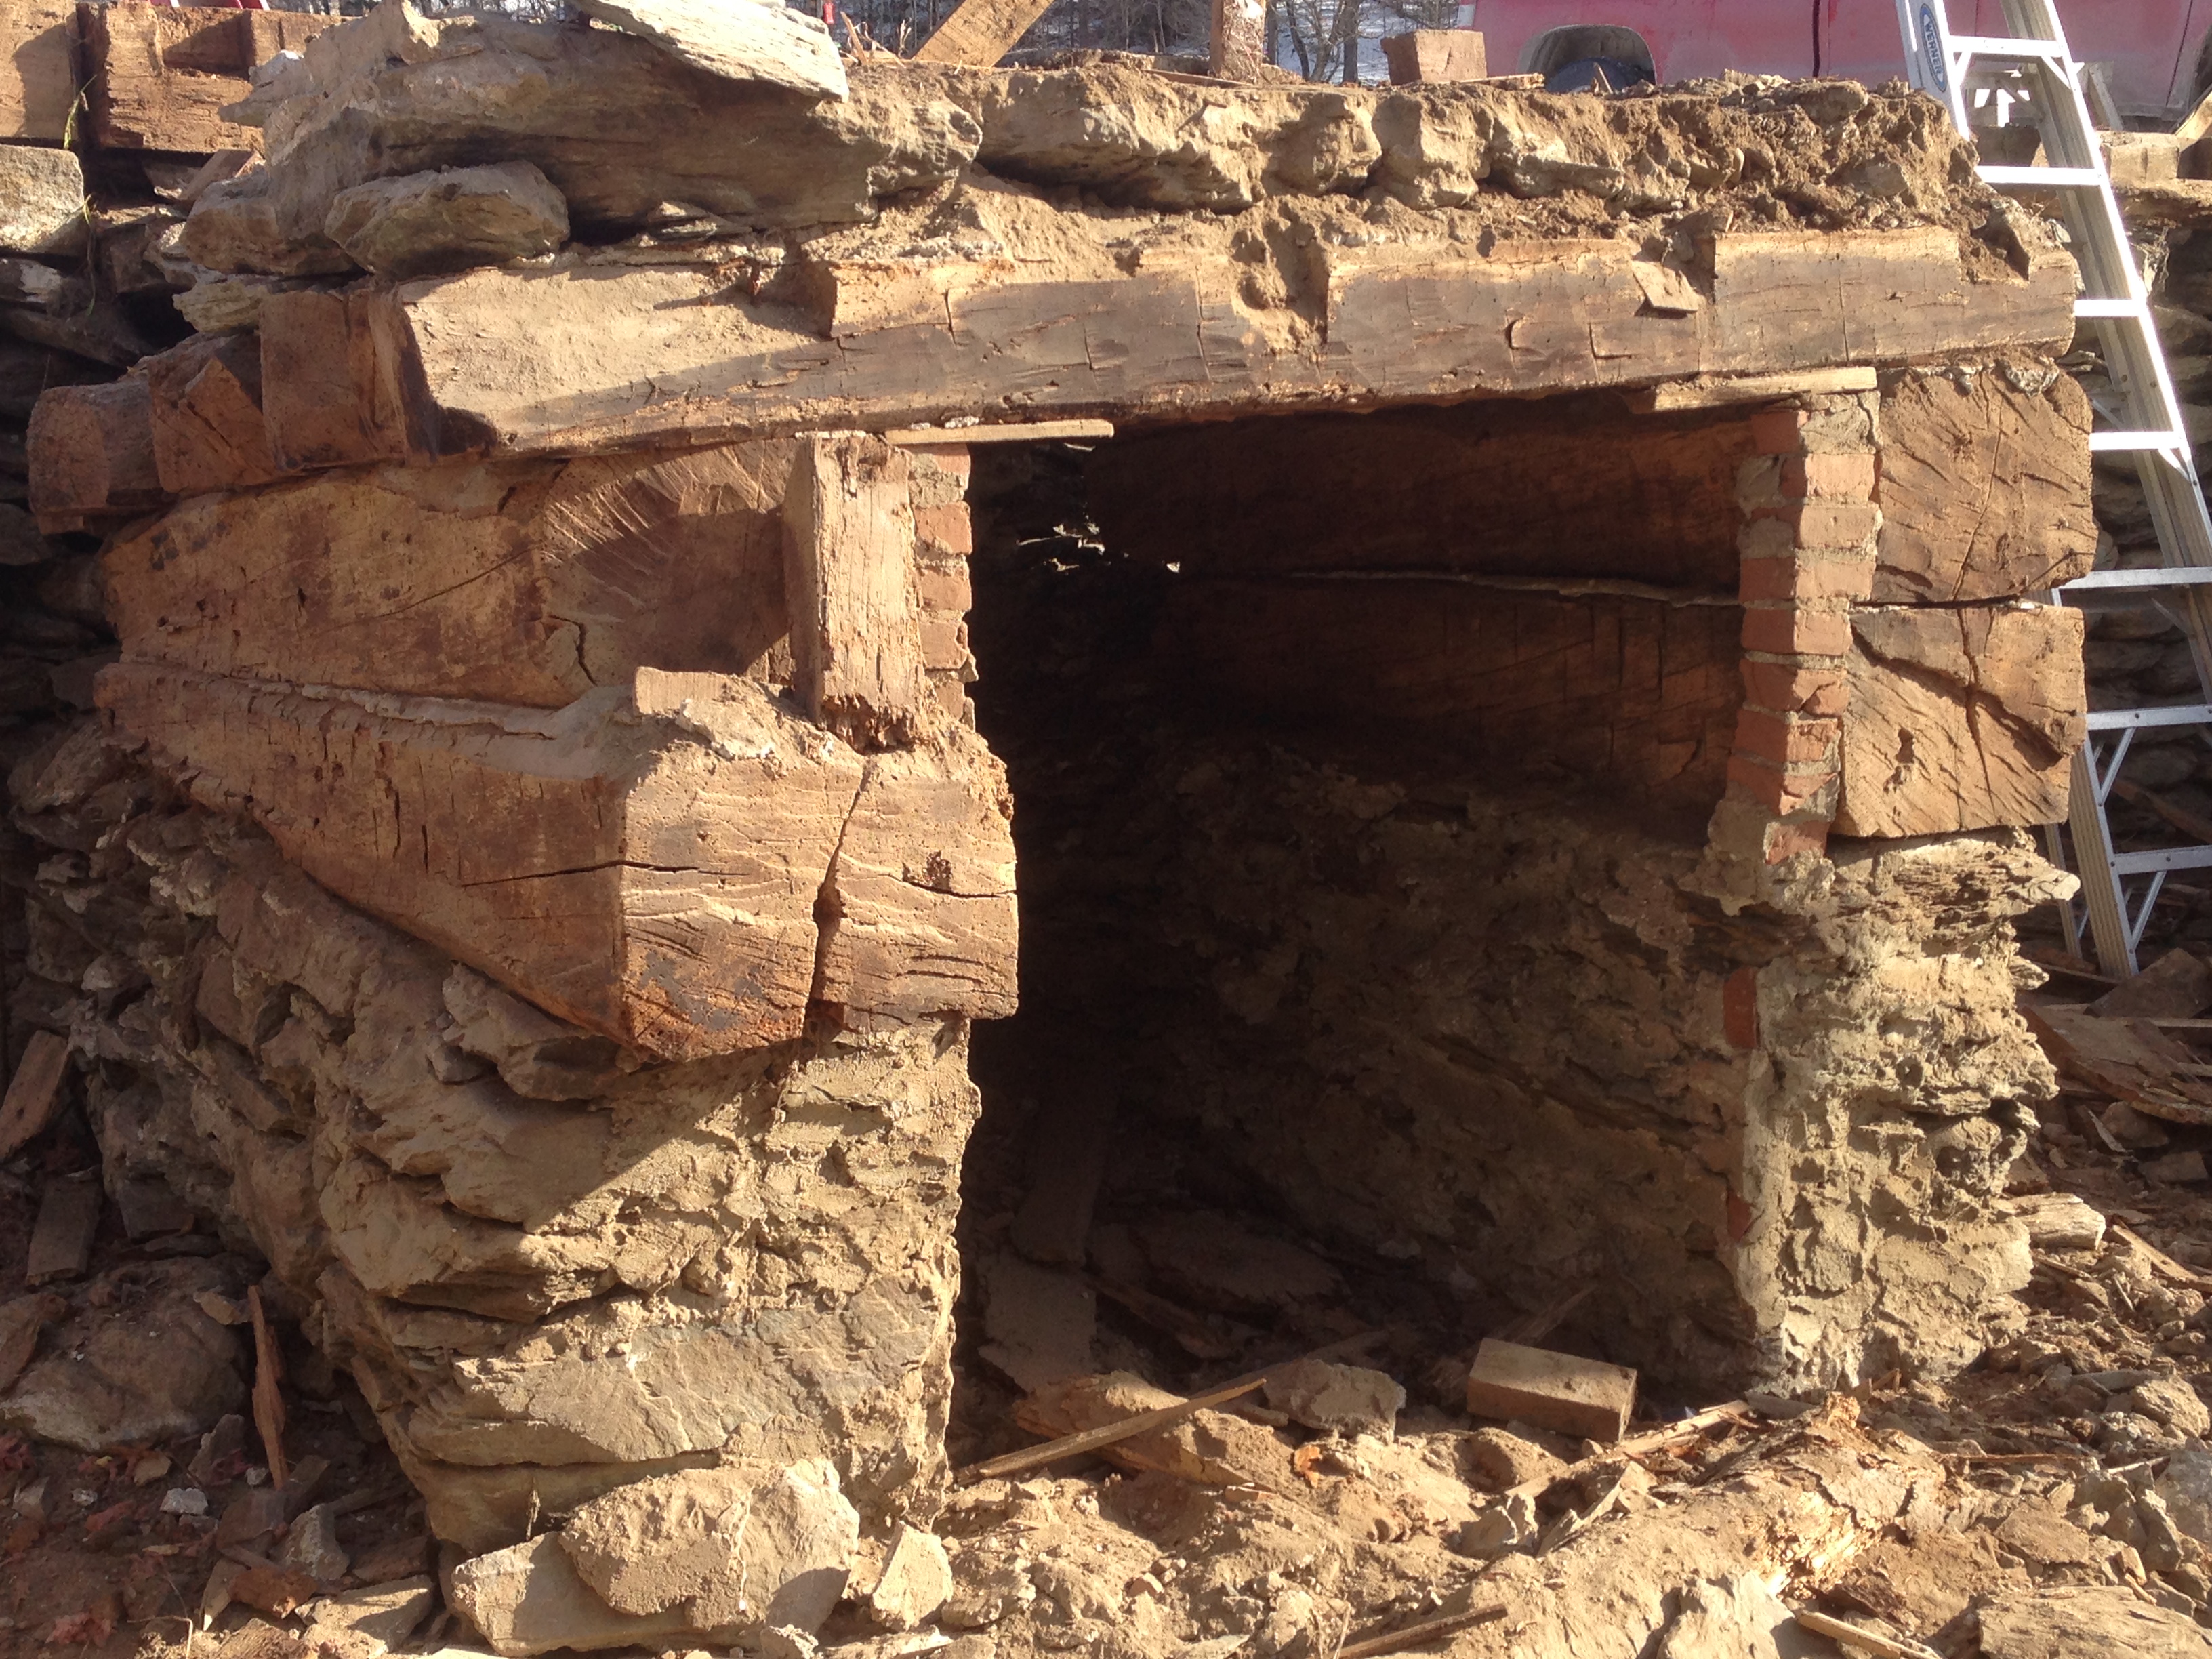
Next, we needed a foundation upon which to place this barn. I was grateful that our use of this barn allowed us to match the original one. I called my friends Ethan and Jeb at Vermont Landscaping and Stonework, and they were up for the challenge!

Using stone from our shop property, they created a dry laid rock foundation, and it is beautiful.

We installed the sills during one of the first Vermont snow squalls of the season!

While the foundation was being crafted, and the barn restored and washed, we have been able to learn some details about the farm in Cambridge and the family that built the barn. Our first resource has been “The Family Letters: A Portrait of an American Family Though Letters From the 18th and 20th Century” edited by John T. B. Mudge. We are excited to dive deeper into the history.

John McKie was born in Bargaly Glen, Scotland, in 1705. At the age of sixty-two, he emigrated to America with his teenage sons and settled in the hills near Cambridge, reportedly because the hilly landscape reminded him of Scotland. James, one of his sons, joined the revolutionaries and had a daring escape from the British at Skenesboro near the south end of Lake Champlain. James was one of just thirteen soldiers left for a time to man the garrison which came under attack while reinforcements were on the way. He jumped into the Wood Creek and swam underwater to a clump of branches and ice, where he hid in the frigid water until the British withdrew.

Two year later, at the age of twenty-two, James took over management of the family farm when his father John died. We expect that it was James who oversaw the construction of the eighty foot, seven bent barn, sometime in the first decades of the 1800s.

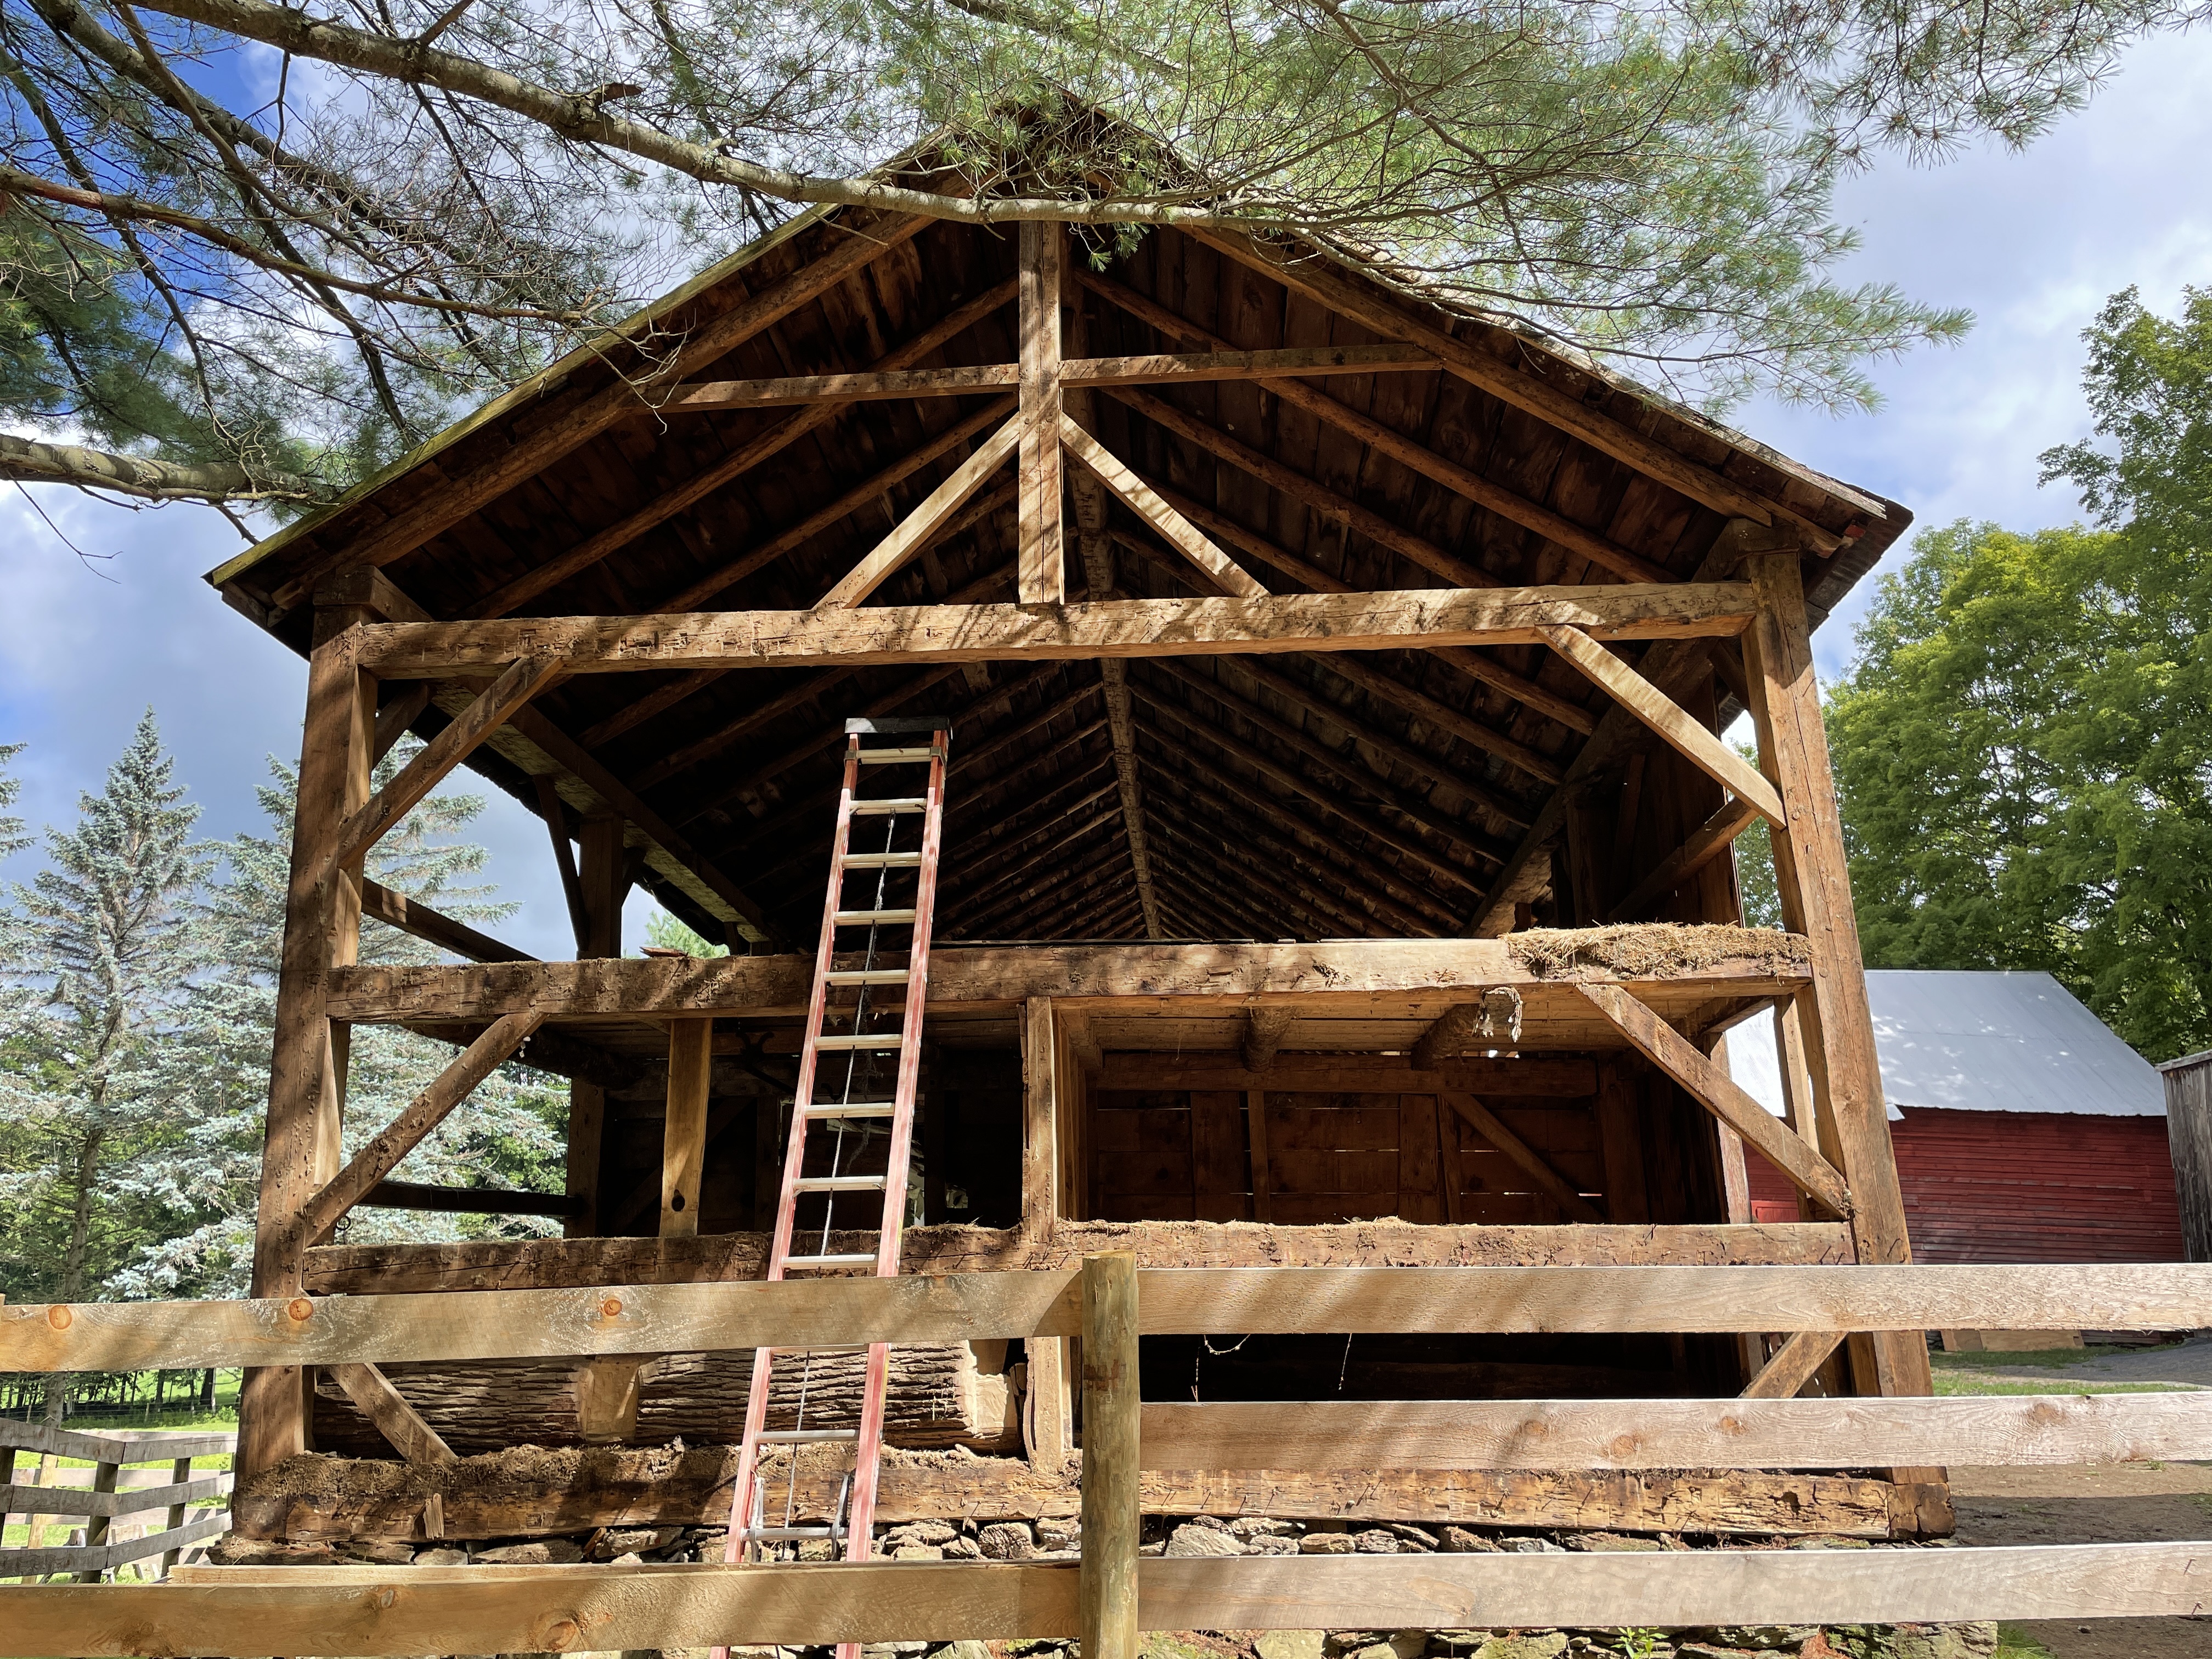
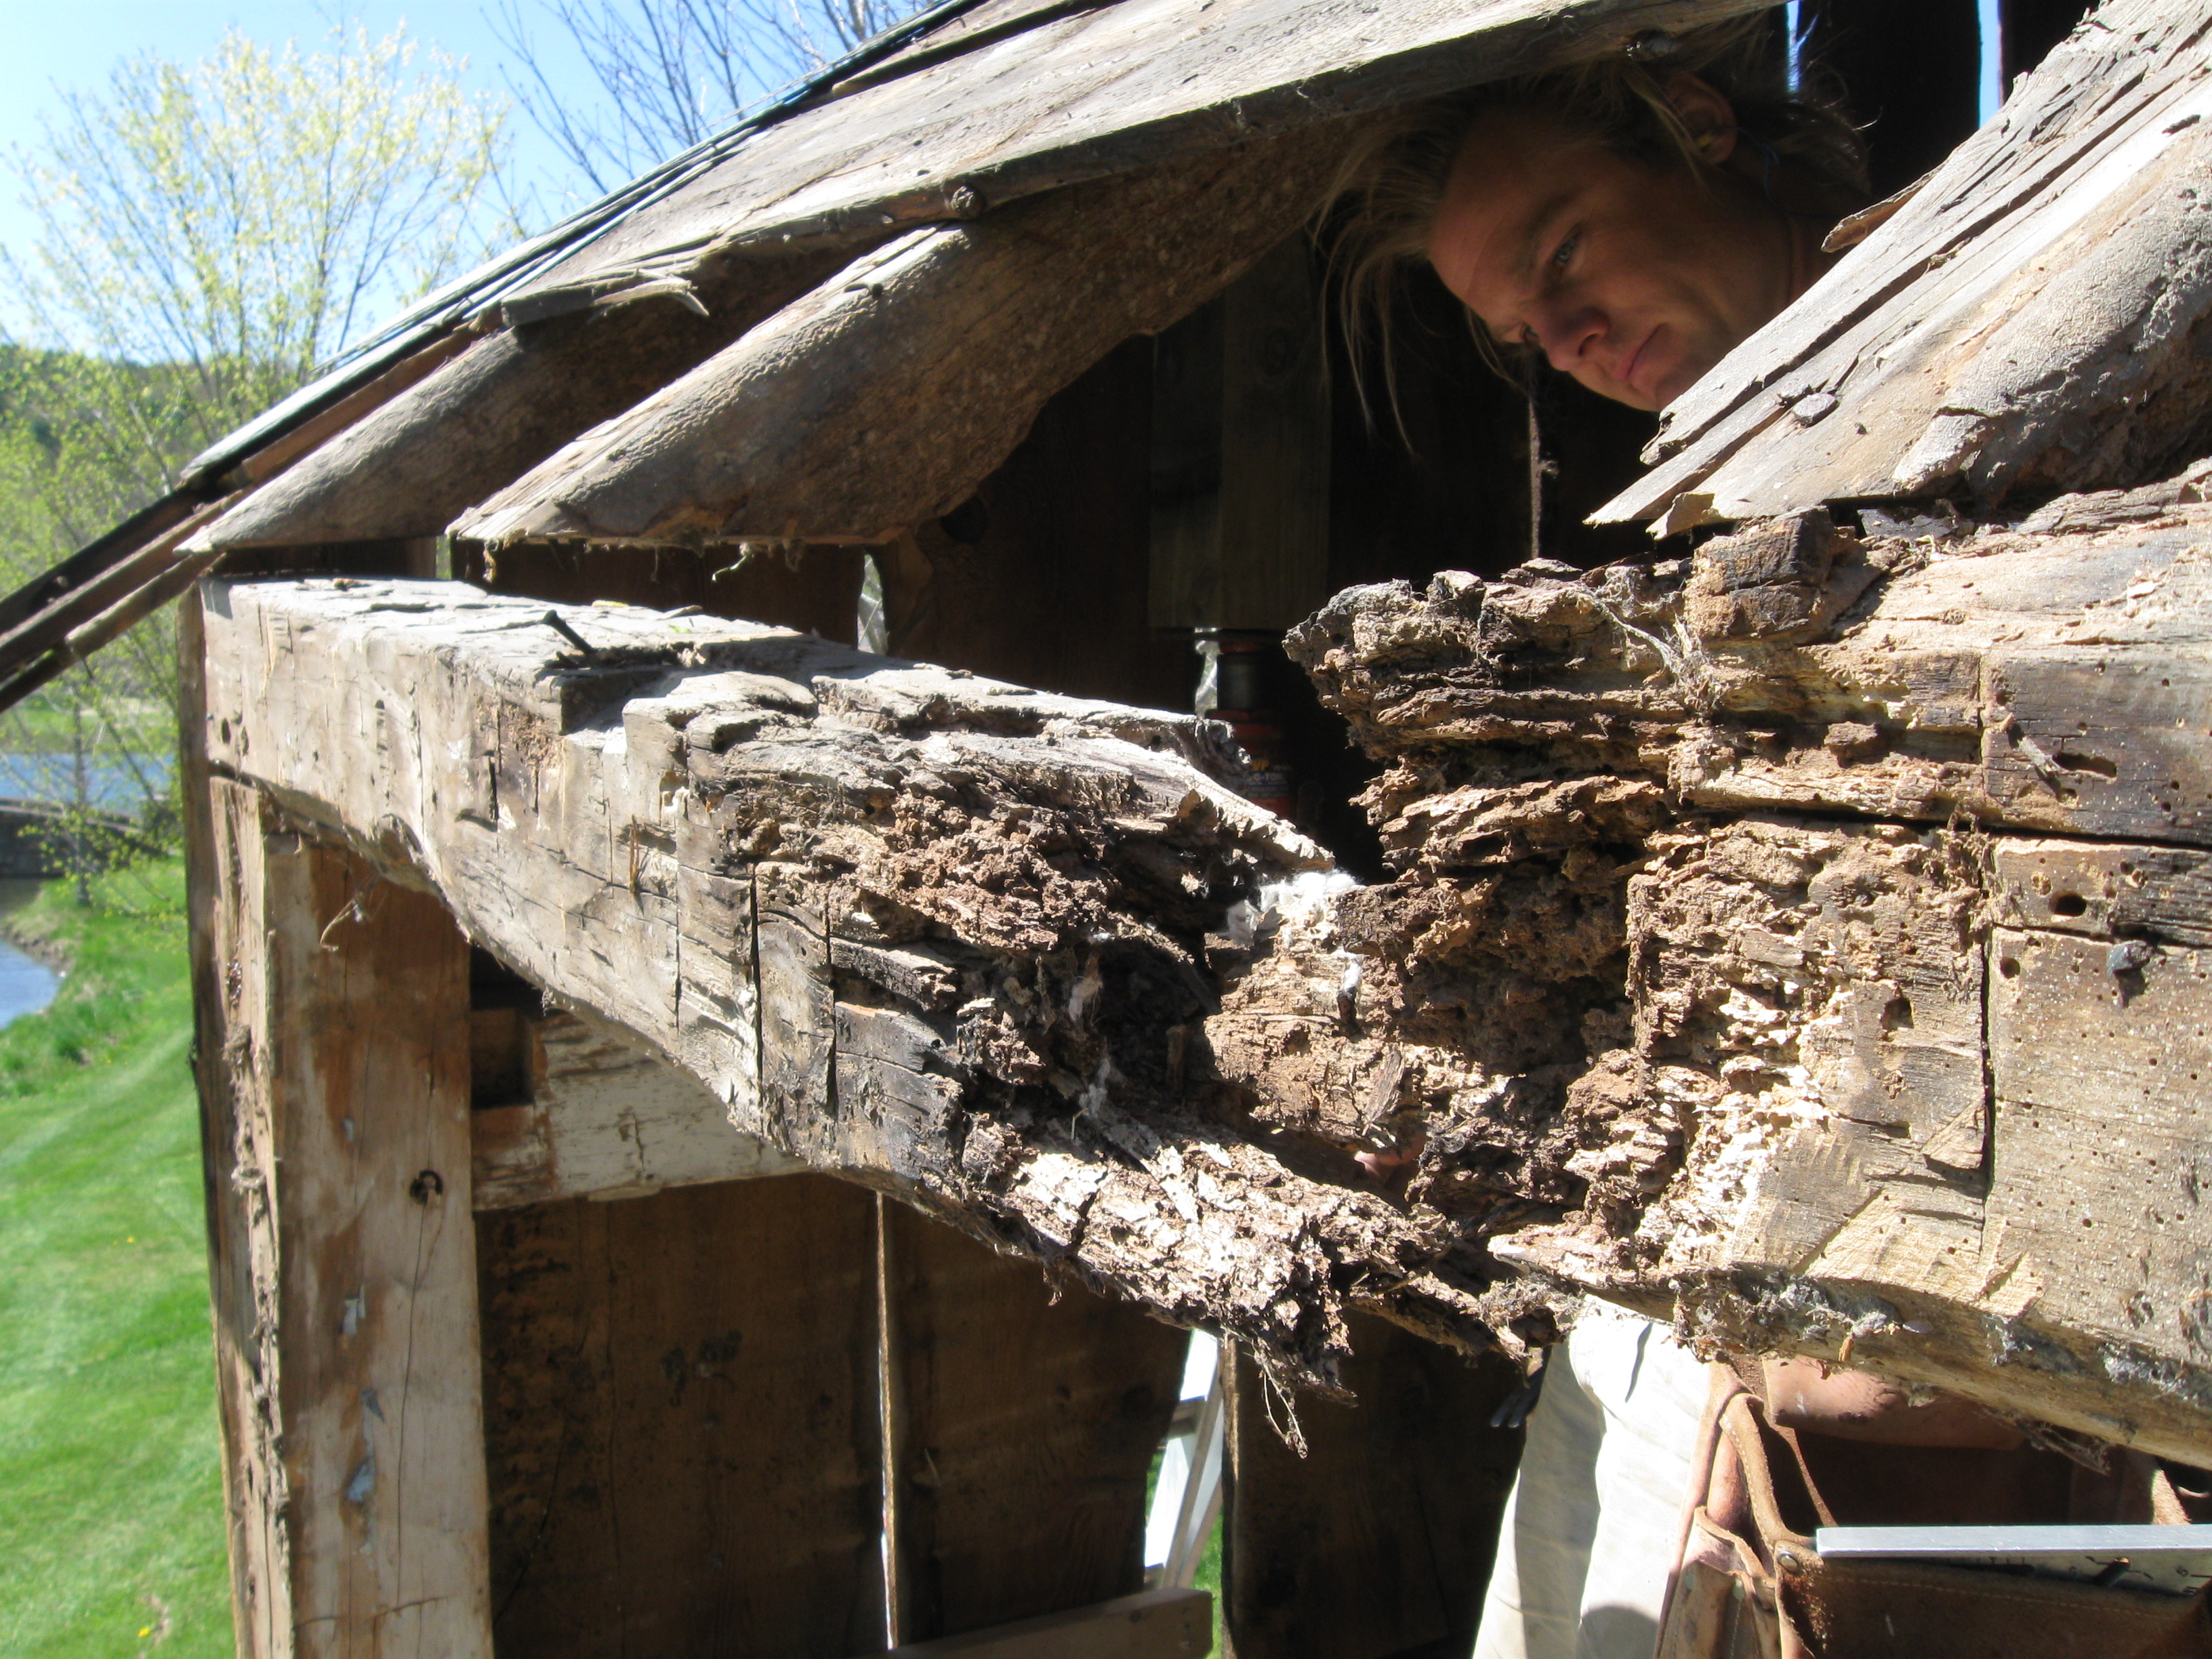
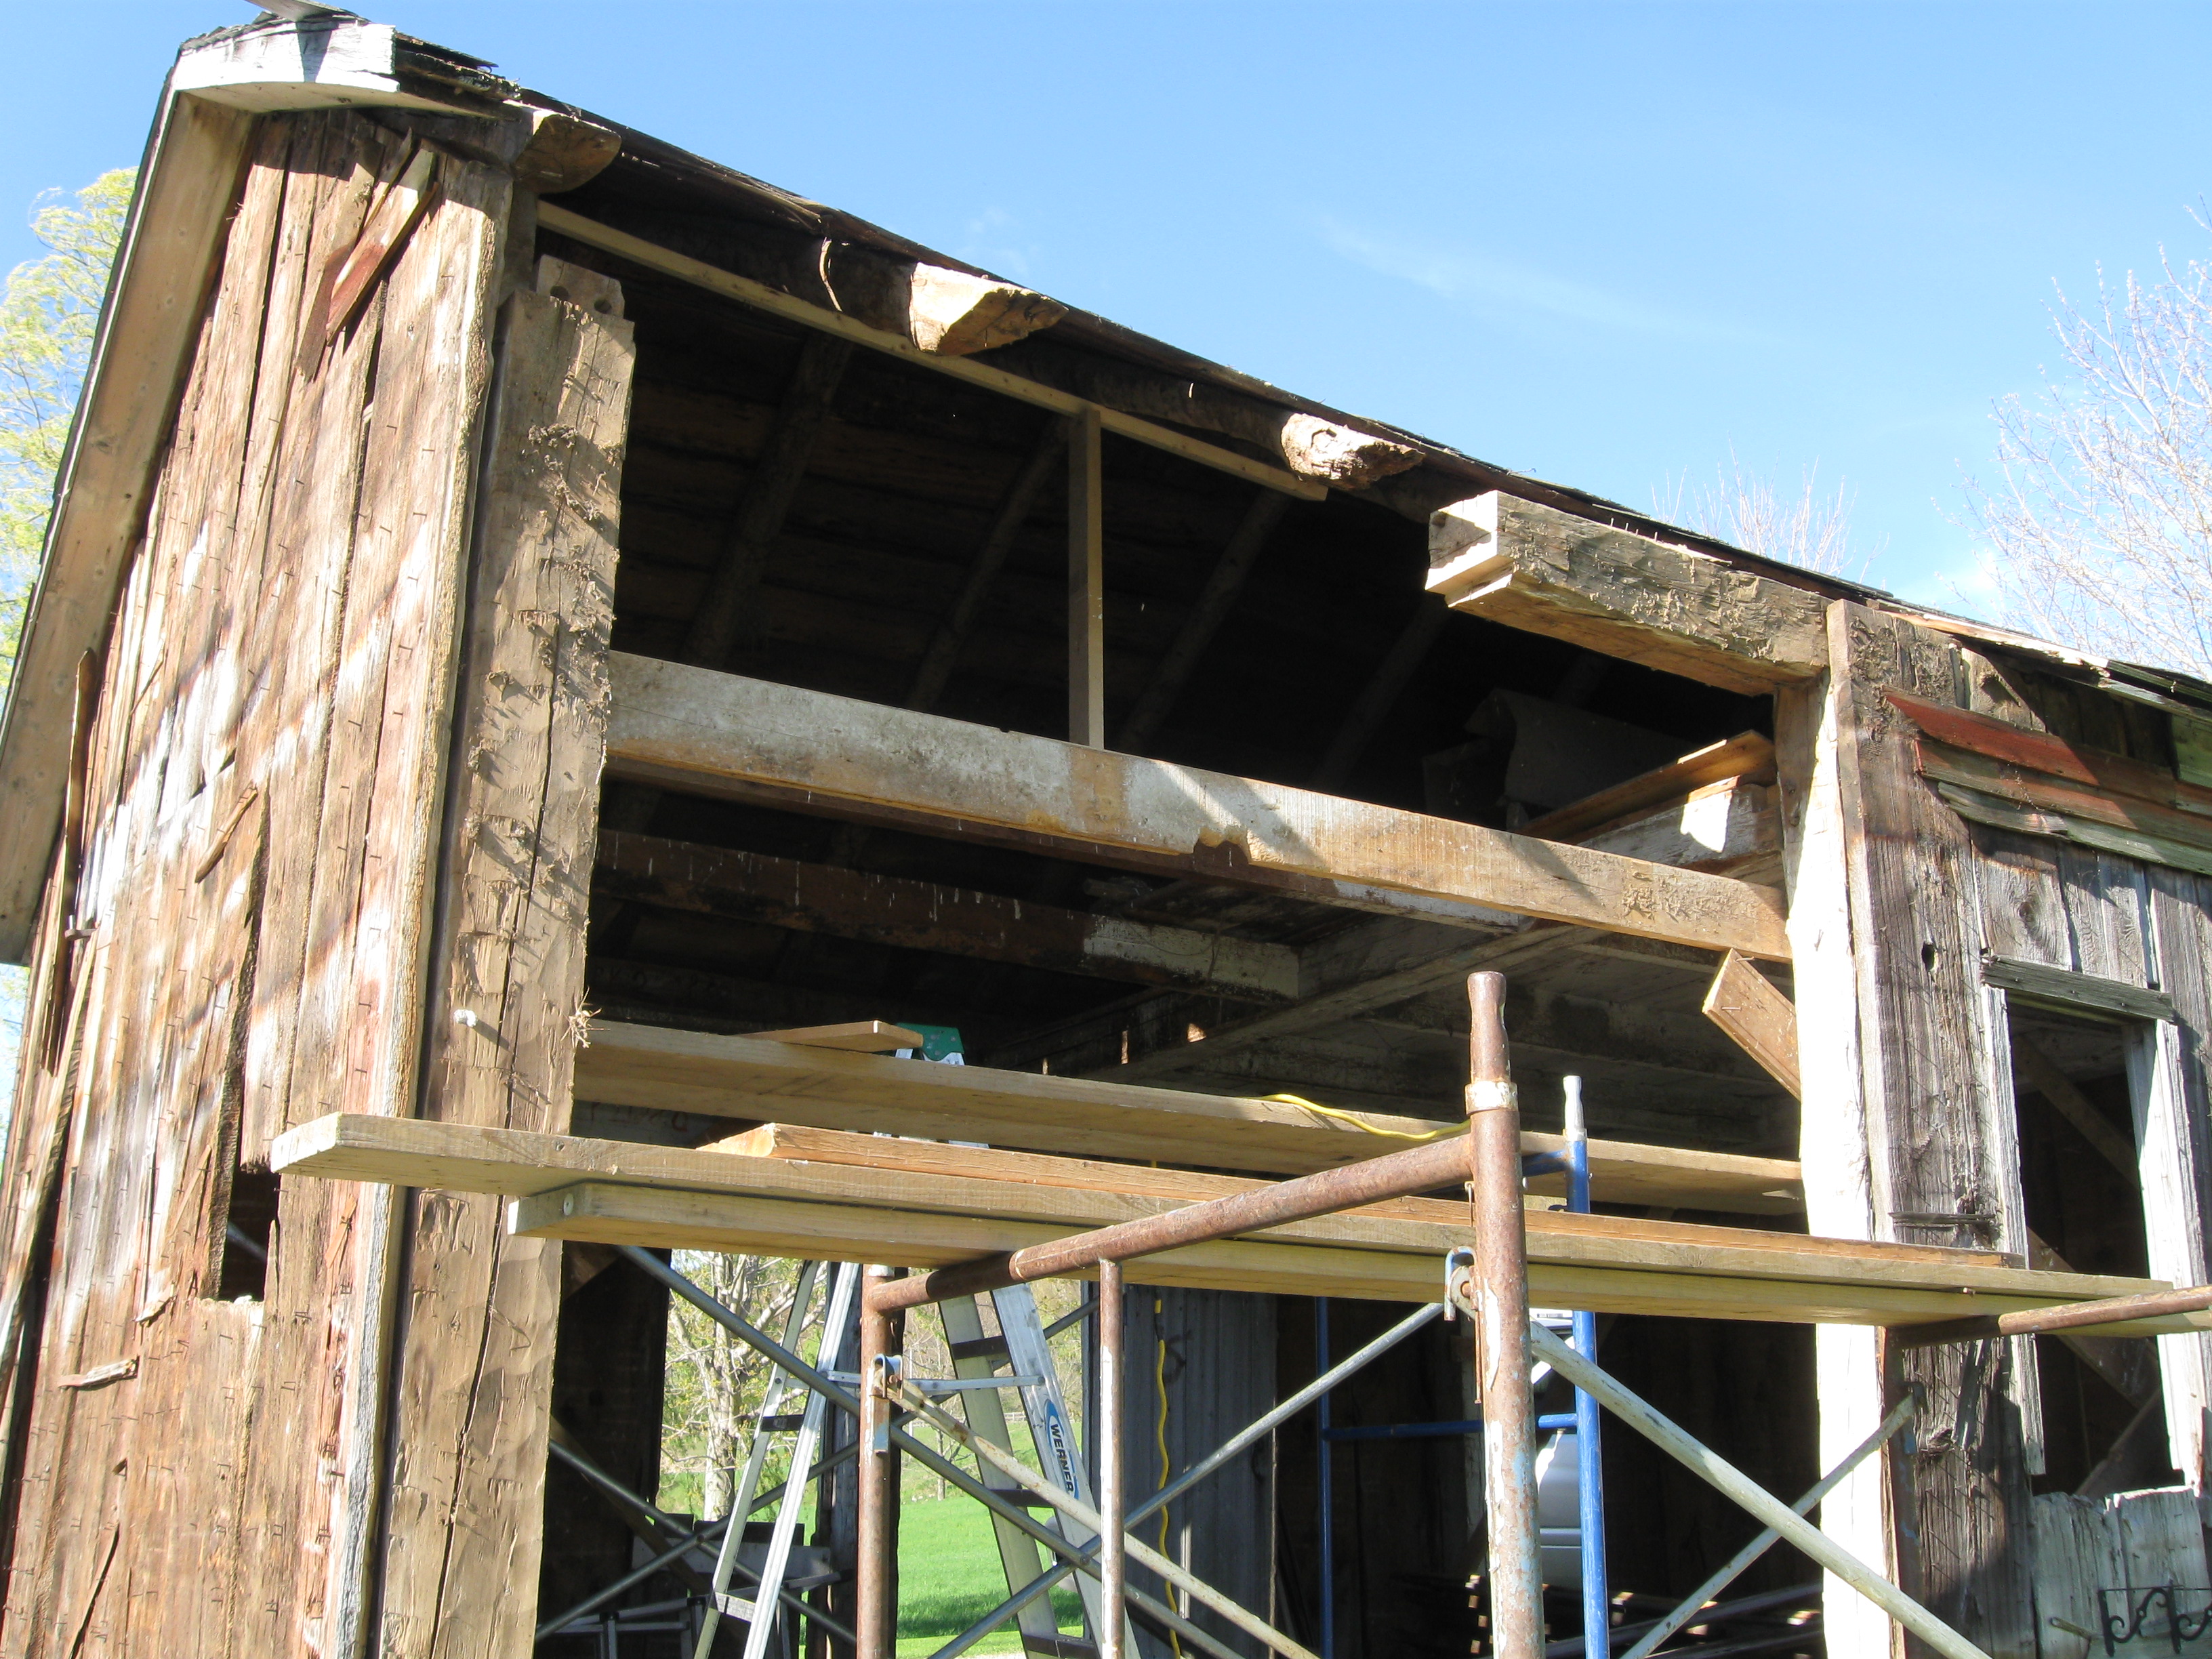
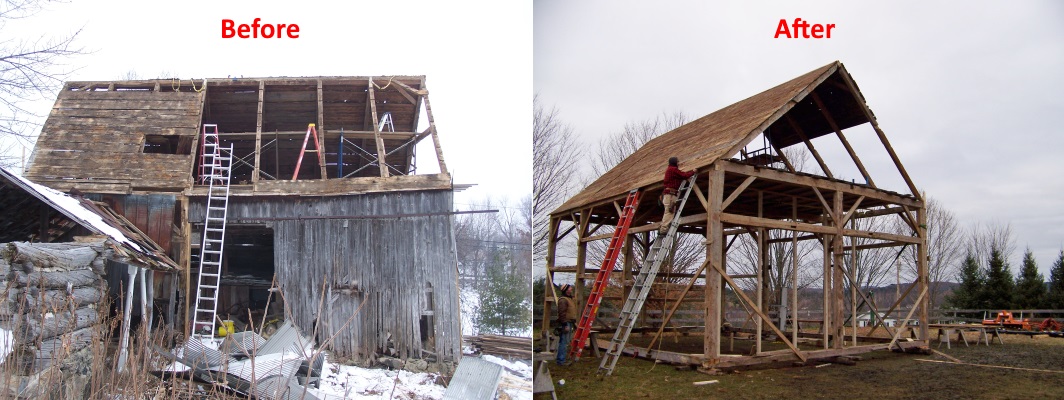
This barn was built to house sheep, a flock which no doubt the Scottish family was well accustomed to when the wool industry boomed in the first half of that century. There were four run-in bays with low ceilings and a continuous wooden hay rack in the back. At each end, an enclosed lambing bay had wooden water troughs. We will be restoring one lambing room back as close to original as possible, complete with replicating this rotten wooden water trough.

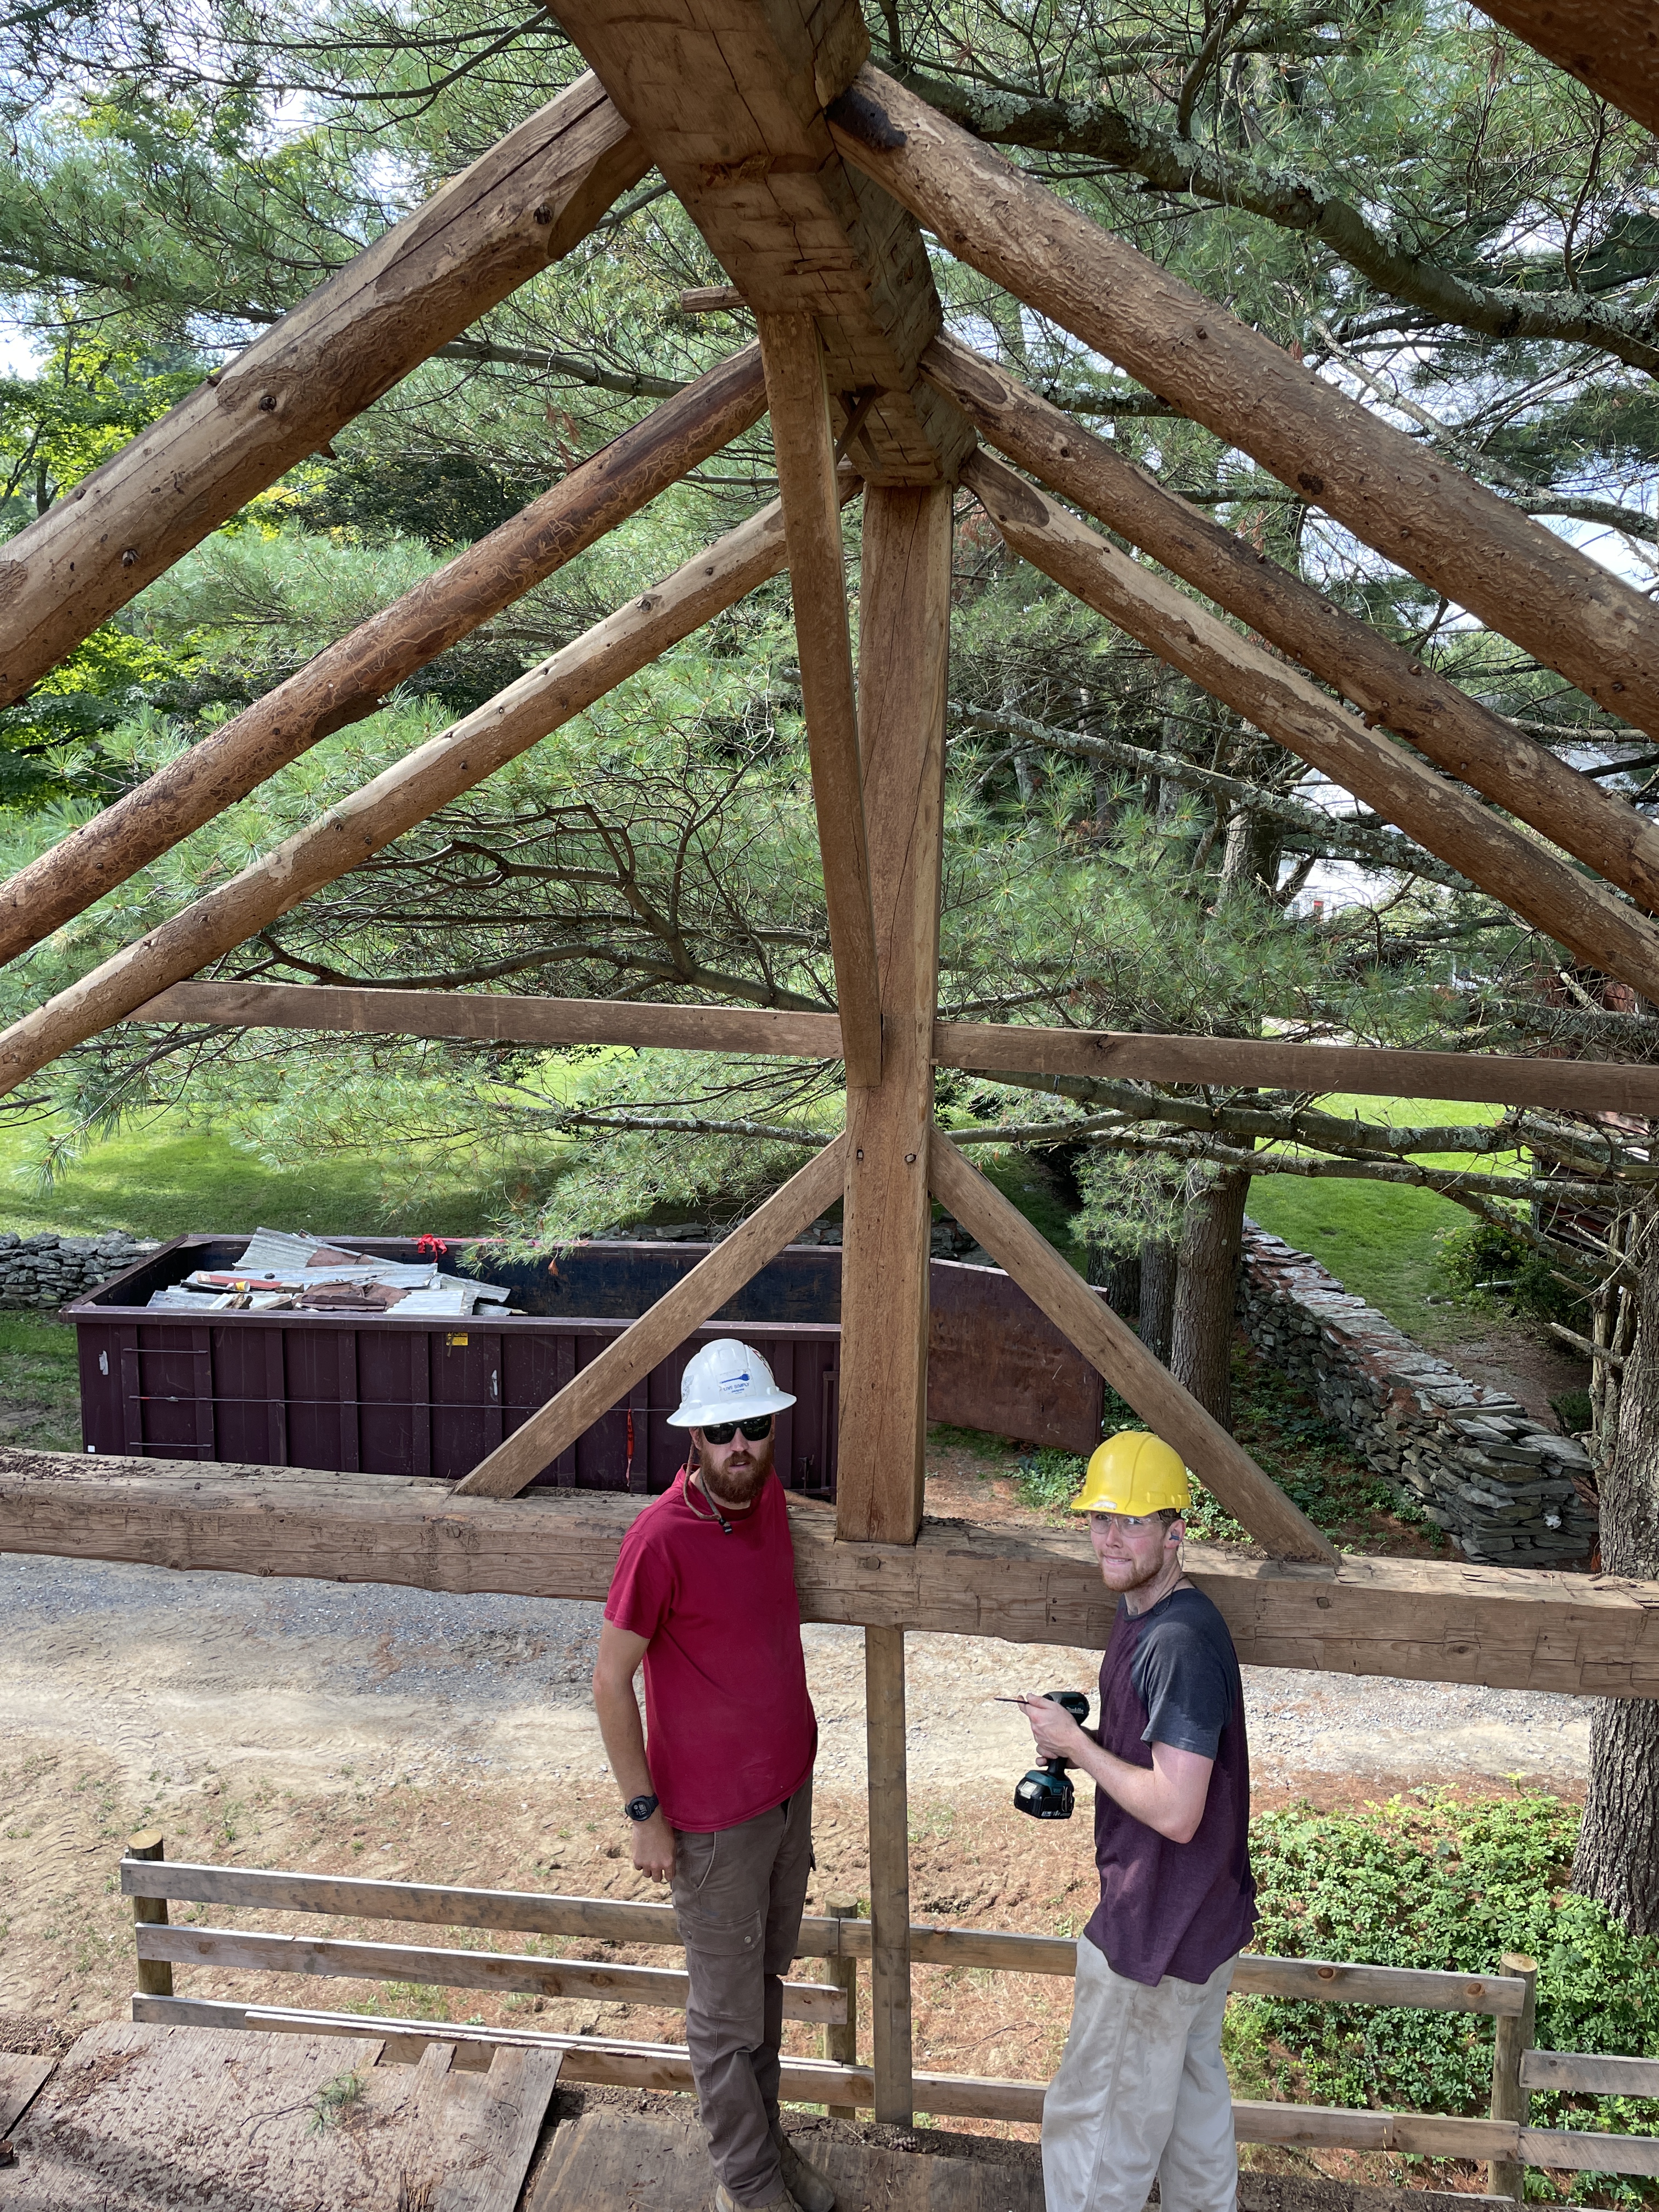
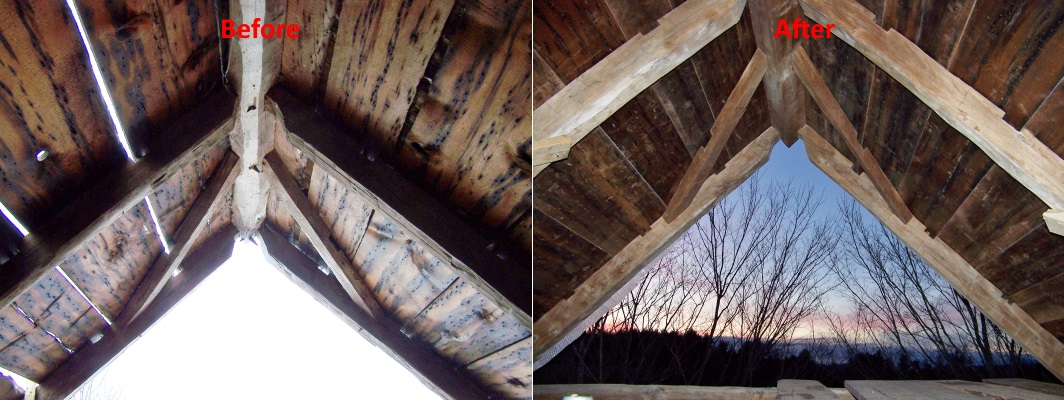
A full second floor, held in place by an incredible five-sided ridge beam, was used to store the winter supply of hay. In the next photo, we had installed plywood over the original, somewhat rotten floor, to keep us safe while we worked.

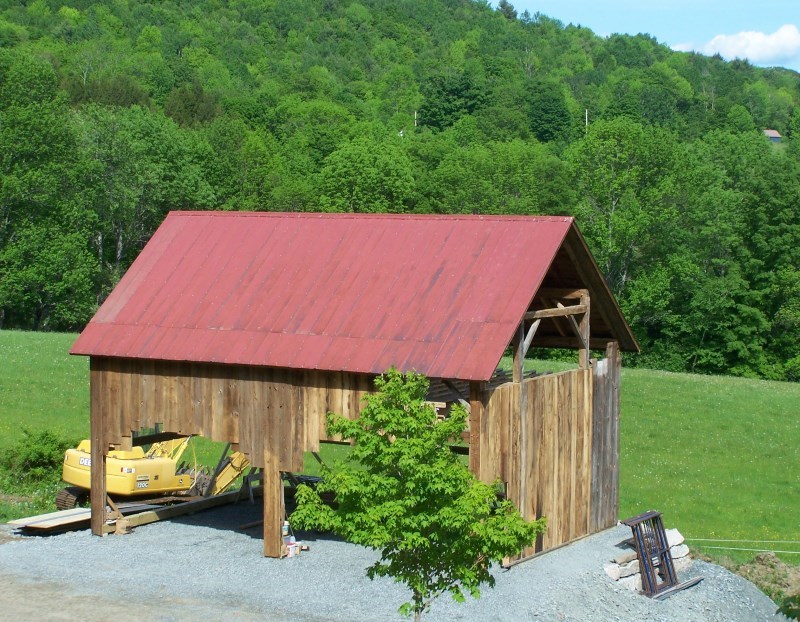
We are thrilled and grateful to be the new caretakers for this incredible barn and to give it a new home in Middletown Springs, Vermont! The barn will be of great assistance in our restoration work of other structures, and we look forward to setting up displays of agricultural artifacts from past centuries.

If you are nearby and able, please join us in celebration of this barn raising. We will begin the day with a blessing and prayer for safety at 7:45. Watch the crew work and warm up in the Reuben Wait Barn with coffee and doughnuts. Stop in throughout the day to say hello!

Contact sara@greenmountaintimberframes.com with questions.

Green Mountain Timber Frames | 430 West Street, Middletown Springs, VT 05757 | www.greenmountaintimberframes.com/workshops-events

Author Talk and Riving Workshop at Green Mountain Timber Frames

Featured

Greetings from Green Mountain Timber Frames!

Here at GMTF, we care deeply about regenerative practices, and this extends well beyond our passion for saving and restoring old agricultural buildings. We strive to foster in our own lives an attentiveness to the wisdom and teachings of past generations who lived, worked, gardened, and farmed in the barns that we restore. We are inspired by people right in our own community doing amazing things and working incredibly hard to bring back a healthy connection between our food sources, the land, and our community. 


In this spirit, we are extremely excited and privileged to welcome author, blogger, and podcaster Jade Miles to the Reuben Waite Barn for a conversation and book signing on Saturday, June 25th. We were introduced to Jade through a mutual friend, and we have been listening to the thoughtful and inspiring conversations on her podcast. We cannot believe our good fortune to welcome this world-renowned author to our very own woodworking shop- the 1780s Reuben Waite Barn! 

Jade will discuss her latest book “Futuresteading: Live like tomorrow matters: Practical skills, recipes and rituals for a simpler life.” Jade is visiting from Black Barn Farm in Victoria, Australia where she and her family tend an orchard and regenerative nursery business, and are committed to bringing celebration and awe back to food literacy as a first step in building a localized fair food system. 


Jade will sign copies of her book and folks are encouraged to bring a potluck dish to share as we dive deeper into conversation with Jade and our community.

We are excited to start the afternoon around our shop garden with a demonstration of fence riving technique. Luke will demonstrate the  proper use of a froe, shaving horse, and draw knife as we work on a traditional country garden fence with hand tools. Who knows – we may even get to make a little progress on the much needed fence around our garden with your help! 

We hope you can join us! 

Saturday, June 25, 2022 | 4 – 7 PM

Reuben Waite Barn at Green Mountain Timber Frames

430 West Street, Middletown Springs, Vermont

Schedule of Events

4 pm: Riving Technique Demonstration 

5 pm: Author talk with Jade Miles

6 pm: Potluck dinner and conversation on the concepts presented in “Futuresteading”

This is a free event. Books will be available for $32. Please RSVP to sara@greenmountatintimberframes.com

From Japan to Arizona and Back Home to Vermont…Grand Entrances Abound

Featured

Gates, doors, and entryways play a large role in the way that humans organize meaning.  Consider that prayers, linguistic expressions, and literary expressions heavily lean on the symbolism of doorways.

The Power of Entrances (Architecture’s Way to Make a First Impression)

A beautiful entrance can literally frame the stance of a home, garden, or barn towards the outside world. I have been thinking a lot about doors lately and want to take this opportunity to share images of some of my favorite entrances…from the very large to the very small, from those above my doorstep to those much farther afoot.

timber frame porch on barn home green mountain timber frames

The Gateways of Japan

Last year, I had the incredible opportunity to travel around Japan, viewing some of the largest and the oldest timber frame structures in the world. The craftsmanship was astounding and inspiring!

In the next photos, you can see a couple of entrance gates and I will start this reflection with these large doorways. The first massive entrance is a Torii gate, which signifies that you are entering a sacred space. The second is the entrance to a temple. Leaving the profane behind, and entering the sacred, is a theme signified in many religions.

While in Japan, I also got to view many garden gates- and these really spoke to me! Japanese garden gate |  green mountain timber frames

That gateway represents a remarkable invitation to enter nature!

Green Mountain Gateways and Gazebos

Speaking of spaces for reflection, the next photo is of a timber frame gazebo that Green Mountain Timber Frames founder Dan McKeen built a few years ago.

Not unlike the garden pictured above, the goal for the pavilion was to create a space of invitation- invitation to reflect and take in the view of the Vermont Green Mountains. Careful thought went into the layout and proportions of the entrances to this space.timber frame Gazebo- green mountain timber frames

The significance of doorways is often noted when we take that first photo of our new home, or of our children standing in front of the doorway as they leave for a first day of school.

We also put prayer scrolls, flags, and wise sayings on or over our doorways. The significance of stepping over a threshold is noted in so many literary and experiential texts.

Home Sweet Home

The next photo shows my partner and I standing in front of an 1820s corn crib that we have dismantled and will be re-erecting as our own cabin retreat in the woods.Montpelier Corn Crib Entrance vintage corn crib cabin green mountain timber frames

A Timber Frame Porch for a Home in the Mountains

The Green Mountain Timber Frames crew recently built a timber frame porch as an addition to a barn home. The porch is 44-feet long, and I love the way the dormer frames the entrance to this lovely space. The steps leading through garden and grass to an off-center door present a beautiful entrance.

timber frame porch on barn home green mountain timber frames

Here are a couple more shots of the timber frame porch:

timber frame porch in Vermont Green Mountainsbarn home timber frame porch green mountain timber frames

We have come across beautiful barn doors as we do restoration work, and the granary that we are currently restoring at our shop is no exception. Note the beautiful hand forged hinges in the following photos.

We will be putting this building back up with a bell tower and have been carefully thinking about the best way to craft the new entrance, with the original hinges, into the space that will be a small chapel.

Here is our latest sketch of the entry and windows:drawing of rupert granary barn home green mountain timber frames

Here is a photo of a grist mill that I recently drove past. I love the doorway on this building!

I have had opportunities to construct a few doors that serve as the entrance to restored barn homes. I have always found it incredibly meaningful to handcraft the “gateway” into a home centered around a barn that we have restored. This next door was built out of maple, and a local artist crafted the bullseye glass.
bulls eye glass custom entrance door green mountain timber frames barn home

In this photo and the next, you can see “hidden” doors that lead to outdoor closets on the right-hand side of the doorway. custom divided lights entryway barn home green mountain timber frames

Materials Matter

Significance can also be found in the materials used for an entrance. When I built a timber frame sugar house on my family’s farm, we had to cut down a plum tree that had lived on the barn site. Out of respect for the tree, I used a branch of the plum to frame the top of the door opening. timber frame sugar house | Green mountain timber framesPlumb tree door header in timber frame sugar house green mountain timber frames

Last week, we delivered two doors that will be installed as the entrance to a large timber frame that we recently constructed. Each door is 48-inches wide, so when both swung open on their strap hinges, the opening will be 8 feet. Significantly, the cherry boards that create the interior panels of the two doors are from a tree that was removed from the spot where the barn now lives.

First, the barn: grape vineyard timber frame | green mountain timber frames

And here is one of the custom barn doors ready for delivery: custom barn door timber frame green mountain timber frames

Now, since who doesn’t like a little potty talk, I better throw in a photo of one my favorite outhouse doors!

outhouse in vermont | Green Mountain Timber Frames

Good Things Come in All Sizes

Here at Green Mountain Timber Frames, we have also been fortunate to think about very small entrances. Some kinds of birds have long been considered healthy and happy to have around and in New England barns. For example, swallow doors were sometimes put in the peak of barns to encourage nesting inside. The benefit to the farmers and animals, aside from getting to watch the beautiful acrobats fly all about, was that the feathered friends helped to keep the population of flies in check.

Here is a photo of one of my favorite vintage barns.

Note the mini doors up in the siding: antique barn home swallow doors green mountain timber frames

We replicated this concept in a restored barn that we erected. Along with our client, we designed the opening and nesting box inside for a kestrel, which is a beautiful little raptor that has been struggling in Vermont. It took a few years, but a pair did eventually move in! You can read more about this restored barn.

Here is the barn: vintage barn restoration green mountain timber frames

And here is one of its residents!kestrel in vintage barn by Green mountain timber frames

We also just finished taking down a wonderful little 14 x 22 barn. This structure was first used as a corn crib and later converted to a trappers cabin. Up at the gable peak is a cute little bird door, complete with a landing pad! corn crib barn cabin | green mountain timber frames

Desert Doorways

To end this meandering blog on entrances, I want to show you two beautiful natural doorways that I just encountered while backpacking in the Superstition Mountains in Arizona.

Judging by the beauty of this woven grass, I think it is possible that animals also value the aesthetic of a gorgeous entrance. Here is a bird’s nest, well-protected in the branches of a Jumping Cholla cactus:Superstition Mountains in Arizona | GMTF

And for someone with a bit of arachnophobia, I had to do some steady breathing to really take in the beauty of this spider hole! From my reading since the trip, it seems that some spiders will weave grass around their entrance to channel rain away. But given the beauty of this construction, I am personally tempted to think that they may care about the aesthetic as well.

What do you think?Spider entrance in Superstition Mountains | GMTF

Do you love little barn doors, antiques and all things quaint?

Take a gander at our barns for sale!

What Is One to Do with an Antique Slaughter Wheel?

Featured

This antique slaughter wheel came out of an old Vermont barn for sale, built in the late 1700s. The barn has been taken down, and Green Mountain Timber Frames recently purchased the timber beams, as well as this beautiful antique.vintage slaughter wheel from Vermont barn home
The barn that housed this magnificent wheel was on the Henderson/Vail property in Bennington, Vermont. The family played a significant role in the Revolutionary War.
David Harmon, a key figure in the town’s history, built and operated Harmon’s Tavern around 1770, which was located about 1/4 of a mile from the Vail house. On August 14, 1777, General Stark had breakfast at Harmon’s Tavern on his way to the Battle of Bennington. He likely marched past this barn on his way to the significant battle.
The barn is just visible behind the trees and between the couple in the next photo, taken around 1900. (Read more about this timber frame barn.)
henderson historic barn home in vermont
The slaughter wheel we have just brought home and cleaned was mounted in the center bay of the barn. This was a common practice in the 18th century. In our work restoring old barns, we have come across many of these hoists, forgotten between the bents of ancient barns. Sitting 12-14 feet in the air and just inside a large barn door, the hoists often emerge from the darkness above our heads as our eyes adjust from the bright outdoors to the solemn twilight of an aging barn interior.
hoist of antique slaughter wheel green mountain timber frames
Remarkably, both ends of the log were still able to spin. The doweled ends sat in a cradle on top of the girts, which are the 30-foot timbers, spanning the width of the barn. A rope was wrapped around the large wheel and held in place by hand-forged metal brackets. A second rope passed through a hole in the middle of the round log.
The large size of the wheel in comparison to the diameter of the log gave tremendous leverage to an individual hauling something up into the air. It is an ingenious and simple method that functions much like a pulley system.
antique slaughter wheel green mountain timber frames
The wheel was used for cleaning slaughtered animals or for lifting the end of a wagon in need of repairs. This particular wheel is notable in that it is crafted out of a black walnut tree. The walnut boards that were needed to cut the four curved sections must have started at about 28-inches wide. It is 13 feet long, and about six feet around.
antique hoisting slaughter wheel green mountain timber frames

So what do we do with such a beautiful artifact of our Vermont farming heritage? A client of ours is considering using it as a giant chandelier in his 1780s timber frame barn home that we restored for him. I can just imagine the dinner party conversations that would ensue as guests look up at this slaughter wheel and discuss its past!

Or, this wheel hoist may just end up residing in the upper beams of our shop where we could use it to lift its contemporaries- beams from the same time period that we restore.

Have an idea of what we should do with the slaughter wheel? Or simply interested in learning about the barns we have for sale?

We would love to hear from you.

802.774.8972 or luke@greenmountaintimberframes.com

Way Out West: Timber Framing on Whidbey Island

Featured

Last fall, we were way Down East, tipping up a beautiful frame on the coast of Maine. Fast forward a few months, and the crew of Green Mountain Timber Frames found ourselves a world away, this time delivering a restored frame to Whidbey Island, off the coast of Washington State.

Welcome to Whidbey

Our talented building crew traveled west to deliver this 28 x 38-foot frame from the 1700s to a wonderful client. The gambrel style barn frame will be a beautiful new home, made from these historic timbers. We had restored the timbers back home in Vermont and then carefully prepared each beam before tying the frame aboard this flatbed for the long drive west.

Preparing historic timber frame for shipment

Out on Whidbey, we found a sweet Air BnB on the island and had the privilege to wake up to this view each morning:

Whidbey Island Green Mountain Timber Frames

Barn Raising: Day 1

Here’s a look at how we tipped up the frame, and the progress we made each day. On Day 1, we began with a pre-raising blessing. Then, we spread out the posts on the deck before tipping each one up by hand. The frame had four 28-foot girts. You can see us placing one of them below, with an assist from a telehandler.

Let’s get a closer look at these beams!

Historic vermont timbers_Whidbey Island_Day 1

Closeup on the Gunstock Posts

Notice how the gunstock post tops each have two tenons. One locks into the top plate on the eve wall, while the second receives and holds the girt that crosses the width of the building. The girt end also has a half-dovetail that further holds everything together.

Below, you can see the gunstock post standing strong against Washington State evergreens. A friend came by to use it as a perch and take in the view.

bald eagle perched on restored girt

Barn Raising: Day 2

We spent the second day installing the second-floor joist system. One unique element of this frame was that the girts and floor joists project out beyond the top plates. The rafters then sit out beyond the top plate, gaining two extra feet of living space on the second floor. You can see this overhang in the bottom right image below.

There is a 38-foot chestnut timber that runs down the center of the structure. It is half lapped over the 28-foot girts, creating a beautiful joint over the central posts. In the top right picture above, you can see the labeling in the beams. The original builder created these marks using a small gouge chisel.

Second floor deck

Second floor deck

By the end of day two, we had completed the second floor deck and were ready to begin installing the queen system, which will support the rafters and frame the space for the second-floor bedroom and bath.

Barn Raising: Day 3-4

We spent the next two days working on the upper cube (the Queen System) of the frame and preparing to put up the rafters. We installed the heavy three-inch beech planks that run the length of the eve. The rafters sit on this overhang. The queen system, which supports the rafter pitch change on this gambrel, has eight more gunstock posts as well as two more 38-foot timbers and four 22 foot queen girts.

On the right, you can see how the heavy eve planks are half lapped to each other, and pegged to the overhanging floor joists and girts. In the upper queen post to girt connection, we added a hidden steel plate and threaded rod that will reinforce the good work of the wooden joinery to ensure that the roof can never spread.

Barn Raising: Finishing Up!

The next step was for us to install the rafters and apply the vintage roof boards. Under clear blue skies, we finished up the project.

This slideshow requires JavaScript.

We had a wonderful time on this project and made some new amazing friends on Whidbey Island. The building wrapped up with applying vintage roof boards on the structure, which we covered with tar paper for weather protection. We also installed the original, arched-collar ties. We are so grateful to the craftspeople from the late 1700s who built this frame, all who helped us to save it from demolition, our friend and client in Washington, and to the crew who will now close it in and make it into a home.

Green Mountain Timber Frames crew

Our amazing team!


If you dream of living in a historic home, let us know! We do travel and would love to build a beautiful timber frame home for you.

Contact us at Luke@GreenMountainTimberFrames.com (802.774.8972)

Restoration of an 1806 Barn

Reading this in your email? For easier reading – Click here.

Here at Green Mountain Timber Frames, we are delighted to have a new member on our framing crew! Matt Peschl is not a new face or a new friend, as he worked with us for key projects over the past 12 years. But now, Matt has officially joined us on a full-time basis and we could not be happier about it!

matt-peschl_green-mountain-timber-frames


Reminiscing About a 2011 Barn Restoration

Luke and Matt worked together on a project in 2011 and we’d like to take this opportunity to share it with you. The repairs were done on a small barn on a beautiful property here in our hometown of Middletown Springs, Vermont. The homestead dates from before 1800 and we believe the barn that we worked on was built in 1806.

img_4636
We repaired the red barn, which sits nestled under the mountain among a collection of vintage barns and corn cribs

The barn had two main structural issues: rotten sills and a rotten upper beam called a top plate that supports the rafter bottoms. We decided to start from the ground up.

repairing-rotten-barn-antique-sill-green-mountain-timber-frames

The sills were tired from sitting directly on stone for 205 years

We began by using hydraulic jacks to strategically lift the barn up off of the stone foundation. This allowed us access to the sills where they needed work. In our restorations, we use vintage materials for replacement parts whenever possible.

The next photo shows Luke using a chain mortiser to begin cutting to splice in a new piece.

repairing-sill-of-antique-barn-green-mountain-timber-frames

The beginnings of a scarf joint

With the weight of the barn held up on jacks, we were able to cut joinery on a new sill piece and fit it together with the still sound original section of sill.

repaired-sill-in-old-barn-green-mountain-timber-frames

Here we have used an English scarf joint to add in a new section of sill

One eve wall of the barn was close to grade and the sill was entirely rotten. For this wall, we chose to use Locust wood for the sill replacement.

Locust grows locally and is a remarkable species. As a kid growing up on a Vermont farm, I had the opportunity to work with locust for a long time- at times more cheerfully than others! My father, siblings and I cut many locust fence posts from the woods. We would drive the locust directly into the ground and, because of the nature of the wood, it would last many years even when underground.

In fact, I have stumbled across old, grayed locust fence posts deep in Vermont woods. The old fence posts tell the story of much of Vermont’s land being cleared of forest during the 1800s. Now, the forest land is expanding to take up a larger portion of the state. Locust posts, as well as stone walls, stand sentry in parts of our current woodland to tell the tale and transitions of our farming history.

locust-replacement-sill-antique-barn-green-mountain-timber-frames

We copied the joinery from the original sills before installing the new timber

Once we had the barn set back down on repaired sills and had rebuilt the stone foundation, we took a look at the second major issue. What we found was some serious rot caused by a leaky roof at some point in the past. The first roof had been cedar shakes, later replaced by slate.

rotten-beam-in-antique-barn-green-mountain-timber-frames

Folks, we have an issue!

In order to repair the top plate, we first set up a system to jack up and hold the rafters in order to free up space for our repair.

repairing-antique-barn-top-plate-green-mountain-timber-frames

The rafters are supported and we have cut out the rotten section of beam

We used an English scarf joint to make the top plate repair. When we need to replace a section in a barn, we use vintage materials from our inventory in order to get a matching color, tone and hue.

scarf-joint-repair-in-antique-barn-green-mountain-timber-frames

The top plate is repaired and ready to support the roof for another 200 years

Next, we replaced the siding windows and trim on the barn.

rebfurbished-barn-green-mountain-timber-frames

It is a great joy to have Matt on the team again. He joins us with a great amount of experience, both in timber framing and in every phase of construction. Most importantly, we really enjoy his company!

Do you have a vintage barn of your own that needs repairs?
Give us a call at (802) 774-8972.

Want to read about another timber frame project? How about the time we built a timber frame gazebo!

Dutch Cape House from c. 1800

Reading this in your email? For easier reading – Click here.

One early morning, before dawn in November, two brothers were readying for an early morning deer hunt. Hunting culture in rural Vermont dates back to the original residents, and continues still. On this particular morning, breakfast was cooked, weapons readied, and excitement no doubt was rising!

I can imagine that the black of night began dissipating, and the hunters hurriedly finished their planning and headed out into the breaking daylight. A chair had been left too close the roaring wood stove and a couple hours later, a passerby saw smoke billowing from the house. Fortunately for those young men, for Green Mountain Timber Frames, and for the future owner of this beautiful timber frame, the fire was put out and the house survived!

IMG_3277

Since that early morning fire, this little house has served the farming community well. When the local grange had to move out of a nearby building, the family that owned this cape generously offered the space. After many community work days, the grange moved in for weekly meetings and community events. The National Grange of the Order of Patrons and Husbandry is a national organization that began shortly after the Civil War. The group works to promote community bonding and education around agriculture.

IMG_3091

This frame dates from around 1800, when Vermont was still a young state. It was placed in a little hollow between knolls with a stream nearby and land was cleared around it for farming. The house was built using oak, chestnut, and beach trees- no doubt the very trees that were cut down to begin opening up fields for livestock.

IMG_3252

This frame has four bents and stands true even after 200+ years and a close call with fire!

It is fascinating to get to study so many local timber frames and ultimately to get a sense of who built these structures many generations ago! This particular house is a Dutch style of timber framing. The bents are close together and the floor joists are built strong enough to span the whole 24 feet of width.

IMG_3238

A clear span of 24 feet makes this an open canvas for future room design.

This little building measures 24 feet by 26 feet. It is perfect for a small cabin or house, for an addition onto another building, or as a small storage or animal barn.

IMG_3237

The posts and top plate are 10 x 10 inches – a solid little house!

A Spacious Second Floor

One of the reasons we fell in love with this structure, and just had to save it, was the spacious second floor. The posts extend quite far above the second floor, creating a tall “knee wall.” There is plenty of head room upstairs.

The rafter system has a five sided ridge beam with braces to the rafters. Unfortunately, the rafters and ridge beam were damaged by the close call with fire and by subsequent roof leaks over the years. We will be replicating the original roof system however and it will once again be strong and beautiful.

IMG_3235

The posts extend up beyond the 2nd floor, creations a spacious second floor living area.

IMG_3231

Here you can see braces strengthening the structure.

The Ingenious Basement

The ingenuity and creativity of the builders of this home are demonstrated in the basement of the house. Underneath the floor system, we discovered a very rugged food storage room or “root cellar” built with rough hewn logs, stone, and brick.

I have no doubt that it was filled with ice from the nearby river before the spring thaw, and that it was filled with squash, potatoes and other vegetables in the fall! Surely, it also was an excellent place to make and keep that hard cider that Vermonters loved (and still do)! It also doubled as a very strong foundation for a wood stove on the second floor. Imagine the original residents filling this little room with the fruits of their labors, and then relishing the food during the bitter winters.

IMG_3274

Let’s keep those garden vegetables and root crops good all winter!

Once again, we consider it such a privilege to cross paths across the span of generations with the pioneers, carpenters, farmers, and families who have built and dwelt in this structure. We are also grateful to the family that saw the historical value of the house and allowed us to disassemble it once it could not be kept up in its original location. The restoration of this timber frame will take place over the future months and it will once again be ready to house future generations.

Interested in this timber frame or another historic property?

Contact Green Mountain Timber Frames at
luke@GreenMountainTimberFrames.com, or
802.774.8972


North Hero Barn Restoration: Before and After

Reading this in your email? For easier reading – Click here.

Remember that North Hero, Vermont historic barn we wrote about back in April of last year?

Luke Larson, of Green Mountain Timber Frames rescued this special barn from North Hero Island, which is smack in the middle of Lake Champlain and only a few miles south of the Canadian border.

Removing Roof of timber frame barn home

Dating back to the 1780s, the barn is a hardwood frame with hewn oak braces. While it was truly in very rough shape, Luke was determined to save it because it is such an old, rare specimen. Measuring 26 X 36 feet, it offers nearly 1000 square feet of space and is a gunstock post frame, a good indication it was built before 1800.

A New Beginning – Near The Frame’s Origins

The exciting news is that this beautiful restored timber frame will become a handsome “great room,” complete with a fireplace, for a new home that is being built on the New York side of Lake Champlain.

Understanding the Restoration Process

In the following Before and After photos, you can see the restoration process taking place at one of our shop sites.

2
Above: Many of the beams needed repairs or replacement. One of the top plates was replaced completely during the restoration process. In the restored photo, all of the beams are once again sound.
3
The ridge beam and rafter braces were one of the lovely features that caused us to love this barn!
4
During the dismantling of the barn, we labeled all of the roof boards so that they would go back to the original location. In this “after” photo, we have put all boards back on the roof and used some replacement vintage material to fill in the gaps.
5
The beautiful December sunset here in Vermont showcases the lovely detail where the rafters intersect with the ridge beam. In the restored version, we have made all the edges of the boards straight once again, so that the gaps between the boards are minimized.

Ever Dreamed of Living IN History?

At Green Mountain Timber Frames, we turn old barns into beautiful new homes, studios, offices, barns and more.


For details, please contact Dan or Luke:
802.774.8972
luke@GreenMountainTimberFrames.com

Green Mountain Timber Frames - Contact Us

Timber Frame Labeling – The Pragmatics and Beauty

Reading this in your email? For easier reading – Click here.

What is in a label?

When it comes to timber framing – a great deal!

The homes and historic barns that we disassemble have many individual pieces. A timber frame can easily have over two hundred different pieces of hand crafted wood and each piece has been carefully fit and adjusted to create a specific joint. Individual timbers and braces were scribed to each other. Braces in a building may look interchangeable, but they are not!

Roman Numeral Labeling in Timber Framing_Vermont_Green Mountain Timber Frames_4

We use the terms “bent” and “plate wall” to describe the two types of cross sections in a barn. There are two plate walls in every timber frame, which are the exterior walls where the roof comes down.

“Bents” are a cross section going in the other direction, creating the gable ends and supporting systems for the interior of the building.  A frame can have anywhere from two bents to six or even more, depending on the barn size. Here is a scaled drawing of one bent cross section of an 1840s timber frame. This barn has four bents. Multiply this cross section by four and you can imagine the four bents, usually similar but not identical. Labeling System_scaled drawing of one cross section_1840s timber frame_Green Mountain Timber FramesThere are also the two eve walls with multiple braces, which can’t get mixed in with the “bent” braces! Timber Frame Label System_Green Mountain Timber Frames_2
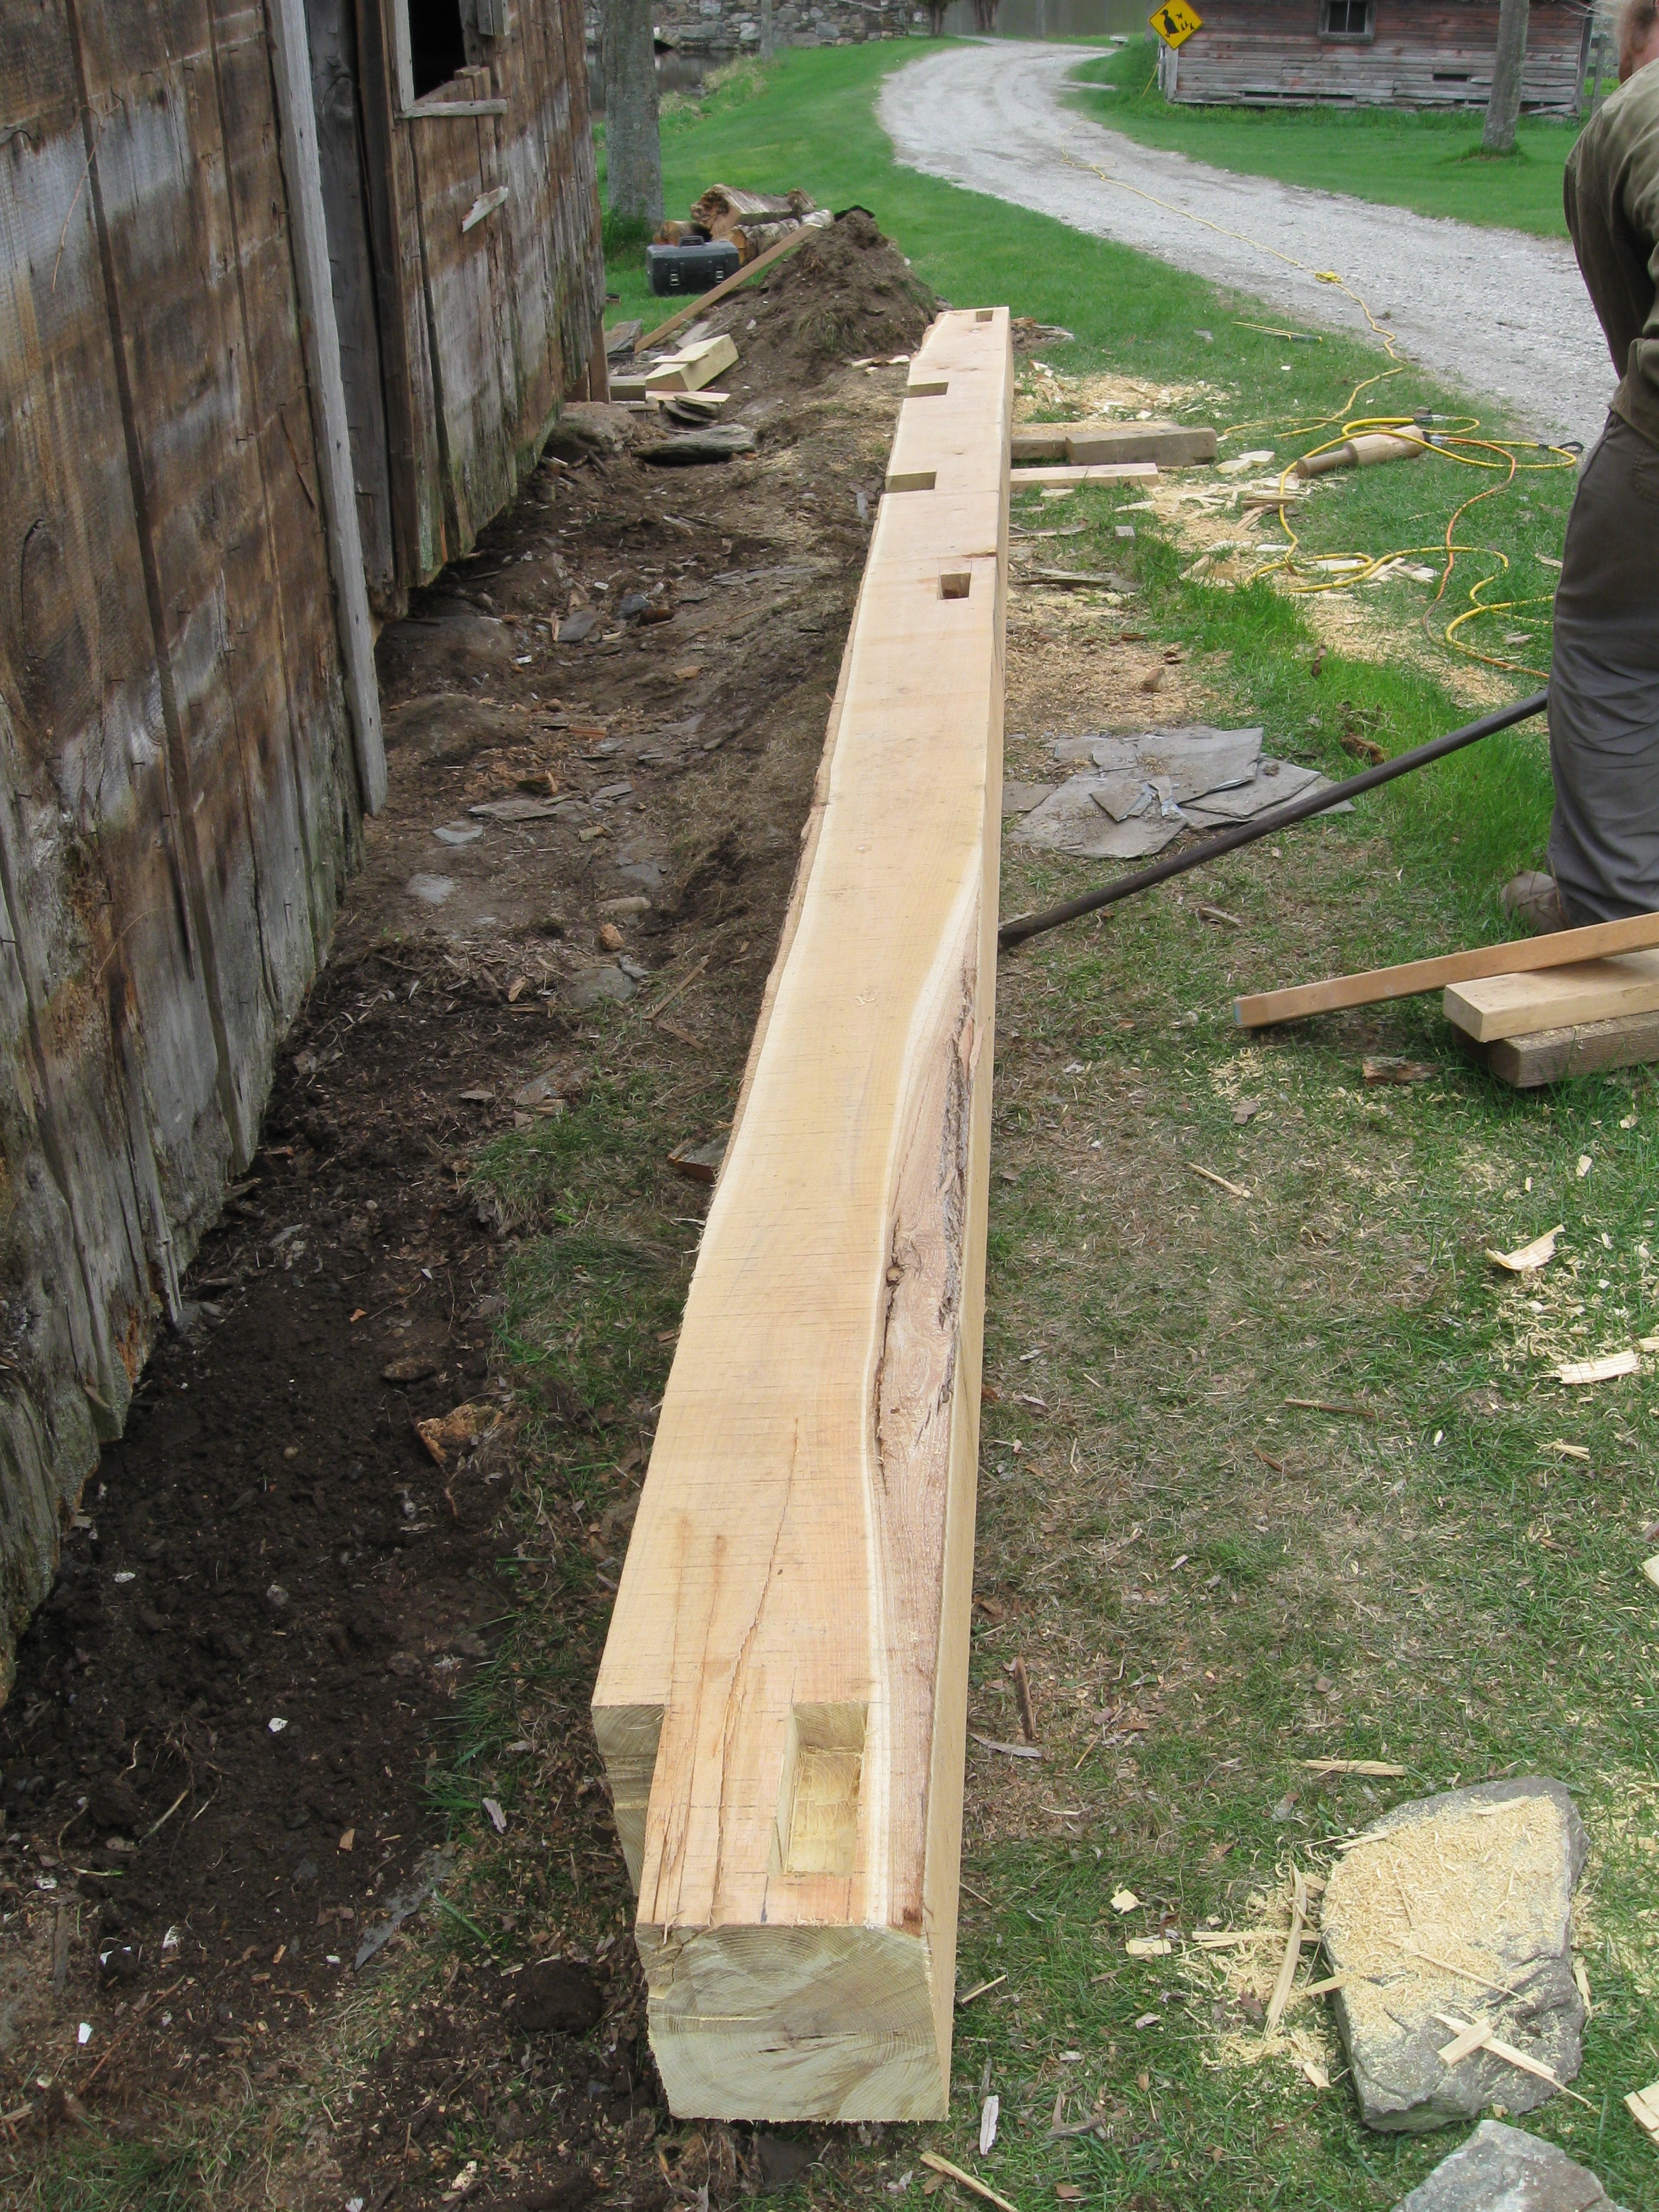
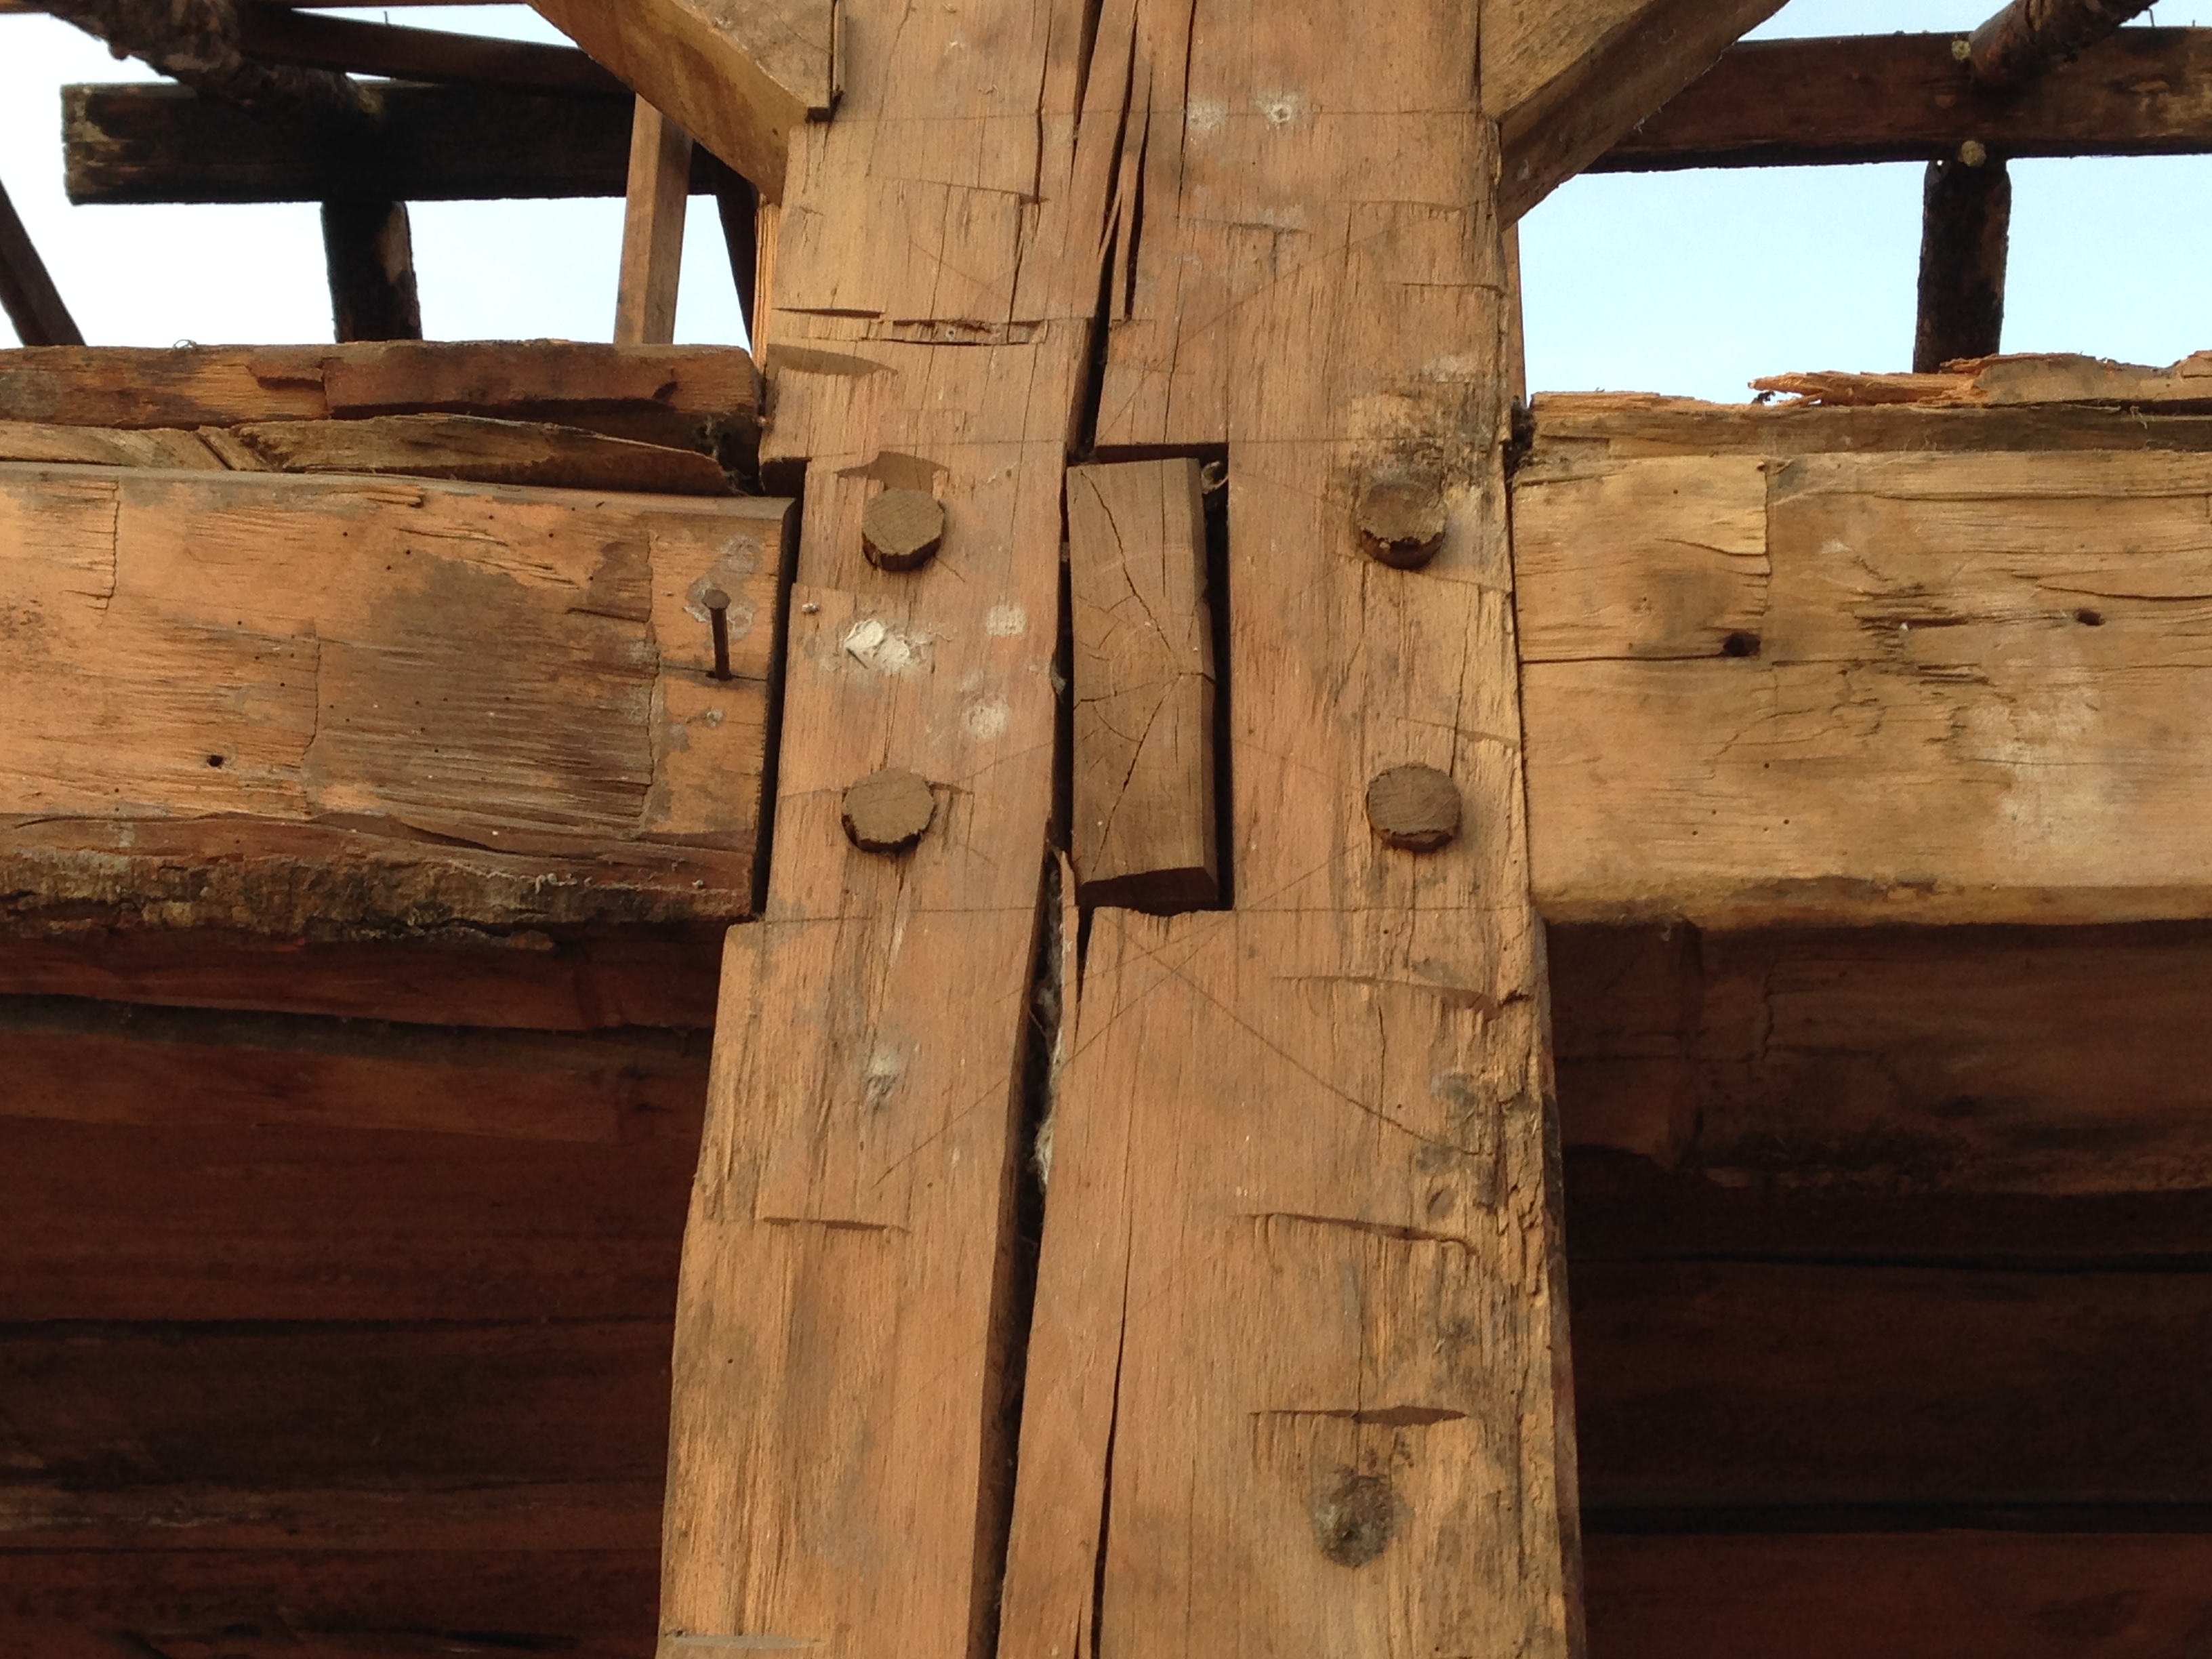
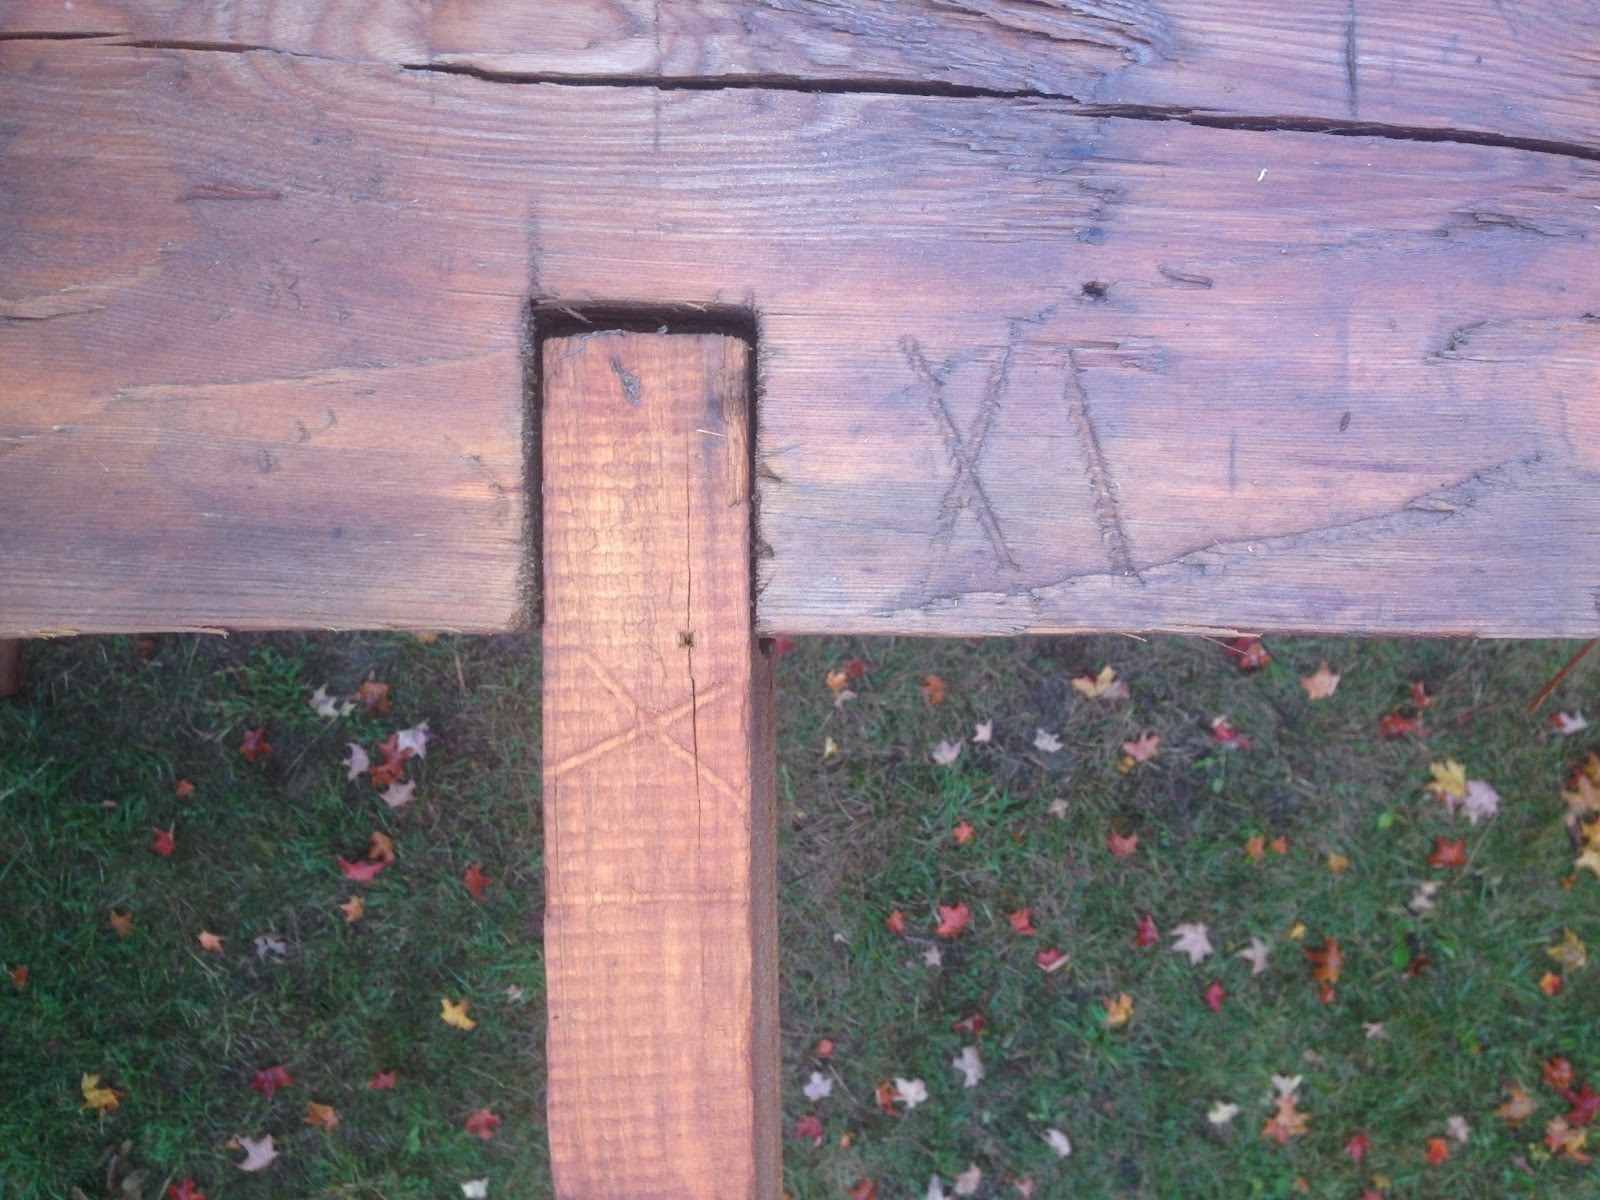
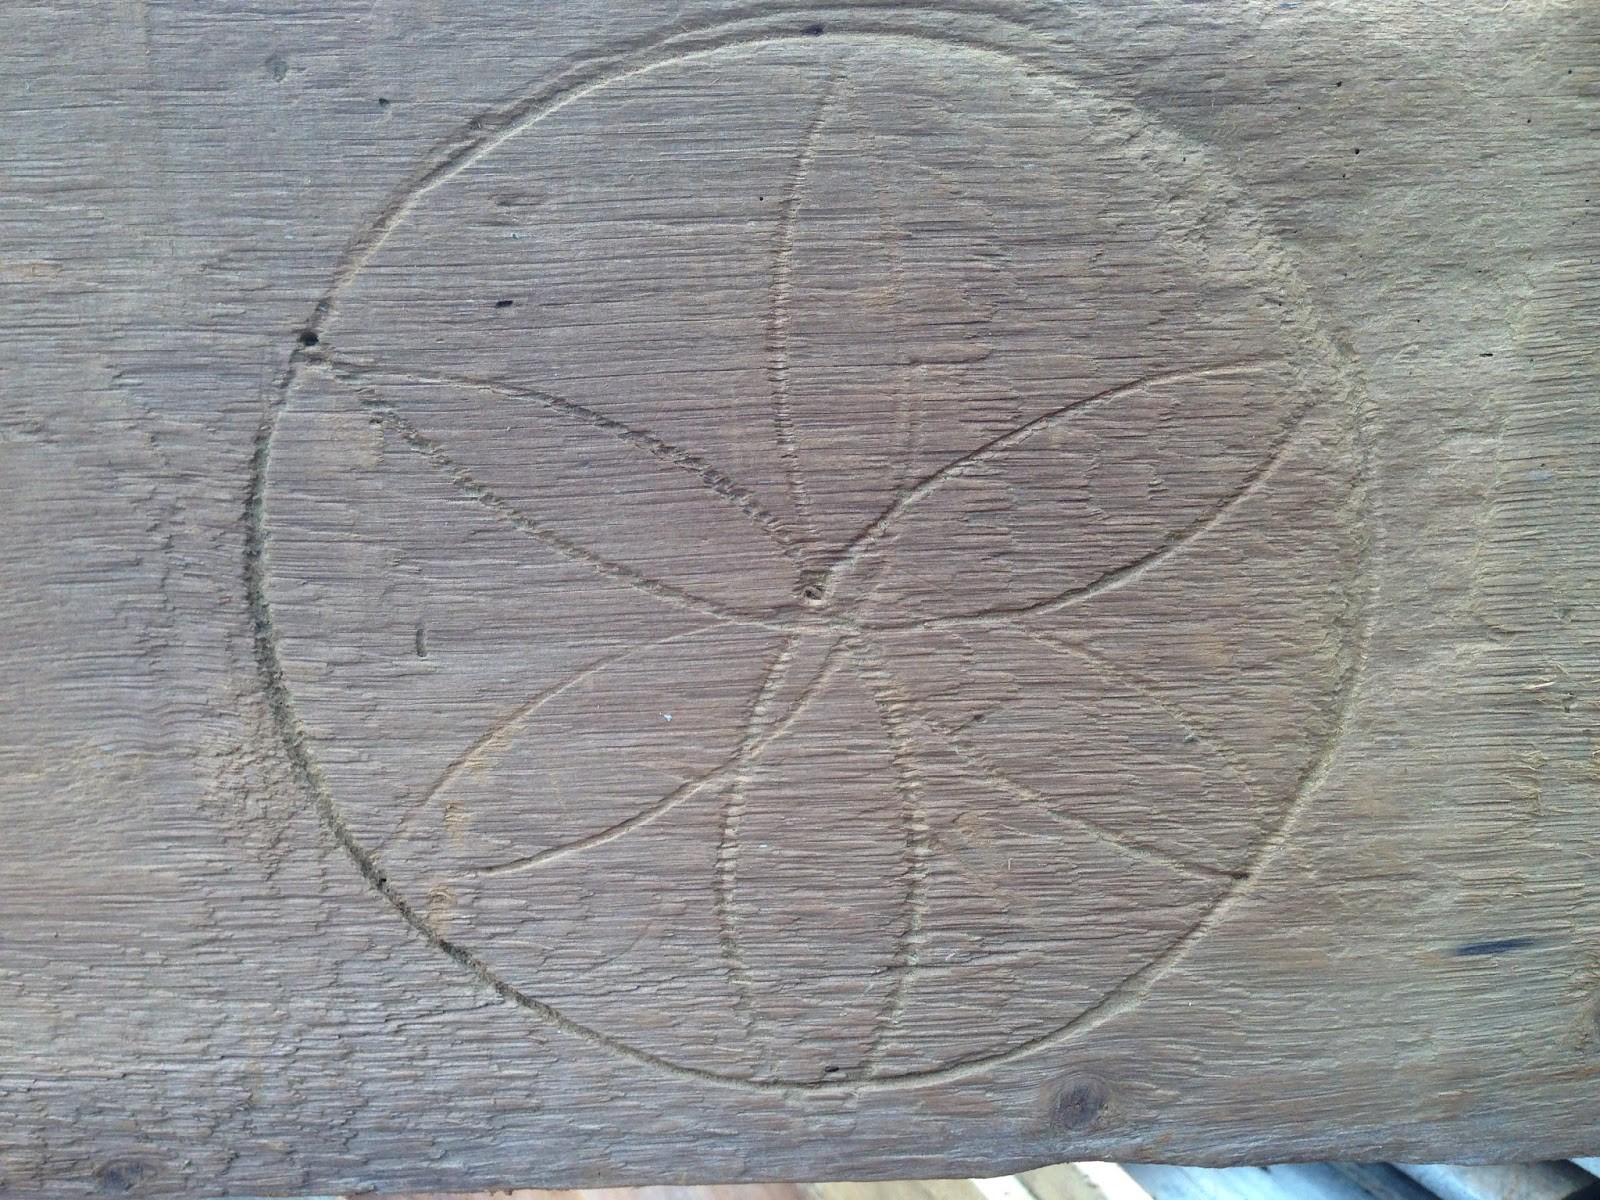
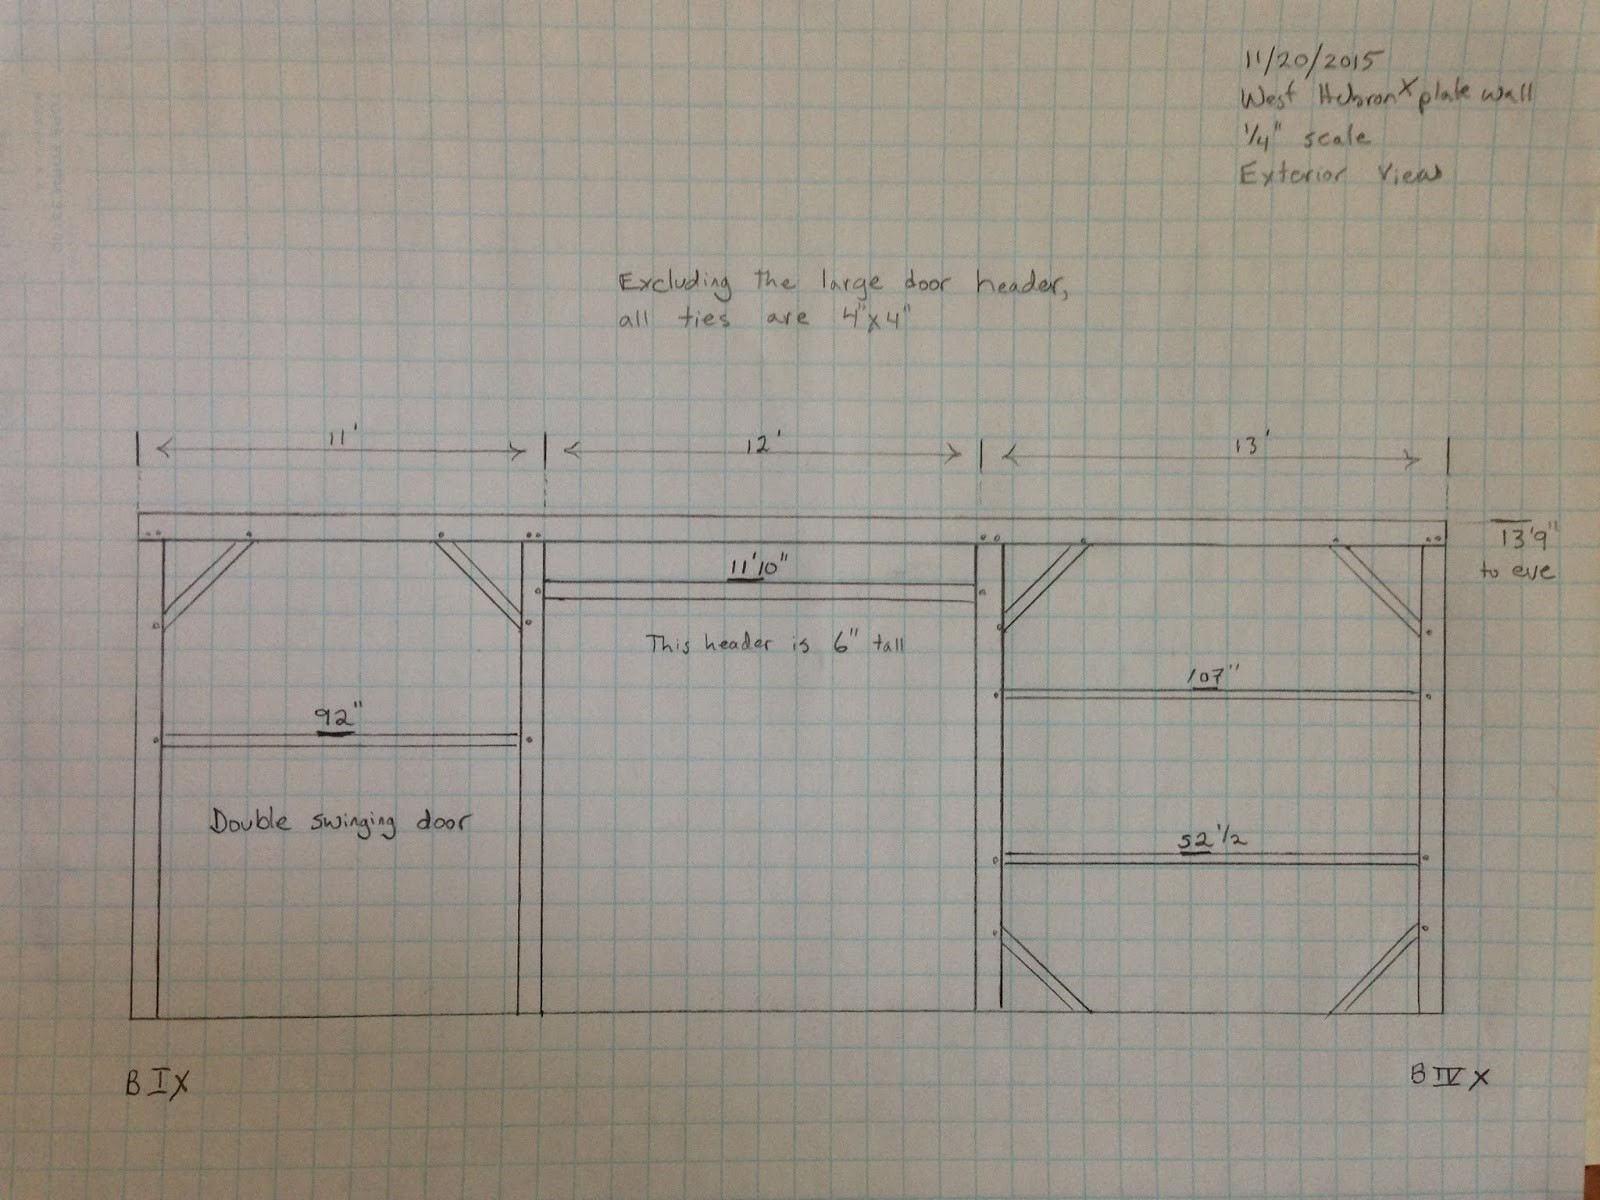
So how does one know where to put each piece of wood?
The labeling system!

History of Labeling Timber Frames
In many of the older barns and homes, even the roof boards and floorboards were labeled! Long before a crew of framers, farmers and family showed up for a house raising, someone had carefully organized the materials and designated a spot for each piece. 

Why would it make sense to label even the roof boards?
One reason is that the boards were often still in the tapered shape of a tree trunk. In other words, they are wider at one end – the base of the tree – and narrower at the other. By switching the direction of the taper – board to board – as you moved up the roof, the framers could get the most width possible out of each board without getting too uneven before reaching the peak of the building. 

Roman numerals were the most common method for inscribing labels on the beams and boards:

Roman Numeral Labeling in Timber Framing_Vermont_Green Mountain Timber Frames_4

We recently completed the restoration of a 1790s gambrel home. (You can read about it in this blog.) This frame is a wonderful example of the way that craftsmen of the past insured that the timbers all ended up in the right place.

In the gambrel house we restored, there are four bents for a total of 12 posts on the first floor. There are 8 more on the second floor.Gambrel Barn Home_Green Mountain Timber Frames_3

But how do you designate which side of the building each piece will live on?
Each exterior post is a component of both an eve wall, and a member of a bent. Therefore, each of the joint sections must be labeled. When we cut a new frame or relabel an old frame, we use “B” for bent, and “P” for plate, or eve wall. On top of this distinction, we distinguish which of the two eave walls any given post or brace belongs to.

In the gambrel, the original builders added a diagonal line to the numbers in order to make this distinction. This line makes post #4 look like this:Labeling System_1840s timber frame_Green Mountain Timber Frames_5
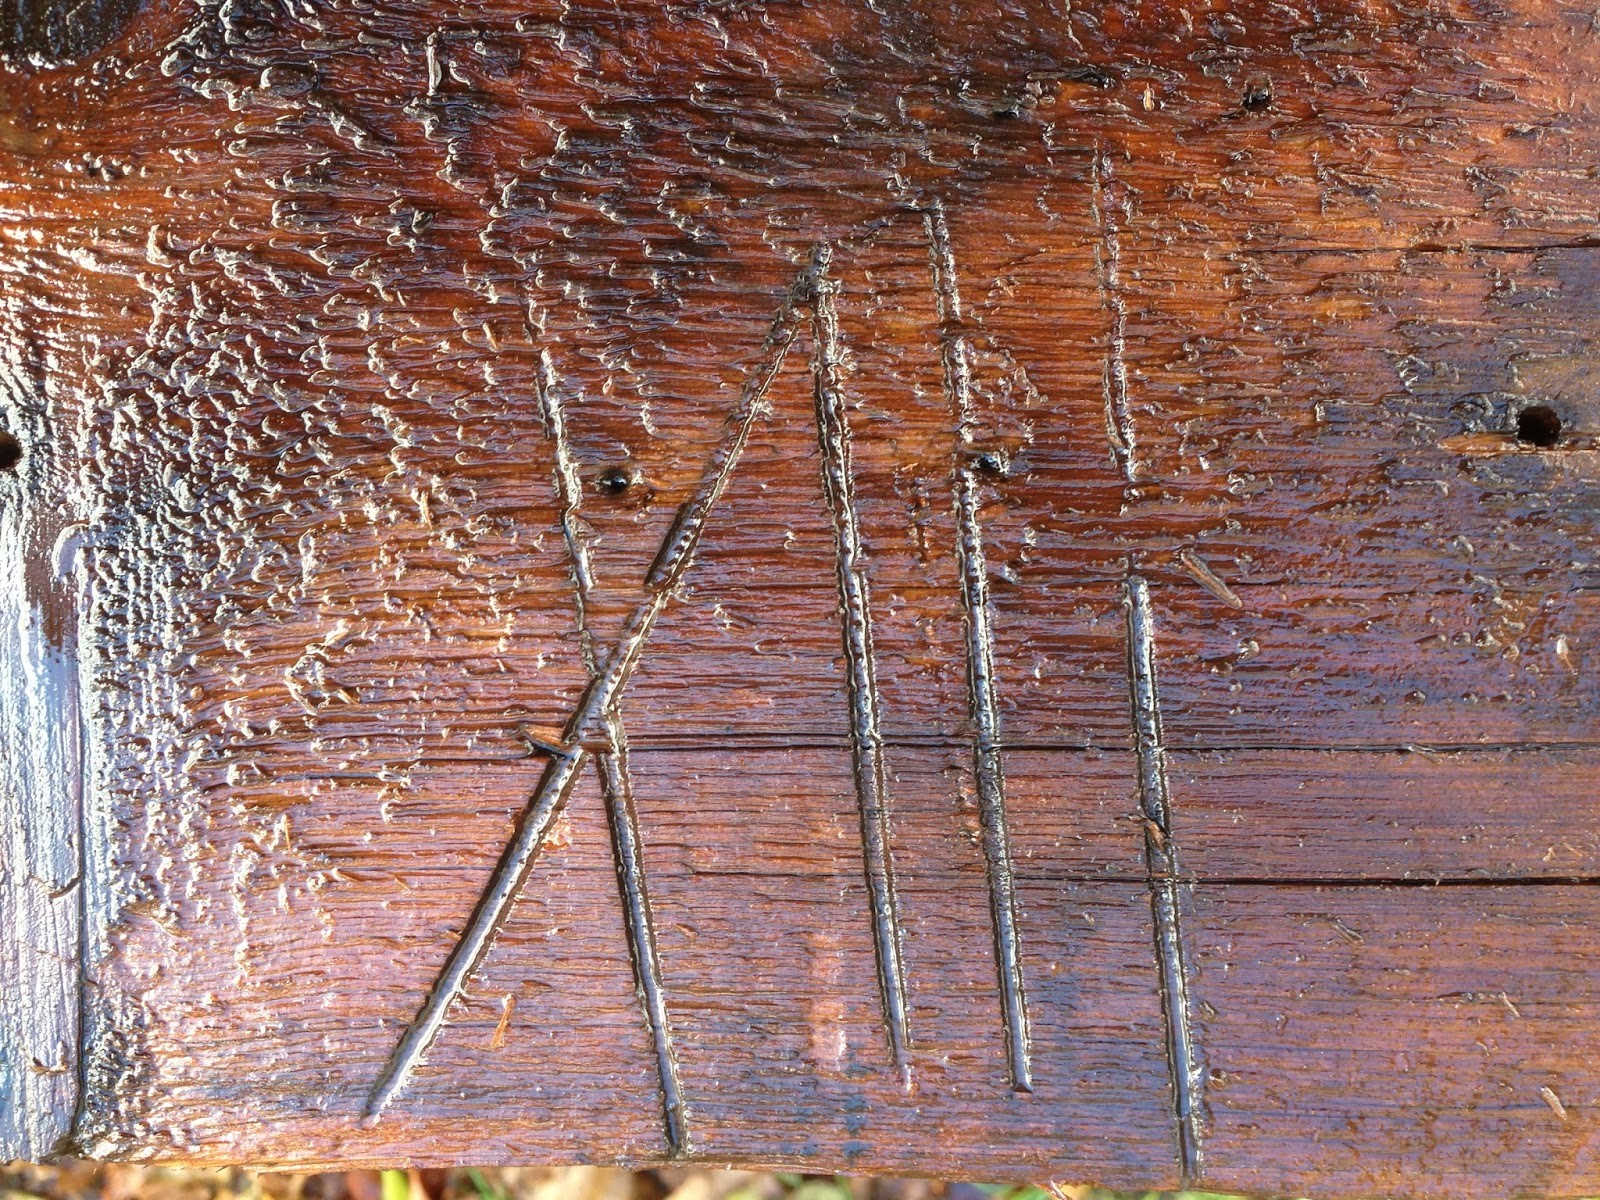
Note the four slashes, and the one slash with an additional diagonal cut. The opposite wall does not have the diagonal marking. 

Below is a label on a floor joist that had us stumped for a while. Then we realized – the framers were distinguishing the roman numeral 9- IX, from the roman numeral 11- XI. What if on raising day someone was looking at the floor joist upside down?

Joist Number Nine Drops Down_Green Mountain Timber Frames_6

Joist #9 drops into the “summer beam”, the central heavy timber that supports the floor system.

Timber Frame Label System_Green Mountain Timber Frames_7

Here is #11, not to be confused with #9!

We have not seen this marking before, but surmise that it meant 11. If anyone has seen this designation for 11 before, please tell us about it!

How do you designate that a post is a center post rather than located on an exterior wall?
Here is how they labeled an exterior mid post on the gambrel:

Exterior mid post on Gambrel Barn Frame_Green Mountain Timber Frames

Someone took artistic care with this inscription!

And here is the label on an upper post that supports the rafter system. Notice our modern (and much less attractive) label on the tenon where it will be hidden:Modern Label on Tenon_Green Mountain Timber Frames_9The gambrel has a unique system where the floor girts and joists went out beyond the eve to create an overhang. Heavy planks rested on the joist tails. Here is a photo of the labeling of those planks:Labeling System for heavy planks on joist tails_green mountain timber frames_10Another beautiful inscription was often placed on a central board in the ceiling. This photo is one of these daisy wheels:Daisy Wheels_Timber Frame Labeling System_11We re-label each joint as we take it down. Occasionally, in the excitement of disassembly, we miss a piece or even mis-label. When we are stumped, we often look for the original labels and figure out where it will be “at home.”

Pragmatic & Beautiful
These old labels are both useful and artistic. They were created using very sharp chisels, often of a “gouge” or cupped variety, as well as compasses. The labels add beauty to the finished space when visible. As with all aspects of vintage frames, much can be learned about the people who crafted the barns or homes by looking at their “handwriting.”

Some label inscriptions are flowery and large; others are more subtle and small, meant to disappear visually once the frame is up.

Below is a brace and post from the North Hero barn:

Labeling system for post and beam historic barns_green mountain timber frames

This builder used much smaller labels and a different marking

How did the framers come up with these markings, and are they universal? 

We do not know how the craftsmen from the past decided on the specifics of their labeling systems. The pragmatic aspect of the labels means that each frame contains its own logic. That is to say, it is a self-contained system that can differ frame to frame. We are just grateful when we see the labels match each other on each joint and we know we’ve put the pieces back together correctly! We like to imagine the framers carefully making the inscriptions generations ago, and we are grateful for the artistic care represented in these labels!

Here is one of my favorites – a label designating a second floor post and brace on the gambrel:Second floor post label_Green Mountain Timber Frames_11

Have you seen labels on pieces of your house? 

Please let us know what you might know about old labeling systems! In particular, we are curious if anyone has seen the representation of 11 that we’ve shown on the gambrel floor joist. We’d love to hear from you.


Green Mountain Timber Frames specializes in restoring historic timber frames and old barn homes. Interested in more information?
We’d love to hear from you!
(802) 774.8972
Luke@GreenMountainTimberFrames.com


Restoration of a Hand Hewn Pine Barn Frame, c. 1840

Reading this in your email? For easier reading – Click here.

Welcome to the heart of spring in Vermont!

Last week in Pomfret, Vermont, beneath a canopy of new leaves and apple blossoms, we tipped up another beautiful timber frame barn.  Below, you can see the barn as it originally stood in Benson, Vermont.

Old Barn home_Original LocationThis hand hewn frame, made of pine timbers, stood 21 feet wide x 30 feet long and was originally a meadow barn, built in the 1840s. We took it down a few years ago, restored the structure and erected it at our workshop. We used it to store materials until recently, when it was chosen to fit the needs of a new owner.

The goal of this barn restoration project is to erect the restored frame and finish the exterior and interior walls with seasoned barn boards. The owners want this “new” barn to look as if it has called the Pomfret site its home for at least 100 years.

It’s no easy task to restore a timber frame, but the work is exciting and rewarding. This past week, the crew of seven experienced timber framers made good progress each day, intent on creating “visual drama” for the new owner, and getting the job done.

Step 1: Dismantling the Old Frame

Here we are dismantling the previously restored frame to re-erect it in Pomfret.

Dismantling of timber frame barnOnce the frame was dismantled, we loaded it for transport to its new location in Pomfret.

Step 2: Re-erecting the Frame

3pm_historic timber frame from 19th century

We were able to put the 175 year old beams back together in our first day’s work.

Step 3: Putting up the Roof System

The next step was to put up the roof system and roof boards. Since this frame stands 25 feet tall, we had to install a temporary work platform to reach the roof peak.

green mountain timber frame vermont home construction
Setting up the roof system

From our safe perch on the temporary floor, we carefully set the roof rafters and applied the roof boards.

Timber frame barn home construction
Restored barn frame with roof boards applied

Step 4: Putting on the Red Roof!

The next step was to put on a recycled red roof. For this project, we took the roofing from another barn project we also have in progress.  I love it when we are able to salvage old wood or materials from one job and use them on another. One person’s trash is indeed another person’s treasure in my line of work.

Below is our third day of progress.

newly applied red roof historic wooden beamsRestored barn home with red roofStep 4: Applying Exterior Siding

On the fourth day of our efforts, we started applying the vintage siding. We’ll show the finished product in our next blog. Stay tuned!

Pomfret restored barn frame with siding———————–

Every dreamed of living in a centuries old barn? Want to save a piece of New England history? Let me know!  I’d love to hear from you!
— Dan McKeen